Showing posts with label Lindy's Stamp Gang. Show all posts

Friday, September 1, 2017

Inlaid Die Cuts

Hello! A new challenge started at Mix It Up. The challenge is to use an inlaid die cut. To be completely honest, I had never heard of this technique and so google helped me. Haha! What an interesting and fun time I had. I should have gone for a more simple die cut, but I never take the easy way! Haha!
I started with a Prima watercolor paper that already had a resist on it. I added some Lindy's magicals from my favorite Steampunk set and got to adding some color. The paper took the water like a champ! I totally enjoy how the magicals flow together and work so beautifully together!

Now comes the inlaid die cut part. After google, and my team explained this technique to me, I was intrigued to try it! So, I used a Sizzix Tim Holtz MM#2 die and cut it out of my paper. I saved all of those little tiny pieces and then cut the die again using white fun foam. I was able to keep the fun foam in the die cut and then just laid that into the paper die cut. Whew! That saved some time. 
Then I started to add the paper die cut on top of the inlaid foam die cut. Very time consuming but also kind of relaxing. I knew where the pieces needed to go and just went at it. I used TomBow glue for this step. 
I added a Reneabouquets butterfly and another die cut for the sentiment (thank you to Sara Emily for that one!). The sentiment die cut was heat embossed using white and gray powders. It is a bit wonky but so am I.

I then added some lovely flowers (also from Reneabouquets) and a handmade bow I made from some crinkle ribbon. I used Lindys Stamp Gang mists for the ribbon.

And there is my take on the inlaid die cut technique. Have you tried this before? I may be the only to have not heard about this technique. Lol! Carpe Diem! Hugz! ~Niki

I am going to share this creation with these lovely challenges:

I was inspired by the colors from the peacock feathers and the swirls in the tree picture.


Of course my favorite color combo is blue with hints of grungy rust and white


Sunday, January 11, 2015

Dreams and Wishes

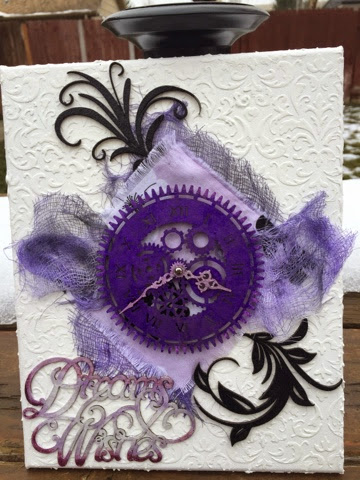
I have much time on my hands now and have been sequestered away in my Craftroom having loads of fun. This piece I have been working on for a bit but never finished it until today! Whew!

I started out with a blank canvas and applied my damask stencil with homemade texture paste. I stenciled the entire canvas and the sides. 

While that was drying I set to work on my cheesecloth. I sprayed it with Lindys Stamp Gang Tea Pot Purple and Saltwater Taffy. I also used Heidi Swapp's Black Velvet. I added a piece of coordinating fabric on top of the cheesecloth. This piece falls into my craft room makeover colors. 

I then started on my chippies. For the title piece I painted it with gesso and then used LSG ST on it but it was too pink so I added perfect pearls (Grape Fizz) and Primary Elements (Ginger Flower) to give it a gradient look that showed the pink as well. 

 For the black swirl chippies I painted it with black acrylic paint and used sparkling black embossing powder to give it some bling. 

Lastly I added my gear clock chipboard after using the same colors on it as I did on my Dreams and Wishes chippy. I wanted it to be darker so I added some Primary Elements to it as well. Then the brad went in the middle and I adhered it to the canvas with some foam dimensional dots. 

Finally it is finished and so is my craftroom makeover. Viola! Carpe Diem!

This project will be shared with the following:

Artist Trading Post-Fresh Beginnings-HERE (new career path, newly refreshed Craftroom)

Frosted Designs-White as a Snowflake HERE I am trying a new technique of using white space. 

The Mirror Crack'd-Stencils HERE I used the damask stencil

Lindys Stamp Gang January Color Challenge HERE