Showing posts with label alcohol ink. Show all posts

Saturday, July 15, 2017

Galaxy Card with Distress Ink

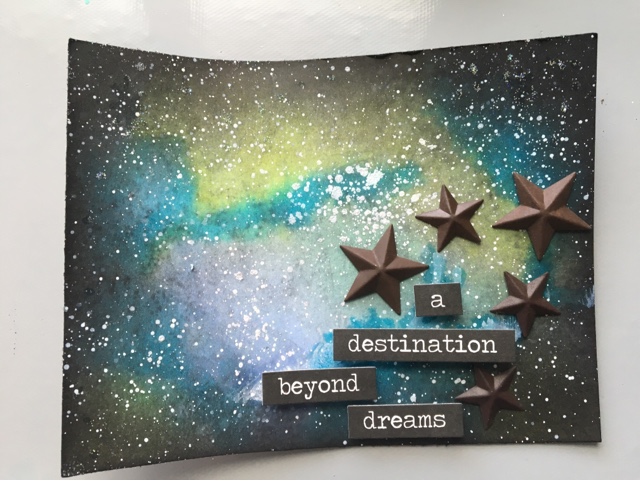
Wowzers! Can you believe we are more than halfway through 2017!?! Say what! Pretty soon the summer will be over and that means back inside out of the cold. But enough about that glum price of news. I wanted to try to create a galaxy card using distress ink and because our new challenge over at Mix It Up is all about Distress Inks/Distress Tool, I had a go. Enjoy!

I started with some heavyweight white card stock and began blending distress ink colors. I went from the lightest color to the darkest and spritzed my card stock with water along the way. 
Next time I'll try using watercolor paper instead. :) I heat dried my card and then added the darkest distress ink-black soot. 
Then I smooshed black soot and mermaid lagoon onto my craft mat and spritzed with water. I added the ML randomly to the card to create an almost blue swirl. Then I did the same with the black soot. And heat dried it again. I then watered down some white heavy acrylic paint and splatter the entire card to create some "stars". 
While my card was drying (under a heavy book) I got started on the stars. I used some Snow Cap alcohol ink on the rusty stars and poured some DecoArt glitter to those while wet. Once everything was dry I added some TH chitchat stickers and glued the stars down with a hot glue gun. Viola!
 My first attempt at a galaxy card. Whew! The best part about this technique is there is no set pattern or colors to use. Just enjoy the process. Hugz and Carpe Diem! ~Niki
I would like to share this design with these wonderful challenges:

What is more beautiful than the galaxy we live in. :)


I was inspired by the night sky fireworks and the stars. 


Saturday, March 5, 2016

Vibrant Colour in a Mixed Media Tag!

Hello and Happy March! Its time for another challenge at the wonderful Anything But Cute! Our very vibrant and fantabulous hostess this month is Branka, from Vintage Handmade. Branka makes some amazingly vibrant and colorful designs so her challenge theme was meant to be. Can you guess what the theme is based on my tag? So bright and colourful!

Crazy for Colour is our theme for March and this is what Branka is looking for: "Spring is coming-a time of the year that brings amazingly beautiful colours! To celebrate it, we would like you to create a mixed media project using VIBRANT COLOURS. It can be a tag, a card, an art journal page or anything else. Just be sure it's vibrant!' Love the badge for the challenge!
Now to be honest, bright colors are a challenge for me so I headed into this design with determination and channeled Branka! Hehe! I made an extra large tag out of some heavy duty white paper/matboard. Then I dabbed some Alcohol in Pool and Wild Plum onto my craft mat and also splooped down some Colour Arte Silks in Vintage Mint and swiped AI paper through it. Pretty and vibrant!
While I was still deciding on the chippies to use I stamped out 4 butterfly stamps and "painted" those with the 3 colors I used on my background. I colored inside and outside the lines-dern art teacher said I could never paint, haha, look at me now!
Fussy cutting is not for the weak handed, nope! And some good scissors are a must! It seemed to take dayssss to cut out my butterflies but I got er done! I wanted to make 2 butterflies that were layered 3 deep and seemed to be 3D! It took some doing but I finally figured out how I wanted both to look and I think it turned out pretty dern good. Hard to get a picture of though. 
The picture above is the butterfly in the lower left corner of the tag and the picture below is the butterfly in the upper portion of the tag. In real life this is full of depth and dimension!
I used a rather large stamp and some bright blue embossing powder to add the design in the lower left corner. 
My chipboard corners were painted with Colour Arte Radiant Gel-Guatemalan Green and glued to the tag with TomBow Multi. I did add some Spanish moss under the chippie. And the butterfly antenna were made out of black wire. 

The sentiment "Off the Beaten Path" was stamped onto vellum and heat embossed with green embossing powder. I chose those words because bright colors are not my norm and took me down a new path. :) And there you have it-A Bright and Vibrant Tag! Can't wait to see what you create! Remember to stop by my teamies blogs and leave em some love! Hugz and Carpe Diem! ~Niki


I would like to share this large tag with these challenges

Try It On Tuesday-Feminine and Fancy

Our Creative Corner-Return of the Challenge
I chose September 2013-Forgotten Things-My bright blue embossing powder has never been used, the corner chippies have been hoarded for some time now, and the black wire for the antenna is about 1.5 years old and this is the first time I have ever made antenna for any butterfly.

Wednesday, September 16, 2015

Alcohol Ink Fun!

So I had a blast dragging Alcohol Ink glossy paper through my mash up of alcohol inks and decided to make an art journal page with the leftovers. This is only my 3rd ever attempt with an art journal so bear with me please. :) I was inspired by the art recipe from Finnabair for April-Out of Ordinary, the color of the Gelatos in the picture. The background was achieved with various colors of alcohol ink.
I tried adding some subtle dimension to the page but not too much because the journal has to close right? Yeppers!  
I heat embossed the clock die cut with two different embossing powders and popped it up with small foam dots. I stamped the left edge and the bottom edge of the journal with some flourish stamps.
The central sentiment is a nod to myself. Keepin it real and happy is my motto along with Carpe Diem! This was a fun design as I wasn't expecting anything but just enjoying the journey. 

Sharing this fun design with some challenges please: 

My NBUS were-the mixed media die cut from TH, the sentiment stamp, and the glossy paper for the background. 

The gelatos in the picture and the texture inspired me


Wednesday, July 1, 2015

Steampunk Tic-Tac-Toe

How does Steampunk and Tic-Tac-Toe fit together you may wonder? Well we've done it over at SanDee&Amelie's Steampunk challenge. Pick a row (vertical, horizontal, or diagonal) from the board below and create anything you would like as long as it is Steampunk(ish).


We have not 1 but 3 prizes to give away for this challenge. The lovely Retro Kraft Shop, La Blanche and Irish Teddy's are our sponsors. Awesome sauce right? You have to join in to win! 

I used the middle vertical row: Top hat - Metal - Rust. 


If you want the template for the hat and a total step by step on how to create the structure click HERE. 

This is what I started with: beautiful right? 


I cut all my crafters foam and glued it together, then gave it a coat of gesso.


 I then started dry embossing metal foil tape. I used alcohol ink in Pool and Rust along with some generic black ink. Note to self: only use real alcohol ink as the generic black ink kept coming off on my fingers (I fixed this by painting all the foil tape with DecoArt Matte Varnish). I then traced all the panels on the metal foil tape and cute it out while leaving the backing on the foil tape

A lot of the metal foil tape ended up in the trash due to operator (me) error. Oops. Anyway, once the varnish was dry I applied each panel to the top and sides of my hat. 

It was a process but I get 'er done! I outlined all the panels with a black marker to hide the white. Now I am not sure why I painted it white in the first place. Hehehe!

The middle panel was done with a clock embossing folder and I added TH clear crackle to it just for fun. You can see that panel better in the very first picture.

The left side of the hat was embellished with a Create light bulb, film strip, feathers, and half of a gear that was inked with the AI and stamped with a script stamp.

The gears for the top of the hat are Cheery Lynn dies that I painted with a silver metallic paint and added LSG sprays to. 

Hats are really hard to photograph so please excuse the random seeming angles. If anyone has a neat trick to photographing odd shaped art, please let me know. :)
I do so hope you enjoyed this post. And for further enjoyment I have added some lovely pictures of my hat being modeled by some gorgeous and handsome models. These models work for Milk Bones so I was able to reserve them for future posts and modeling gigs as well. 

My Husky, Nanook, modeling my hat. I think he is giving me the "eye"

The new puppy, Keen, wondering how this hat got on his head. :)
Hopefully you have many ideas swirling around in your creative minds and join in with all the fun!  Thanks for stopping by and I look forward to your sweet comments, it sure does brighten my day! Hugs and Carpe Diem! ~Niki

I would really love to share this mini top hat with: