Showing posts with label distress inks. Show all posts

Saturday, July 15, 2017

Galaxy Card with Distress Ink

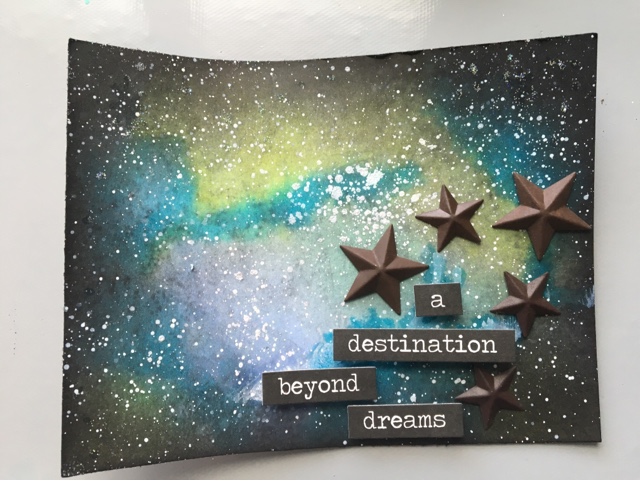
Wowzers! Can you believe we are more than halfway through 2017!?! Say what! Pretty soon the summer will be over and that means back inside out of the cold. But enough about that glum price of news. I wanted to try to create a galaxy card using distress ink and because our new challenge over at Mix It Up is all about Distress Inks/Distress Tool, I had a go. Enjoy!

I started with some heavyweight white card stock and began blending distress ink colors. I went from the lightest color to the darkest and spritzed my card stock with water along the way. 
Next time I'll try using watercolor paper instead. :) I heat dried my card and then added the darkest distress ink-black soot. 
Then I smooshed black soot and mermaid lagoon onto my craft mat and spritzed with water. I added the ML randomly to the card to create an almost blue swirl. Then I did the same with the black soot. And heat dried it again. I then watered down some white heavy acrylic paint and splatter the entire card to create some "stars". 
While my card was drying (under a heavy book) I got started on the stars. I used some Snow Cap alcohol ink on the rusty stars and poured some DecoArt glitter to those while wet. Once everything was dry I added some TH chitchat stickers and glued the stars down with a hot glue gun. Viola!
 My first attempt at a galaxy card. Whew! The best part about this technique is there is no set pattern or colors to use. Just enjoy the process. Hugz and Carpe Diem! ~Niki
I would like to share this design with these wonderful challenges:

What is more beautiful than the galaxy we live in. :)


I was inspired by the night sky fireworks and the stars. 


Wednesday, October 5, 2016

Explore Autumn

Hello there everyone and Happy Fall ya'll! I sure hope you all are enjoying each day to the fullest. Autumn makes me think about Giving and getting together with family, not to mention having a bountiful harvest. My Grandmother has been in the wheat business for years, and the farm has been passed down through generations. Wheat, corn, corn mazes, pumpkin patches, hay rides and so much more are starting here in my neck of the woods and that got me thinking about what to design for Autumn. Here is my canvas:
Today is the start of a new challenge at Anything But Cute and our wonderfully talented Autumn of Sew Paper Paint is our Hostess. She chose the theme of "An Autumn Day" and describes it as follows:
"I could not help but choose October as my month to hostess here at Anything But Cute. This month, we want to see your creations inspired by An Autumn Day.  Anything goes mixed media with an fall color palette, or Autumnal elements.  Be inspired by nature with the sights, smells, and sounds of this beautiful season.  We cannot wait to see the amazing artwork you turn out!"
Perfect theme for this time of year in my part of the world. I started with a flat canvas and then laid down some stencil work using matte texture paste. While the paste was still wet I sprinkled on some clear glitter, and because I am an impatient person, I used my heat tool to help the paste dry faster. :) After it was all dry I added multiple colors of distress inks and kept blending until I was okay with it.
Next came all the embellishments. I was gifted this orangish burlap and had to use it on this design. I cut it into strips and glued it to the canvas with a hot glue gun. 
I pulled some of the threads from the burlap to give it a distressed look and then got my acorns out. I gathered these while visiting my Grandmother for Thanksgiving last year and to celebrate her 90th Birthday. I did have to glue the acorns back into their shells. Hehe! 

The rest of the embellishments are picks from various stores. I added and altered and layered until it looked right to me. 
The bows were made with some leftover ribbon and jute. Those bows took forever to make but persistence pays off. 
The corn husk was inked up and fringed up a bit. The husk part was lightly misted with water and cut into smaller sections that I could curl back. The devil is in the details right? Yeppers.
A couple of metal elements were added and the word "Explore" was added because the cooler days mean exploring more of my town. And voila! Done. Hopefully you all are staying warm and enjoying your day. Carpe Diem! Hugz! ~Niki

I would enjoy sharing this design with these challenges: 

I am celebrating Fall and the harvest of the wheat crop. Not to mention the celebration of the upcoming Holidays. 

Sunday, October 11, 2015

October Tim Tag 2015

This months is all about experimentation for me, and lots of skulls. I do enjoy the gothic, dark side of art and feel more confident about my darker art. With that in mind I knew I would create something completely different than the tag that Tim created but alas, I do not have the dies or most of the supplies he used this month. So here is what I did!  Mwahahaha!
Here is a link to the original and there is a video this month as well. Go on and check it out. 
 I used my new die, TH Sizzix Pendiments die and glued those to my tag. Note to self: DI does not like to attach to TomBow Multi glue. Oops! I then used the wrinkle free distress technique and swiped away. Inky and messy = fun art.
I also used the same technique for the Alcohol Ink glossy paper that my skull is mounted to. More messy fun. Such a good day in the art studio today! Yippee! 
I added some leftover lace type stuff to the bottom of my tag after inking it up with Twisted Citron DI. The numbers 31 are a die cut (I layered 3 thick pieces together) and are painted with DecoArt Metallic paint and then I used crackle paint and when that was dry I added some Pool Alcohol ink to the top. The blood splatters are from flinging the end of a spray bottle at the tag with red paint. The circle pattern is from a TCW stencil-Mini Specimens inked with DI Fired Brick.The little 'Help Me" frame is a Halloween sticker from last year.
Stay tuned because on the 15th of this month, I have the most interesting skull to share! It is a doozey and may even send chills up your spine! Thanks again for popping over to this section of blogland! Have a wonderful week and Carpe Diem! ~Niki

Challenges I would like to share this tag with:


I went with Halloween and Dark

I chose Freaky

Our Creative Corner-Horror

CuttleBug Mania-No Squares
I used my CuttleBug and the Tim Holtz Sizzix Pediments die

Sunday, August 30, 2015

Mr. Captain Man 12 Tags of 2015

Ever have one of those months where anything you try to create goes haywire? Grrr! It seems like that has happened to me this month. I skipped last months Tims Tag-I just didn't connect with it at all so I was determined to do this months. Check out the original Here. This is my 2nd take, the first ended up in the recycle bin.
For the life of me, the background just did not turn out anything like the original but I had none, none, none, of the supplies he used. I only have 8 dies and 6 embossing folders so I did my own thing and it took forever. Lol. I didn't even have multi matte medium. When I opened the bottle is was hard and not usable at all, so I used Mod Podge. 
I hand glued all of those little cutouts that usually get thrown away. Crazy much? And I did the technique like he explained but mine looks a lot different. :) It was an interesting time in my art room during this entire tag making session. 
The man is a retired Captain that loved life on the open ocean. He excelled in many aspect of being  a Captain but his favorite was learning how the entire shipped worked and fixing it if needed.  He had to use what was around because he didn't always have access to parts or tools if his ship broke down (much like me not having the supplies used in the original tag) Maybe he is even thinking about how steam could have powered his ship.......then he could 
come out of retirement and be the Captain of a Steampunk ship! 
Too bad the weekend is over because my DH gave me an art gift for our anniversary and it is: Chemistry 101 with Tim Holtz! Yippee! But back to work tomorrow so I don't have time until Thursday to start this amazing new adventure. My first art "class". Thanks for stopping by and laughing along with my crazy antics. Y'all are awesome sauce! Carpe Diem! ~Niki

I would very much enjoy sharing this tag with these challenges:

Between all the mediums I used and extra bits this surprisingly has lots of texture. 


I had to think waayyy outside the box for this tag and get very creative to complete this design. I used 7 different inks for this. Whew!


Friday, June 5, 2015

Masculine You Say?

Hello dearies and wonderful day to you all! Today starts a new challenge over at Anything But Cute. Our amazeballs hostess is the lovely Cec! She chose the theme for this month and wants to Make It Masculine. "Make a mixed media card, or other project for a fellow in your life. It could be for Father's Day, a birthday, an anniversary, or just because you want him to know how special he is."

I chose to make a display honoring the Veterans and soldiers in my country. This piece will be abandoned at a local Veterans Hospital. Hopefully someone enjoys it! 

I started by dry embossing my tag and then added alcohol inks and copper embossing powder. Once the inks were dry I gave the entire tag a wash of metallic glaze (leftover from a revamp of my bedroom dresser). 
I added the chain die cut after painting it with gold distress paint. I added the tiny tag after using the same alcohol ink and dry embossing with a different EF. The white "sticks" under the small tag are parts of my paintbrush I accidently left in water overnight. Oops, and not the first time that has ever happened. :)


When the tag was finished I figured it need more so I grabbed some paper and went to town using distress inks, a sanding block, distress glaze and my black archival pen to trace around the word "Liberty". 

The black around the word makes it pop off the page. I also added some weathered wood but it didn't work out so well. You can sort of see the cracks in this corner. You can also see some of my stamping here with black archival ink. I wanted to give it a "postage" feel with the rubber stamp.

I then added some ephemera and other tid-bits. The chit chat stickers added the perfect finishing touch to this piece to remember our brave. What is your take on a Masculine project? 


Huge hugz and lots of Happy Crafting this month! Carpe Diem!
~Niki~

I would like to share this project with the following challenges please:

Mixed Media World #3-Vintage

The Artistic Stamper-Summer is on its Way What better way to celebrate summer here in the states than by thanking our brave so close to the 4th! I would rather use this color combo.


Monday, December 29, 2014

Family is.......

Hello again! I hope the holidays are treating you well and you are getting to spend time with family. Family is what this post is about. Enjoy!

This is the first year I have lived in the same state as my parents since I was 15!
We have always read books, it is a tradition and something that was started before I was born. I believe that I love reading because of my Grandma and my Dad. I love the smell, the feel, the excitement that books can bring. Everyone in my family reads at least a book a week. 

Now to the canvas! I started with Gesso and then sprayed Lindys Stamp Gang sprays. I was trying to achieve an older look. While that was drying I started on my bookmark (the tag). I used champagne embossing powder first then applied Distress Inks to my tag and I used the TH distress for the edges.

Next I cut out my book pages. I don't really use rulers so I just cut it down to the size I wanted. I applied DI to all the book pages and sewed it together with black string. I added the sentiments with black embossing powder. I did rub some of the embossing powder off to give the book an aged appearance. All the sentiments are related to what morals I grew up with. 


I adhered some stickers to a cream paper because the stickers are see through. Next I stamped the harlequin pattern and the typewriter. The typewriter was stamped onto tissue paper then glued to the canvas using Mod Podge. 
 There! Did and done!


Thank you for stopping by my little crafting corner. Carpe Diem!

This project will be shared with the following: 

Frosted Designs-All About Family HERE

SOE/SOD-mood board HERE

Vintage Journey-Ring out the old-Ring in the New. HERE I was inspired by the words in the poem. Ring out the old-books cover the old and the new. The typewriter makes a bell sound when you reach the end of the paper (old and new (young) people still use typewriters. I used many TH products and he is always an inspiration.