Showing posts with label Christmas. Show all posts

Friday, December 9, 2016

Secret Santa and a Card!

Why helllloooooo lovelies! Can you believe it is December already!?! I sure can't. I am so very thankful that everything is looking up and my family is doing well. We had a scare with my beloved FIL but he is improving every day. Thank goodness! And I am also thankful for such an amazing team at Anything But Cute. Every lovely lady on our team is talented, sweet, supportive, plus we all communicate terrifically. This year we decided to do Secret Santa gifts and my chosen one is Autumn! She is a kind and caring lady, not to mention a totally stellar artist so I had to pull out the big guns for this card! Cards scare the daylights out of me and I always have such a hard time with the design. This little card took me 3.5 weeks! Yikes and haha all at the same time right? Here is my gift to the fantabulous and wonderful Autumn!
I started with brown card stock and cut the TH paper to size. No measurements because I eyeball everything. Then I used my sanding block and sanded the TH paper to help showcase the holiday words. The edges were distressed. 
Next came the Santa picture (a lovely gift from Bubbles, aka Pamellia, last Christmas). I had a play on words since we are doing a secret Santa and thought this pic was perfect for the theme. Not to mention so very festive and perfect for the Holiday!
 I heat embossed the ornate frame with about 4 different embossing powders and then glued the Santa picture to the frame. I also wrote on the back of the frame the year, and date so Autumn remembers where it came from. :)
The front was made to look like glass by using a thick layer of Glossy Accents. Yes, there are air bubbles but that's okay by me. A plaid bow, some jingle bells and Santa is good to go. 

I then heat embossed a chippie word and added some more goodies and a snowflake charm to the front of the car. I think I mostly used hot glue and glossy accents for adhering everything. And of course the "snow" is a circle stencil with some glittery embossing powder sprinkled over it and the snow on the edges of the card is made using the DecoArt snow writer. 

Now for a secret: I just had to add a special touch and make Autumn a keepsake she could put on her Christmas tree so I added Velcro to the back of the ornate frame Santa so it can be taken off of the card. It's an ornament in disguise! Happy Secret Santa Autumn!

And that's all for this cards folks! But, wait there is more! Here is a sneaky peaky of the gift I received from the gloriously sweet and talented Branka of Vintage Handmade. You just have to go visit her blog to find out the amazing details of this rustic and gorgeous design! I absolutely love it!

It looks even more fantabulous in real life and the textures and crackle are spectacular! Thank you very much B and Merry Christmas! Hugz and Carpe Diem! ~Niki

I would like to share my Santa card with these challenges:


I'm totally celebrating Christmas and the giving season! 

I made a dangle ornament and used a metal snowflake charm like the one in the picture. 


Saturday, November 21, 2015

Christmas Tag


My art studio sure is getting used right now. Today was a very successful day and I am pumped to do some more but I am about to watch a movie with my DH and it is almost 10pm. I just wanted to share this Christmas tag real quick. Hope you enjoy and all of you are staying warm!

I wanted to try something new and get really messy. I started by heat embossing a Rubber Dance script stamp with Champagne EP. The edges of the tag were inked with Ground Espresso DI. 
I then started on my ornate frame. I tried some different color combos and wasn't liking the results.....Too yellow! 
I ended up using my Primary Elements-Olive Vine and am happy I did! This set me on the path to the colors you see in the final tag. I also used Emperor's Gold. While the frame was drying I flicked a bit  of Primary Element colors onto my tag  Gorgeous shimmer! 

I die cut "Joy to the World" (a new die that my hubby bought me today) 3 times and layered those cuts. It was inked up with DI and then heat embossed with Red Tinsel. 
The sprigs greenery and glitter leaves were remnants of a Christmas pick I had in my stash. I love adding the picks to my Christmas wrapped gifts! The ribbon was hand died with the Primary Elements and then splattered with them as well. I am hoping to get a better picture tomorrow when the sun is out!
Updated pictures of this tag while the sun was out. Ahhhh the shimmer and glitter!

I hope you are all having an amazing weekend! Hugz and Carpe Diem! 

This tag would love to be in these challenges: 


I used the Festive Red color and the Optional Theme


Thursday, November 5, 2015

It's Ornamental!

Hello peeps! I do hope you enjoyed your Halloween and all that it entailed. Today starts a new challenge at Anything But Cute #7-It's Ornamental and the super sweet, and talented Cec is our hostess! Here is what she said, "Since the holiday will be coming up pretty quickly, we want you to create a mixed media ornament for your Christmas tree or a Christmas decor item for your house or table.
I love, love, love the Christmas holiday and go all out for it! So without further adieu here is my design! Who knew I could go from shock horror to soft and pretty!?! Lol. Grab a cuppa, this is a long one. :)

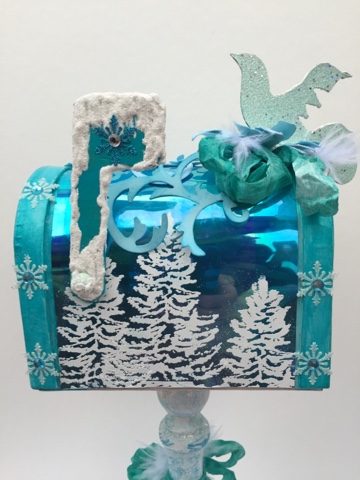
I started with a paper mâché mailbox. Applied some gesso and LSG sprays to the front and back. Then started on the Shimmer Sheetz. 
Using 3 different colors of embossing powder and a tree stamp, I got to stamping. The EP adds some nice texture to the Sheetz. TIP-Shimmer Sheetz don't hold up to heat embossing and will warp a bit but it can still be done! I used two sheetz to cover the sides of the mailbox and overlapped those at the top. Then came the die cuts. 
The flower was made with TH Tattered Flowers die. I layered three pieces and added some EP randomly, as well as some Stickles. The bird is a new Sizzix die. The bottom layer of the bird die was painted with DecoArt Media Cobalt Teal Hue (my cuttlebug didn't cut it all the way through but I used it anyway). The top die cut was heat embossed with a Recollections EP. Glossy Accents was liberally applied and I put the pieces together. The glossy accents gooped out through the holes in the top die cut which resulted in a glass like appearance and added some nice texture to the bird. 
The mailbox edges were painted with DecoArt Media Cobalt Teal Hue as well and then snowflake stickers were added. 
The filigree die cuts were made from white and a pale blue cardstock. Both were then lightly edged with Mermaid Lagoon DI. My ribbon was hand died with LSG sprays and helped to create my birds "nest". The flower has a bit of bling added and some small feathers. So many luscious layers! More layers help create nice texture and depth to any design. 
The snow on the mailbox flag (as well as the top of the candlestick) was created by using DecoArt Snow-Tex
This is the front of the mailbox. I used another die cut and lightly edged it with Mermaid Lagoon DI as well. The "Merry Christmas" sentiment is a TH rub on (thanks Samra!)
Let it snow, let it snow, let it snow! Although, I don't really like snow IRL-too cold for me. Brrrr! 
The back of the mailbox had a snowflake rub on and an embossed sentiment as well. 
The candlestick was painted white and then Cobalt Teal Hue, I then added a layer of white crackle paint. Once that was dry, I took a damask print stamp (inked with ML DI) and randomly applied it to the entirely awkward shape. Stickles added some glitter and Snow-Tex added some more texture. Pretty! 
And now for
THE SURPRISE: 
I created a false front to the opened mailbox and it raises up when the lid is closed. The reindeer, trees, and moon (actually my thumbprint, lol) are heat embossed onto vellum. The mini tree was sprayed with LSG sprays, and texture was added with the DecoArt Snow-Tex. I painted the mini lights with Cobalt Teal Hue and gesso. The floor was made to look like ice by sprinkling EP and layering DecoArt Liquid Glass over it. The cobblestones were hand cut and lightly pushed into the "ice". 
Whew! You made it to the end! Congrats! I hope you had a fun journey and create some amazing designs! Thanks for stopping by. Hugz and Carpe Diem! ~Niki

I will be sharing this altered design with these challenges:


I used Glossy accents to adhere almost everything in this design, as well as adding dimension to the bird die cuts


I used lots of glitter, diamonds and gems, as well as luscious embossing powder that has bling in it.

I used 3 different dies on this design.


Monday, December 15, 2014

Christmas Time!!!!

Hello y'all! Christmas is my absolute favorite time of the year. I can give gifts and nobody can say no. Hehehe! This tag is for my secret Santa at work. I hope she likes it and her gift-inside the awesome looking box is everything she will need for a spa day. Soaps, lotions, loofa, candle, showering gel and chocolate. And because I am a vet tech and she has 2 dogs, I included some dog treats dipped in yogurt for her furry babies.


I used my Tim Holtz (TH) tag die and made up about 20 tags so I would be good to go in the tag department. I used Mowed Lawn and Fire Brick DI for the background. I edged the tag with the TH distress tool and chalked around the tag with Dark Bark fluid chalker. Then I grabbed my TH stamp Fabulous Flourish, and embossed the stamped image with Snow embossing powder. It makes the stamped image POP! Loves it. 


I then sprayed Sheer Shimmer Spritz Frost to the entire tag for a glittery effect. Next I applied a ribbon at the bottom and added two brads from My Minds Eye-Sleigh Bells Ring. But shhhhhh-the brads actually hide a "mistake" I made during the heat embossing moment. Oops. 

I added some glitter ribbon and my Secret Santas name and I was done. 

Here are a couple of different angles and a close up so you can see all the glittery goodness. 


Thanks for stopping by during this busy Holiday season! Merry Christmas and Carpe Diem!

This project will be shared with the following: 

Mixed Media Monthly Challenge-Tic Tac Toe HERE-I used Bow, Glitter, and Ribbon

Frilly and Funkie-A Vintage Holiday HERE

A Vintage Journey-Special Christmas Giveaway!!! HERE

The Mirror Crack'd-Upcycle/Recycle or a Christmas Gift. HERE


Monday, December 1, 2014

Stacked Layered Christmas Card

Happy December y'all! This is my first year ever making my own Christmas cards. I saw an image floating around FB of a stacked image card and thought I could do that! The learning process was very curved for me though. Lol!


Our challenge over at Mixed Media Mojo this month is Winter Holidays with an optional twist to make an ornament. I will do a tutorial later this month on my ornament piece-it is kid friendly as well!

We can't wait to see what you all create! Happy Holidays and Merry Christmas! 

This project will be shared with the following:

Simon Says Stamp-Holiday Cards HERE