Showing posts with label diy. Show all posts

Sunday, April 9, 2017

New Challenge Blog!

Why hello there crafty people's. I sure hope your weekend is going well. I have some BIG news to share about a new blog in blogland. It's called Mix It Up Challenge. This is a technique based challenge blog that will make you want to try new things. Cool right? Yeppers. I happen to be on the Design Team (yippee!) and just wanted to share the news.
The challenges start in May but we are doing a "Just For Fun" challenge for April.  You can design anything your heart wants. Mix It Up and try something new if you feel up for it. Anything Goes with this Just For Fun challenge. And you can also become a follower. You could even possibly win a prize! Awesome sauce! 

Click HERE for the link to the challenge.


Happy Crafting and Carpe Diem! Hugz. ~Niki


Sunday, February 5, 2017

Mini Top Hat for CHA

So excited to finally being able to share this top hat I designed for Kim of Emerald Creek Dares. She has a new stamp designer, Gail, of Crystal Media Arts, and asked if I would like to have a go at these new stamps. The stamps are burlesque themed and so perfect for a mini top hat! I couldn't refuse and was so thrilled to get started.
I started the usual way and used craft foam and my template to cut out each piece. This hat is made from scratch. It doesn't matter what color your craft foam is because everything gets a coat (or two or three) of paint.
Good scissors and contact glue are so important! You just can't make this hat without contact glue. Here is a shot of the gluing process. 

I left the top of the hat off because I wanted to stamp one of the Crystal Cookie stamps on it and heat emboss the image using the new Epaulette Blue powder from Emerald Creek. The base of the hat is painted with metallic blue paint. The stamp is called Boots Before Corset

Once the hat was completely glued together I went to town on decorating it to achieve the burlesque theme. Black lace with some bling went around the top and the bottom. Black feathers and a black rose, with a mini metal rose in the middle are a must! I applied black alcohol ink to the little boot and added those near the black rose 'cause these boots are made for walkin, and that's just what I'll do!

I used a metal frame that I heat embossed with another new Emerald Creek EP, Metabaloid Blue. I then stamped the Playful and Full of Life lady onto some tissue paper and then glued the tissue paper onto some tinfoil. 
I then cut the foil to fit inside the frame and hot glue it to the front of the hat. 

Some more feathers were added and I wanted a surprise pop of color so I added bright purple feathers as well. I found these purple feathers on a rather cheap mask and since it was falling apart at the store they sold it to me for a dollar! Score!


Then I got out some clear vellum and stamped the words "Boots Before Corset" using Versamark and heat embossed it with the Metabaloid Blue powder as well. 

Every girls needs a sassy hat and this one sure turned out sassy. Haha. Huge thank you to Kim for the opportunity and also to Gail for creating these wonderful stamps! Hugz and Carpe Diem! ~Niki

I would like to share this hat with these wonderful challenges:


I used the feathers and the overall blue hues and the sentiment inspired me as well.

I used Boots Before Corset. These words are special to me because this was my first design made for CHA and without this stamp, it wouldn't have been possible. 


Thursday, September 15, 2016

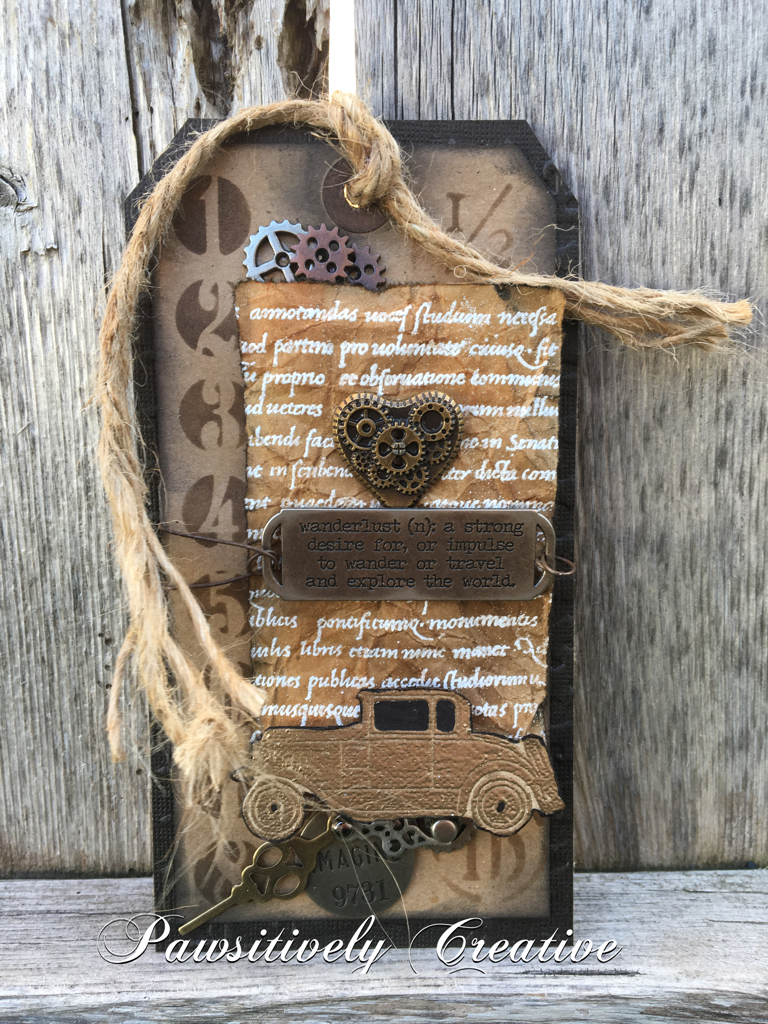
Vintage Travel Tag

Hello dearies! I hope you are all well and good. We are having cooler weather in my neck of the woods. I miss the 90's and above but most people seem to enjoy the 70's. I spent a little bit of time in my art room to create a new tag for our challenge over at SanDee&Amelie's Steampunk challenge where of theme is Anything Goes Steampunk/Industrial. I haven't created a tag for what seems to be months so thought I would see what happened.
I started with a Kraft tag and added an Andy Skinner stencil with DI.
 Then layered the word panel stamped with an Artistic  Stamper word stamp, heat embossed and crinkled on top of the tag. Then swiped some distress ink over it and around the edges. The metal trinkets were glued with glossy accents. The metal sentiment was adhered with rusty wire and glossy accents. 
I heat embossed the little car with champagne EP and fussy cut it to fit the bottom of the tag. The stamp was a gift from Bubbles aka Pamellia @ mylittlecraftthings. The windows were colored with a black marker.

Hope to see you try your hat at anything Steampunk and be in the draw for some wonderful prizes! Hugz! Carpe Diem!
I would like to share this tag with these challenges:


Monday, September 5, 2016

Pixie Coffin or something else?

Hello lovelies! Seems like I have an adventure to tell! I was diggin up my grass to plant a new flower garden and came upon this enchanting little surprise! Do you believe in Pixies and dream about fairytales? I just might after seeing this! I call it Mortem Lectulo. In Latin this means death bed. I'll tell the story in a sec...
Today starts a new challenge at Anything But Cute and the lovely sweet Branka from Vintage Handmade is our hostess. Yippee! Our theme this month is one that many of you will enjoy: FRIENDSHIP! Yeppers! Let's celebrate those near and dear besties! Branka described the challenge as so,"Friendship is a relationship of mutual affection between two or more people. We want you to show us a mixed media creation that's inspired by friendship. You can create anything, from tags to art journal pages but make sure it's a mixed media piece. Let's celebrate friendship together!"

THE STORY OF MORTEM LECTULO
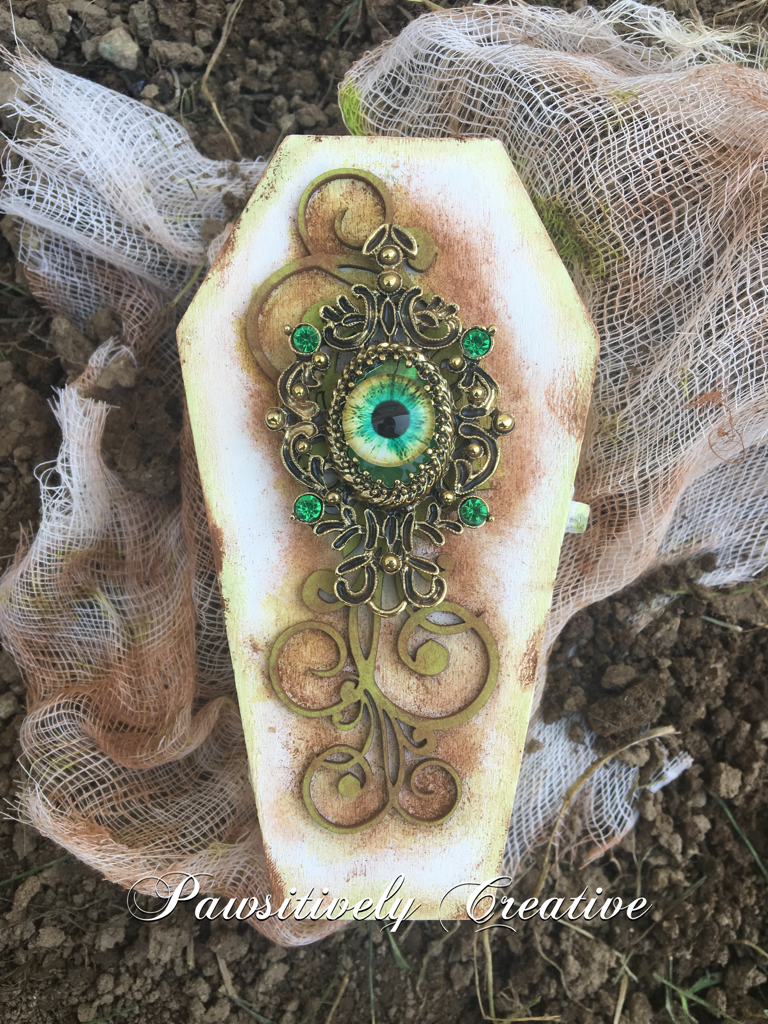
As I said my friend (Jazmin, my furry BFF or 15 years. She's a mixed breed little 8lb dog with a heart of gold!) and I were digging, she did most of the diggin, and we stumbled upon this little coffin. I couldn't wait to open it! Like Pandoras Box, I just had to! The outside was decorated with a green watchful eye and some intricate scrollwork. So cool! With baited breath I carefully opened the box. Trumpets sounded and a little pixie laugh was heard! Jaz and I looked at each other in wonder. The first thing I saw in the coffin was a little bottle with what looked like a note in it! 
I was busy taking pictures of everything to share with you all and right when I opened the coffin it started raining! Coincidence? Maybe. Anyway, I brought the note inside and tried to decipher it. Here is what I think it says:
 "My Dearest Daughter,  
As a Pixie you may encounter other
creatures that aren't like us,
and wish you harm. As King
of the Pixies, I have made these
coffins called Mortem Lectulo,
 to help protect my offspring. 
Use each potion wisely,
the sword bravely,
and trust your heart. 
Beware the ones who have
no reflection! 
If bitten, drink the large red potion
and pray. 
Go forth with honour and courage. 
Your adventure had just begun!"
Wowzers! Looks like Jaz and I found a warriors protection coffin! Weird and different but very interesting.
Here is what else was in the coffin. And who knew Pixie's spoke a bit of Latin?!
Little potion bottles, the bravely swung sword, some little wooden stakes and the scary red liquid in the larger bottle! The green fabric it all sets on feels like silk and so luxurious! You can tell she was a Princess with good taste, as was her father. Wonder where she went? Jaz chased something off when we first opened the box, wonder if it was the Princess? Guess we may never know......

After much research on this little gem I think I know how her father made it. The outside was coated with a chalky sort of paint and then a twisted citron green ink was added to the edges. The brown looking stuff has to be artisan powder! 
The scroll design looks to be coated with the citron and the powder as well. The jewel is probably a family crest with the green eyeball (maybe a dragon eye?). The inside padded top and bottom had to have been made with the help of batting and a template like this one. Notice the little notches that were cut out to help in placement of the template to make sure it fit well. Such a smart King!
Looks like these Pixies were very intelligent because the padded parts were hot glued to the top and bottom. The sword was embellished with some gems and pearls. These Pixies must be rich!
The scroll looks to have been stamped and heat embossed with a snow embossing powder and distressed by crumpling the paper and swiping DI over the entire thing.
It only makes sense for the red liquid to be a life reviving potion made from red berries know for their healing powders (today we call it chili powder ink).
The green stakes are as small as toothpicks but to a Pixie it probably fits her hand perfectly. Some people might know that these are what humans call toothpicks. :)

In conclusion, Jaz and I had a blast looking at this coffin. Just goes to show that you shouldn't judge a book by its cover or I would have maybe thought there was a dead little something in this coffin. BTW-here is a pic of my child "Jazmin". She is a rescue, a cutie pie and doesn't look like she is almost 16 years old! Aww! Loves her. 
Jaz and I wish you all a happy weekend! It is a holiday here and we are continuing with our gardening. We are making progress but this is what it looks like until tomorrow when we dig in again. Hand laying the brick edging is taking longer than I anticipated. Carpe Diem right?  

I would very much like to share this discovery with these challenges:


My furry "child" helped me find this and pixies are fun for any child! 

My fave is Jaz, chalky paints, coffins, and creating the unexpected. 

The stamping is on little scroll the King wrote. 

Fairy tales and dreams go hand in hand in my book. Pixies are magical creatures dreamt up by someone very creative and imaginative. 


Sunday, February 7, 2016

Altered Glass Bottle, the good, the bad, and the beautiful.

How many of you try a new technique or, for lack of a better word, process, and just end up hating (strong word) the results? I just made an altered glass bottle and even though I did a post about it (HERE), I wasn't happy with it. So, I was determined to improve and experiment. And experiment I sure did! This is only the 3rd bottle I have altered but the first time really experimenting with paints and so many elements and learning what works (for me) to get paint to stick to the bottle.
Now the first thing I wanted to know was-how does paint stick to the bottle? I tried gesso, multi medium and wasn't having the best result. So for this bottle I tried HEAVY black gesso and when it was dry I used the multi medium over the gesso, then applied a second layer of heavy black gesso. Win! I then applied some white gesso and crackle paste randomly with my finger.

The next step was to add all the different elements to form my design. I raided my stash and then some! One thing I have yet to read about is the cost for making this type of bottle. All of these many different elements add up. The metal flowers, the gears and cogs, the springs, the wooden arrows, the pen nibs, the floral pick, the clock face, the metal leaves, the metal filigree.....the end result is definitely worth it but now I know how much it actually costs. Whew! My local thrift store was a shopping haven for some of these elements though. I applied almost all of the elements with a hot glue gun because I couldn't wait for the multi medium to dry (patience isn't my strongest trait, but I am working on it). The hot glue worked very well because I already had the layers of HEAVY gesso and multi medium for the glue to stick to. All of the elements got a good coat of white gesso (not heavy white gesso).
 Color! Now the hard part. For me, adding color to a design is the make or break point because I sometimes don't like the end result. Such was the case for this bottle. I used about 5 different Primary Element mica powders, some Silks and LSG sprays (blues, greens, gold, copper, purple, pink). It was okay but not what I had pictured in my head. This is one reason I love mixed media-you can just keep adding paint! So add away I did!
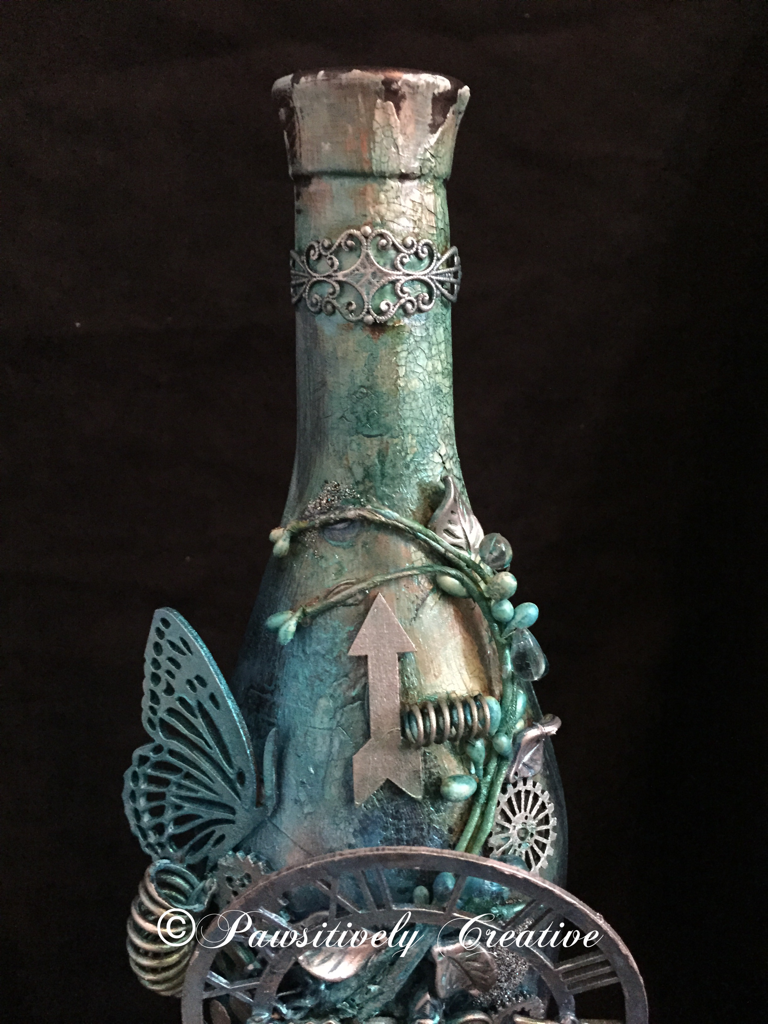
The final layer of paints were only blues. I dabbed, spritzed, sprayed, splattered and even sponged until I was happy. The bottle is dark so you can't really see all of the drips and splatters. When everything was dry I used my finger to apply some silver Rub-n-Buff to highlight areas and then added some Wow Embossing Powder-Vintage Peacock randomly. Here are some close ups. The picture below is of the top of the bottle. Aren't those springs fun!?! I think so. This is where most of the crackle is as well. NOTE WORTHY: All of the pictures I have taken were with an Iphone 6 and no filters. I don't have a camera or use any apps to make my pics look better.

 The picture below is of the middle of the bottle where most of the elements are. I think that the bottom layers of paints/sprays/powders really added nice contrast to this design, and it shows up amazingly in pictures.

This is what I am calling the "bottom" of the bottle. I sure do need some more of those Roman numerals (loves 'em)! See the difference between the indoor vs outdoor pics? The indoor pics show more of the paint colors underneath, whereas the outdoor pics show more of the blue. Awesome sauce!
Outdoor Picture

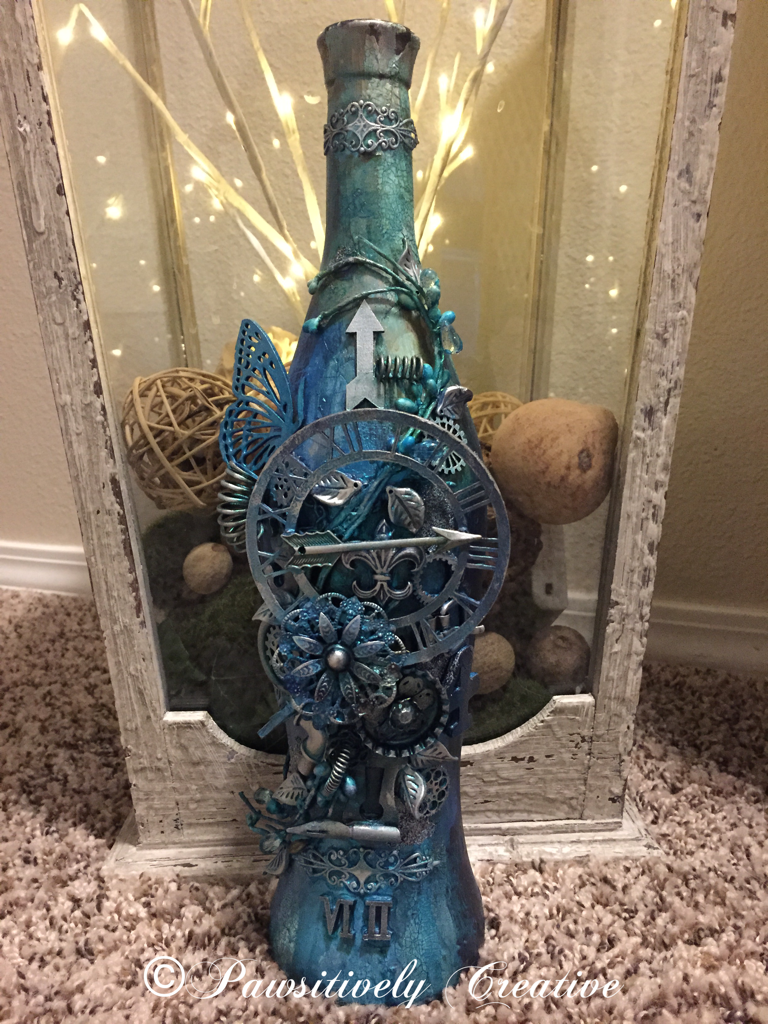
 This final picture is in front of a large lantern I designed for my entryway. I do believe this experiment was a success and my hypothesis was sound-using HEAVY gesso will result in better paint "stickage" to a glass bottle. Hugz and Carpe Diem! ~Niki
I am thrilled to be sharing this altered bottle with these amazing challenges:

I believe I used every color in this color challenge. 
The LSG colors I used the most are: Delphinium Turquoise, Jack in the Pulpit Teal, and Sweet Violet Purple Teal


I took inspiration from the quote. This bottle is a rainbow of color underneath it all.

Simon Says Stamp-Work It Wednesday-Use Something New
(I have used new LSG sprays, Silks, Wow Embossing Powder and new techniques)

Emerald Creek Dares-Love is NOT in the air
This bottle is a perfect gift for a single person, and if it were full they wouldn't have to share any of the yummy wine. :)

UPDATE:
This bottle is featured on Tuesdays Tutorials with Marjie Kemper
http://marjiekemper.com/blog-series


Saturday, January 23, 2016

Shabby Something?

Hello y'all! Keeping with my goal to try many different styles and colors, I have decided to delve into a more feminine canvas today. Now, anyone that knows my blog understands I tend toward the darker color palettes but this design is none of that! Eek! I received some new LSG sprays for Christmas (from Alleystamp.com) and am using these today. Talk about a new path, and a new beginning.
I started with a 5x7 canvas and some gesso. Then added some script stamping randomly. I totally forgot to take pictures while I was working on the background. Oops. I then added the HS stencil and some texture paste. Once that was dry, I grabbed my LSG spray and sprayed it through the HS stencil to get a soft pattern. 
I painted the gate with white acrylic paint and the ornate frame was painted with Inka Gold-Turquoise. I used the LSG sprays to spray the small flowers. The leaves are made from a mold and Clay and painted with Luminarte Lucky Apple Primary Elements. The cheesecloth is added for texture. A MS branch punch was also used to create more texture. 
The butterfly was heat embossed and then "painted" in some spots with my new Liquid Pearls-Pewter. The sentiment was stamped onto vellum and little dots of the LP was added to the banner. The square green gems are new as well. I then splattered the entire canvas with all the colors I used and stamped another script stamp with Adirondack Mushroom ink. 
I know I forgot some steps but I was in the zone and just kept trying different things. :) Carpe Diem right? Hugz! ~Niki

I would love to share this design with these challenges: 


Monday, December 14, 2015

Another Christmas Card!

I keep on trying this Christmas card making phenom and am finally getting into it a bit. After watching countless videos (mostly Pamellia)  and reading different tutorials, I had a go at making a layered card with lots of textures. Enjoy!
I started by watering down DecoArt Metallic gold and silver acrylic paint. Then I swiped some glossy paper through it and slowly heat dried it. It started to look like hills! Yippee! 
I then took a stencil and applied DecoArt Titanium white acrylic paint through a stencil to create a snow texture. My rolling hill is a piece of scrap paper that has numerous layers of paints on it. I finished the hill with DecoArt texture paste stippled with my palette knife. When it was dry I added some DecoArt Snow-Tex randomly and some glitter. 
I layered my tree dies behind the hill. For the gold trees I added some DecoArt Snow Tex to create some depth and interest to the tree line. While it was still wet I sprinkled on DecoArt Crystal sprinkle on glitter. The white trees were painted with a thin layer of DecoArt Liquid Glass and the crystal glitter was sprinkled onto that. When it was dry I added some Snow Tex just like I did for the gold trees and the same glitter. 
The base behind the tree layer is painted with DecoArt Metallic Gold paint. I only went around the edge that would show though. 

The base of the card is embossed and hand painted with the gold metallic paint as well. 
I added a seam binding bow that was hand painted with watered down gold metallic paint. HINT-when using paint to color a seam binding bow, know ahead of time that the bow will be kind of stiff unless you use a fabric medium. The metal tidbits were attached with a thin metal wire that is wrapped around the back of the bow. 
This card will be shared with the following challenges: