Showing posts with label handmade. Show all posts

Thursday, September 7, 2017

Ruffled in Darkness

Well hello there lovelies! I have been on a hat making kick and am going strong with so many designs. You all will probably get sick of me posting these. Hehe! I have wanted to make a totally black and soft hat featuring a more elegant gothic feel and so I decided to play with lots and lots of feathers. I was inspired by all of the beautiful ravens that are cawing around my neighborhood. Here is the finished design. Enjoy!
I started with the usual foam. I used the taller black top hat for this feathered design. The shorter white hat will be featured at a later date. 
I glue my hat together and the grabbed a load of black feathers. You can dye your feathers using food coloring if you would like to make a certain color. The draw back is, the lack of certain colors in food coloring, and it makes the feathers more of a light color. But anyway, it is a fun thing to try!
As you can see in the picture above, it was a feathery good time! Those feathers ended up everywhere! Each feather was laid exactly where I wanted it and surgically glued into place. I didn't want any of the stem to show so there is a lot of overlap. The feathers were bent and curled to fit the curve of the hat.
The skull and wings were given a special treatment and then I added some dark blue rhinestones to it. The circle under the beak was inlaid with Prussian blue paint and highlighted with glossy accents. I added some soft black lace around the base of the hat and also tied some black leather into knots to give it more texture. It is hard to see in the picture.
The sides of the hat feature a TH skull and crossbone. The eyes are ice blue rhinestones from Xanderous Crafty Stash. Those little gems are so little and were very interesting to work with. The eyes were glued in with glossy accents as well. I did trim off the loop at the top of the skull.
The back of the hat showcases the large lace bow and another skull and crossbone. The lace is extra long to give the hat a nice added form of elegant goth. I do hope you enjoyed this journey with me! Thank you for looking! Carpe Diem!

I would like to share this hat with these challenges:


With so many ravens about in my neck of the woods, I thought this would fit into the Nature part. 


Saturday, January 23, 2016

Shabby Something?

Hello y'all! Keeping with my goal to try many different styles and colors, I have decided to delve into a more feminine canvas today. Now, anyone that knows my blog understands I tend toward the darker color palettes but this design is none of that! Eek! I received some new LSG sprays for Christmas (from Alleystamp.com) and am using these today. Talk about a new path, and a new beginning.
I started with a 5x7 canvas and some gesso. Then added some script stamping randomly. I totally forgot to take pictures while I was working on the background. Oops. I then added the HS stencil and some texture paste. Once that was dry, I grabbed my LSG spray and sprayed it through the HS stencil to get a soft pattern. 
I painted the gate with white acrylic paint and the ornate frame was painted with Inka Gold-Turquoise. I used the LSG sprays to spray the small flowers. The leaves are made from a mold and Clay and painted with Luminarte Lucky Apple Primary Elements. The cheesecloth is added for texture. A MS branch punch was also used to create more texture. 
The butterfly was heat embossed and then "painted" in some spots with my new Liquid Pearls-Pewter. The sentiment was stamped onto vellum and little dots of the LP was added to the banner. The square green gems are new as well. I then splattered the entire canvas with all the colors I used and stamped another script stamp with Adirondack Mushroom ink. 
I know I forgot some steps but I was in the zone and just kept trying different things. :) Carpe Diem right? Hugz! ~Niki

I would love to share this design with these challenges: 


Friday, January 15, 2016

DecoArt at SanDee&Amelie's

Hello y'all! Today starts another challenge at SanDee&Amelie's Steampunk challenge. There have been a few changes but I promise you'll like em. We start with our new sponsor-DecoArt! How cool is that? At SanDee&amelie's Steampunk Challenge, we have the great honour and pleasure of having gained DecoArt as our "one and only" prize sponsor from now on, the whole team decided to put a special spotlight on some of the fabulous products from their wide range of media and paints. 

So this month each DT member not only used DecoArt paints and media on her DT project, but also introduces more closely one of the products she has used. 


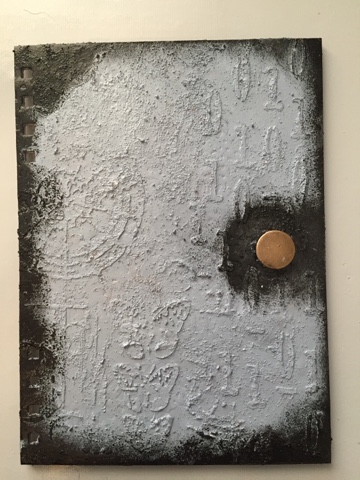
Here is what I decided to make. This is my first time trying this Andy Skinner technique (which you can see HERE) and of course I put my spin on it. Enjoy! This is going to be a long journey.
I have had this art journal for over a year and only have 4 pages done in it. So I decided to start with the cover thinking if it looked better, I would be more inclined to use it. Hehe! 
I added some texture paste through 2 stencils, the number stencil is from Andy Skinner. I then added some sand texture paste thus starting the painting technique showcased in the video by Andy Skinner. 
I kept adding paints making sure everything was dry between layers. 
Then came the clock and gear chipboard piece. I watched another video (HERE) and used this technique (first time trying this one as well) but changed up the colors. Yellow green for the base. 
Then Cobalt Turquoise Hue applied using a new texture stamp. This is where I added my own spin to the painting technique because I just kept adding color until I was happy. 
The clock/gear chippie was glued down with DecoArt Liqui Glass and then whitewashed with DecoArt Titanium White antiquing cream. 
This is what it looks like all put together with the rest of my Art journal. The picture above is closer to what it looks like in real life. I don't think the lighting does it justice though as it isn't this washed out and blurry (like the pic below shows). Darn photos. :) 
Here is a quick peek at the prize package you could win! You have to be "In it, to Win It!" Just remember to have fun and enjoy the process. Hugz and Carpe Diem! ~Niki
I would like to share this art journal cover with these lovely challenges:

(I have used 2 new techniques, and a new texture stamp)


(Anything Goes altered art)

(I used numbers, some of the colors from the board and plan to make time to use my art journal) 

(Anything Goes Altered Art/Mixed Media)

Saturday, November 21, 2015

Christmas Tag


My art studio sure is getting used right now. Today was a very successful day and I am pumped to do some more but I am about to watch a movie with my DH and it is almost 10pm. I just wanted to share this Christmas tag real quick. Hope you enjoy and all of you are staying warm!

I wanted to try something new and get really messy. I started by heat embossing a Rubber Dance script stamp with Champagne EP. The edges of the tag were inked with Ground Espresso DI. 
I then started on my ornate frame. I tried some different color combos and wasn't liking the results.....Too yellow! 
I ended up using my Primary Elements-Olive Vine and am happy I did! This set me on the path to the colors you see in the final tag. I also used Emperor's Gold. While the frame was drying I flicked a bit  of Primary Element colors onto my tag  Gorgeous shimmer! 

I die cut "Joy to the World" (a new die that my hubby bought me today) 3 times and layered those cuts. It was inked up with DI and then heat embossed with Red Tinsel. 
The sprigs greenery and glitter leaves were remnants of a Christmas pick I had in my stash. I love adding the picks to my Christmas wrapped gifts! The ribbon was hand died with the Primary Elements and then splattered with them as well. I am hoping to get a better picture tomorrow when the sun is out!
Updated pictures of this tag while the sun was out. Ahhhh the shimmer and glitter!

I hope you are all having an amazing weekend! Hugz and Carpe Diem! 

This tag would love to be in these challenges: 


I used the Festive Red color and the Optional Theme


Many Thanks!

Oh boy have things been busy here! My DH has surprised me with Christmas lights on our new house, he knows how much I adore lights during the Christmas holiday. Such a sweetie he is! Now, onto this design.

We just celebrated Veterans Day here in the States and I am honoring all my heroes with this tag. This is my way of saying Many Thanks and I applaud your dedication through everything. Without you, I would not be free. My brother was in the service and all soldiers should be thanked repeatedly.
I started with a manila tag and covered it with my rusty patina aluminum tape. To create the rusty tape I embossed aluminum tape, applied Pool and Rust Alcohol Ink, then sprinkled some rusting powder randomly. Once everything was dry I stuck it to the tag and trimmed the edges. 
To create my center "ornament", I used some metal filigree corners and a TH sticker frame to form my bell shape ornament. The 3 gentlemen were inked onto some tissue paper and then painted over with a glaze to create my vintage image. See, you can use certain elements to create something completely different! I never would have thought all these different pieces could make such a nice ornament! Can you see the bell shape? 
I added the propeller with Glossy accents and the greenery is a pick. The sentiment is self explanatory. 

The rusty orange ribbon/bow was in some Happy Mail I received in a swap, I just sprayed it with Carbon Black DecoArt mister and applied some Rust Alcohol Ink to it. How do you honor your heroes?
Just a reminder, over at SanDee&Amelie's Steampunk challenge we are having our winter special! The challenge is Anything Goes and runs for 2 months, until the end of December. Check it out HERE

I would really enjoy sharing my tag with the following challenges


I have altered the metal filigree corners into a bell ornament featuring these wonderful 3 wise men

I just went to a local craft store and purchased the greenery pick I have used in this design and a new bottle or Rust Alcohol ink was used as well. 

I am celebrating Veterans Day, Thanksgiving and Christmas all in one. 


Sunday, November 8, 2015

Light and Dark Autumn Leaves

Wowzers! Can you believe it is almost December!?! What! Where did the time go? The leaves are falling here and the days are growing colder. I don't really enjoy Fall or Winter but there are 2 special holidays during this cold time that I very much look forward to, Thanksgiving and Christmas! I was out in my back yard today watching the leaves fall and the dogs play and grabbed a maple leaf. It was so textural and pretty, I decided to use it on my design. It also reminded me of having to rake leaves when I was younger. We had more than enough trees, but the fun part was when my Golden Retriever decided to play in the piles of leaves. Good memories!
When Daylight Savings happened on November 1st, I knew the light change would alter how I photographed my art so this design was inspired by the leaves and the light change. I started with my leaf and painted it with Gold modeling paste. Then cut out a square from some thick paperboard and added the gold paste to it as well. I used my Emperors Gold silks to go over the gold paste (note the bumps and textures-my Gold Silks isn't so silky anymore, it seems to be drying out) :( Then came a wash of Spiced Pumpkin Silks. After the paste and Silks was dry, I added some DecoArt Antiquing Cream Raw Umber to the edges. 
The leaf was popped up a bit with foam dots and a metal filigree charm was added. The A is self explanatory.  I was able to use my new Dymo labeler by adding the word "Autumn".
 While all of this was happening I had also cut out my base and applied the Silks Pumpkin to it as well. The crackle is a TH stamp and coffee archival ink. 
 Adding layers is my new challenge for myself, so I went about it. I used DecoArt crackle paste and the TH flourish stencil around the edge of the base. I did add some Distress Glitter to the wet paste. When it was dry I lightly sponged over it with coffee Archival ink. 
The gold tassel is just for fun! The Gold frame is from a local craft store and "painted" with Gold Alcohol Ink then washed with the Emperors Gold Silks after applying some DecoArt Crackle Glaze.  
I used my favorite glue, TomBow Multi to adhere the frame to the leaf piece. 
The frame looks rather vintage now! Awesome sauce! I do hope you aren't too cold wherever you are and you maybe had some fun while reading this post. Happy Holidays and Carpe Diem! ~Niki

I would love to share this wall hanging with these amazing challenges: