Showing posts with label DecoArt. Show all posts

Tuesday, July 18, 2017

Blues and Metal

Today is the day that I can share my second guest design for Xandeous Crafty Stash! I enjoy working with metal trinkets and tid-bits and Naomi (the owner of XCS) was kind enough to let me have a play. With so many wonderful challenges going on I wanted to create a design that fit all so I decided to keep it blue. For some reasons blues are more easy for me to work with. I have been working on trying to create more layers, texture and composition in my designs. Exploring the possibility is what I am enjoying right now. Here is the final result.
I started by applying black gesso to my background board (compliments of Autumn from Sew Paper Paint) and adding some stenciling with black modeling paste. 
Then I had to decide on the composition of the pieces. Every metal piece you see is from Xandeous Crafty Stash! The paintbrushes are from my stash. Everything was glued down with multi matte medium. 
Once you have everything glued and in its place, apply more black gesso and cover it all up. 
To add even more texture I randomly slopped on some texture paste. That's the white gritty lookin stuff in the picture below. 
A thin coat of DecoArt Prussian Blue Hue was brushed over the entire piece, then another thin layer. Once that was dry I kept using different DecoArt blues to create different layers of blue colors. Cobalt Teal Hue, Cobalt Turquoise Hue and Turquoise Water. Around the edge, where most of the texture paste is I added some Quinacridone Gold. And some Q-gold in other random spots. 
Then came the dry brushing using different shades of white. The best white I use for dry brushing is DecoArt Titanium White.
I would like to share this design with these fun challenges:


*I was inspired by those lovely paintbrushes and the textured wall. 


Friday, August 5, 2016

Shabby Garden Barn Doors and Peeled Paint

Hello there dearies! I am back after a month long break and ready to share with you all my newest design. I have been decorating my home and am wanting to put barn doors up in my kitchen and in my bedroom for a rustic vibe. It is on my to-do list but I needed to get the idea out of my head and with the new challenge over at Anything But Cute, I knew this was a win win situation. I give you my version of a Shabby Garden.

The doors are on hinges and open to reveal the secret garden elements inside. 
Lisa the Fantabulous, of Mermaid Crafts, is our hostess for this month at Anything But Cute #16, and the theme is inspired by her mood board of this Shabby Garden. 

Here is what she would like to see: For this challenge, we are asking you to take a stroll through a romantic shabby garden. Create any mixed media project strongly inspired by the mood board. Think flowers and plants in cracked pots, peeling paint bird feeders, distressed timeworn furniture, crumbling statues, soft pastels and feminine accessories. Don't forget to tell us how the mood board inspired your project and have fun!

This is an 8x10 reverse canvas. I used cardboard from a box to cover the front. I cut out the middle with an exacto knife. Then I added a Layer of white gesso and when dry peeled back some of the cardboard. Next came a layer of DecoArt white chalky paint. The inside lip of the canvas was painted with the chalky paint as well. 
While the chalky paint was drying (it really doesn't take long though) I started constructing my barn doors. I used the backing from a calander. The doors got the gesso and white chalky paint base. 

While many people use wax to create the peeled paint technique, I found it didn't give me the look I wanted (I really did try it). I randomly painted chalky paint (Relic and Turquoise) over the white base. Then tried the wax layer. Blah! 

So I re-did it with CHAPSTICK! Yeppers, I seem to have an abundance of Chapstick laying around and liked the smell (hehe!) so I swiped it over the areas I wanted to "crack and peel"! It worked like a charm and you can see the "cracks" it created after I painted over the Chapstick with the white chalky paint. 

After the top layer of paint is dry, take a sanding block and GENTLY sand over the areas you want to distress. This will reveal the colors below and creates a wonderful peeled paint shabby look! TIP-I also used this technique of the Chapstick on my shabby wall shelf in my bedroom! Works great! I also stamped a rose design using the shadow stamp technique. You can see these on the gram and the front and back of the doors. 

Anyway, I used a plain piece of scrapbook paper to make my background. I heat embossed a stencil design and a word stamp from the Artistic Stamper, then I scraped off some of the embossing powder before I used my hearing tool. I used white and grey EP. Then I grabbed a pipette and dribbled my shades of blue from the DecoArt media line and spritzed with water to create a watercolor effect. 

After the background was dry I added some stamped feathers, small flowers and sprigs. I used ink around the edges of the small white flowers to give some added blue color. 
And there you have it! My take on a Shabby Garden. This was a challenge and out of my comfort zone but it was a totally BLAST to design! Hugz and Carpe Diem!
Closed Doors
Sneak Peak! :)
Open Doors!

I would love to share this Shabby design with these challenges:


Some of my best moment this summer are planting new flower beds and learning how to make a butterfly friendly "bird bath" (you add flat marble stones to it so the butterflies can stay above the water)


The Artistic Stamper-Anything Goes

A Vintage Journey-Stencil It
I used the TH flourish stencil on the frame and the background inside the canvas

Mixed Media Place-Be Inspire by the mood board. 
I used the blues and the overall shabby feel of the board and was inspired by the over hanging tree path. 


Sunday, June 19, 2016

Time Moves On

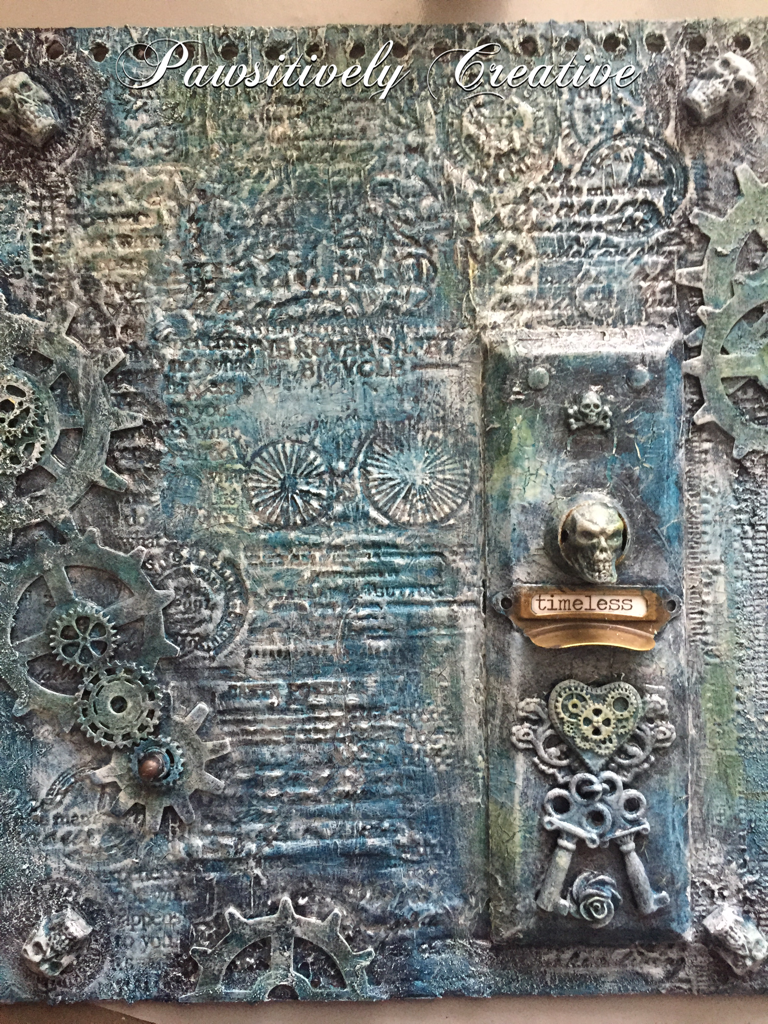
Well it sure has been a busy time here at my house. I am painting and designing my master bedroom and is a big undertaking but the end is in sight! I really wanted to share this Time piece and stamping into modeling paste again. Fun stuff, this is sort of where my stenciling brayer technique came from. Anyhow, I altered this cover. It was black and white with a lot of poof to it, like it was stuffed with something and I figured it was TIME to change it. Lol.
I started with DecoArt black gesso, then some DecoArt modeling paste. Waited for it to dry a bit then grabbed lots of stamps and stamped away! Then added some skulls, an old door plate, some gears and some more skulls, and a pull handle. An eclectic mix but it makes sense in my brain. :) Then painted with black gesso again. This is an Andy Skinner technique.
I then applied a wash of Titanium white paint, let it dry, then a wash of my new favorite DecoArt color Prussian Blue Hue! Gorgeous color!!! I left some areas white for a nice ghostly contrast. 
Random spots of DecoArt Q-gold and Red Oxide. The Media line of acrylic paints from DecoArt are awesome sauce for layering. 
You may have noticed I left the drawer pull alone. This is a play on words. My Skellies and other pieces have been "aged" by time and have essentially died but metal stays around a lot longer hence the sentiment "timeless". Although I did apply some paint to see what it would look like, in the end I wiped the paint off.  Multiple dry bushing with Titanium white was done as the last step. This design took time because of the layers of paint and I wanted to try different colors. There was some Phthalo Green-Blue and Titan Buff but I covered those up. 
Hope y'all are having an amazing weekend and enjoying everything you do! Hugz and Carpe Diem! ~Niki

I would like to share this altered cover with these challenges: 


Sunday, June 5, 2016

The Birds and the Bee's

Hello lovelies! What a whirlwind May was! Whew. Thankfully the warm weather is finally here and I can sit outside and enjoy hearing the sounds of Spring although I don't care for getting stung by wasps. Seems like those critters set up a nice hive in my outdoor umbrella and my dog and I were both stung. Ouch! We are better now and got rid of the hive so everything is good but this helped inspire my design and the theme for this month at Anything But Cute!


I am the hostess this month at Anything But Cute and the theme is: The Birds and the Bees! With the lovely warm weather in my neck of the woods, I am seeing so many wonderful birds and bee's, so I would love to see those in your mixed media makes! Pull out those bird stamps, think of feathers and maybe some honeycomb. Or you could even go for a non-traditional interpretation like a family crest that has a bird emblem on it. The sky is the limit but NO BUTTERFLIES please!

I started with an old red book (I bought a bag of books for $1) and lathered some modeling paste to it, then waited for it to mostly dry then I grabbed a stencil and used a brayer to push the stencil design into the modeling paste. It worked for the most part. I painted it with DecoArt paint then added a layer of crackle glaze. Once the glaze was dry Raw Umber antiquing cream was added then wiped with a damp baby wipe.
Then I traced out my shield pattern onto some thick matboard and played with some chippies until I like the layout. The picture below is what everything looked like before I went to town with the mixed media part. Hehe! 
All of the chippies were painted with white acrylic paint then a layer of DecoArt crackle paint and when that was dry and the cracks showed it was time to apply a layer of Raw Umber antiquing cream and wipe it with a baby wipe. The shield was painted with Tansparent Red Oxide, a layer of crackle glaze and then Raw Umber. 
While the book was drying I worked on the spine piece. I used paper leather and ran it through an embossing folder then used multiple Distress Inks to age it. 
It took me a loooooong time to find an eagle I liked and so this metal pendant was antiqued with alcohol inks, crackle glaze and antiquing cream. The metal  axe looking swords behind the bird were fringed up with alcohol inks and dirt. 
I applied the chippies with Tombow glue and added bronze brads to the shield and built up the bird nest then glued the bird and the axe things with glossy accents. 
The picture above shows the dirty bird with some rusty goodness but I had to change the design because it didn't feel "done" to me. You all know how that goes. So I used the white alcohol inks and paints and was finally satisfied. :)
Thanks for stopping by and have an awesome sauce day! Feel free to see what my lovely teamies have designed as well. Hugz and Carpe Diem! ~Niki

I would like to share this family crest book design with these lovely challenges: 


Anyone that works with red paint knows how messy it gets! My red acrylic paint bottle exploded to top everything off. Hehe! Oops. 


Monday, May 9, 2016

Blood and a Zombie Barbie

Interesting title? I think so. I wanted to create a layout that featured an amazing and inspirational lady I know. Her name is Rheanon Nicole, also known as Zombie Barbie. She is a fantabulous and beautiful person, inside and out. She is also a TV Host, a published author (Broken Halo), a model, and a mother. As you can see, she wears many hats! Hehe! So for this layout I tried to include some of her favorite things.

I wanted to only use three colors (black, white, red). She loves horror movies and the horror genre. I started with a plain 12x12 page and then added some black DecoArt modeling paste through a stencil. I marked out where I wanted the picture and kept that spot blank. Then added some Versamark through an Andy Skinner skull stencil and heat embossed it with Snow EP. Next, I laid out some elements I thought would be used, of course everything changes as the process continues. 
The black fabric stuff reminds me of a web so I used it and also threw in some random pieces of red and white thread. The flowers echo the flower headband Rheanon wears in the picture. 
Here comes the pop of color with the red. I used DecoArt media mister and randomly sprayed. The drips were created by diluting the red with water and letting it run down the page. Looks like blood right? That's the idea and keeping with the Horror movie elements. What's your favorite horror movie? I can't pick just one! 
There are about four different stamps used in the background as well. The picture above shows the embossed skull and the brick chippies (those were heat embossed with Snow and Black EP) Fun stuff! 
The cameo necklace is part of an old necklace I tore apart. The blood red flowers were once orangish white, I just sprayed those with red and black paints. The little red stones are Mini Prills. The last bit was to splatter the entire page with black and red paints (I was going for a blood splatter effect). Viola, done! 

I would be thrilled to share this design with these lovely challenges:

I have Blood, Barbie, Black,  and beauty


I am hoping this darker art design is okay since it is an Anything Goes challenge


I used this definition of collage-a piece of art made by sticking various different materials such as photographs and pieces f paper or fabric onto a backing (I did all three)


Friday, April 15, 2016

Rusty Tag

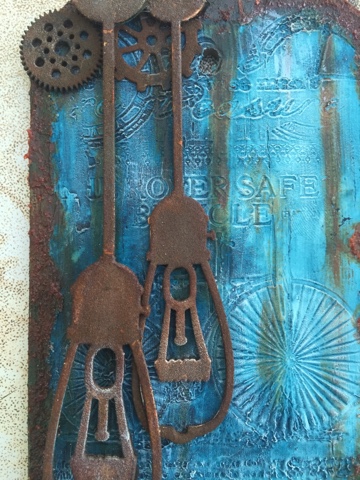
Hello lovelies! I do hope you have been enjoying your day. Seems like April is flying by and the sun sure is out in my neck of the woods. Do you see yourself outside more during the warmer months and creating less? My mojo seems to be out gallivanting right now but I was able to create this rusty tag for our new challenge at SanDee&Amelie's Steampunk challenge.

You can create anything your heart desires as long as there is a Steampunkish, Vintage or Industrial vibe. I started with a canvas tag and applied a layer of modeling paste. Once the paste was almost dry, I used multiple stamps and stamped into the paste. You don't have to push hard to get results. I then applied a wash of Prussian Blue Hue. 
 I then added some texture sand around the edge and when dry painted a thick layer of Quinacridone Gold and used the Q-gold to create my rusty drip lines. I used my trusty rusting powder on all of the die cuts. 

Here is a close up since I forgot to take more process pics. Oops. I need a new phone with more memory so I can take more pictures. Hehe! But don't you just love those rusty drips and the white highlights from dry brushing? SHARED SECRET-those light bulb chippies have been on three, yep, 3, different designs and I have painted, spritzed, powdered and pull off this chippies every time. Thank goodness I was FINALLY able to use em. Whew! I didn't want to throw em away and was getting frustrated. Lol. 
And there you have it, I've never really tried this color combo and am very happy I stumbled into it. I had planned on more paint layers, but once the wash was down I really loved it and decided it was enough. Yippee! Sometimes it sure is hard to add anything to an amazing background. I am sure you all know what I mean! Hugz and Carpe Diem! ~Niki

I would love to share this rusty mixed media tag with the fantabulous challenges:

This tags goin on my Father's Day gift


I used the different shades of blue


Monday, April 11, 2016

Craftroom Decor from an old Kitchen Cabinet

Hello lovelies! I have been breaking out of my norm of doing mixed media and have tried my hand at some home decor items. I have 3 projects going right now. One is complete, the second is almost there-just waiting on new handles, and the third is somewhere in-between. Today I am sharing my new/old kitchen cabinet that's been turned into an art room storage facility. :)
For this design I used the DecoArt Chalky Paint in Everlasting and Relic. I applied 3 coats of the Everlasting (white) because the original color of the cabinet was a dark tone and took a bit to cover up. I applied the paint with a roller but IMHO using a paintbrush is better because the roller sucks up so much paint! 
After the Everlasting Chalky paint was dry, I used a DecoArt-Old French Script stencil to add the design to the sides and front of the cabinet. My art room is mostly grays, whites and some black so I wanted to stick with that color palette. 

The handles were a bronze color but I applied 2 coats of Everlasting with a foam brush and got a nice shabby look. I drilled the holes for the handles and screwed em in. For some reason the cabinet had no drill holes but it was an easy fix. 

The front door inlays are the DecoArt Chalky Paint in Relic. I hand painted the sides with a brush and boy did that take some time. Lol! I really enjoy the chalky paint because it will adhere to anything, even a varnished surface but that is a story for another time and that project is the almost finished one. 
I added some small rounded balls to the bottom of the cabinet for feet and also to make it easy to open the doors without rubbing on the carpet. Those were painted with Everlasting. And there you have it a kitchen cabinet makeover! I was able to thrown away my very broken book shelf that held all of the goodies that are now in this cabinet. The end of it was leaned against my wall so it wouldn't 
fall over. Lol! Into the trash it went. Spring cleaning is in full swing at my house. Thanks for looking and Carpe Diem! Hugz! ~Niki

I would love to share this trash to treasure piece with