Showing posts with label Andy Skinner. Show all posts

Sunday, June 19, 2016

Time Moves On

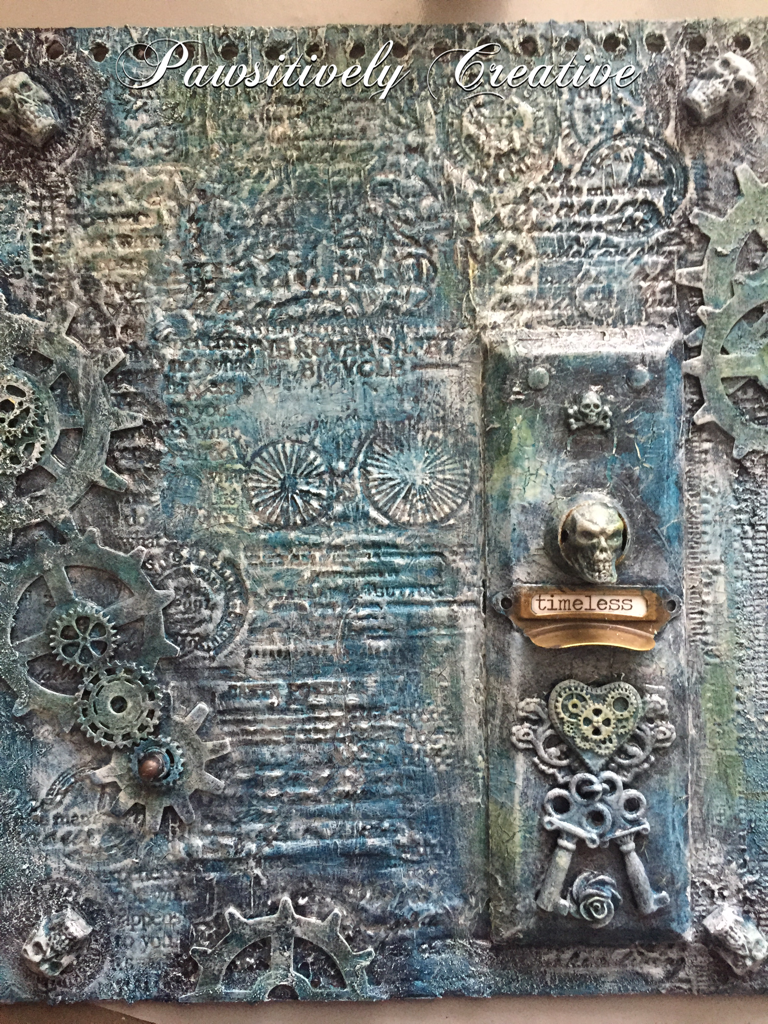
Well it sure has been a busy time here at my house. I am painting and designing my master bedroom and is a big undertaking but the end is in sight! I really wanted to share this Time piece and stamping into modeling paste again. Fun stuff, this is sort of where my stenciling brayer technique came from. Anyhow, I altered this cover. It was black and white with a lot of poof to it, like it was stuffed with something and I figured it was TIME to change it. Lol.
I started with DecoArt black gesso, then some DecoArt modeling paste. Waited for it to dry a bit then grabbed lots of stamps and stamped away! Then added some skulls, an old door plate, some gears and some more skulls, and a pull handle. An eclectic mix but it makes sense in my brain. :) Then painted with black gesso again. This is an Andy Skinner technique.
I then applied a wash of Titanium white paint, let it dry, then a wash of my new favorite DecoArt color Prussian Blue Hue! Gorgeous color!!! I left some areas white for a nice ghostly contrast. 
Random spots of DecoArt Q-gold and Red Oxide. The Media line of acrylic paints from DecoArt are awesome sauce for layering. 
You may have noticed I left the drawer pull alone. This is a play on words. My Skellies and other pieces have been "aged" by time and have essentially died but metal stays around a lot longer hence the sentiment "timeless". Although I did apply some paint to see what it would look like, in the end I wiped the paint off.  Multiple dry bushing with Titanium white was done as the last step. This design took time because of the layers of paint and I wanted to try different colors. There was some Phthalo Green-Blue and Titan Buff but I covered those up. 
Hope y'all are having an amazing weekend and enjoying everything you do! Hugz and Carpe Diem! ~Niki

I would like to share this altered cover with these challenges: 


Tuesday, March 8, 2016

Neons and Sprays

Well there comes a day when you try something completely new and find out some helpful tricks among the way. I've never worked with NEON colors before but today's their lucky day! I wanted to join in a couple of challenges and a new one that Andy Skinner is hosting. Here we go! Sit back and enjoy.

I used an old ruler to create the lines and texture in the DecoArt modeling paste. It was a fun and new experience. My canvas is a chunky one with thick edges. Then I left it overnight to dry completely.
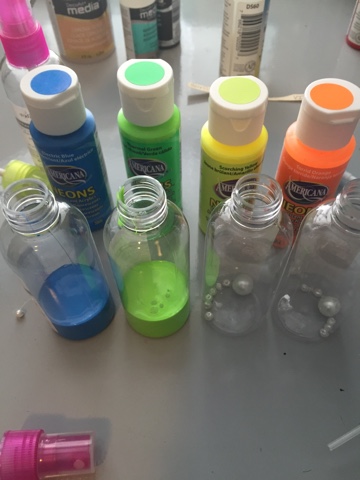
 I knew I wanted to use sprays because I just have more fun with em than a brush. I figured I could make some sprays with the Americana Neon paints (Electric Blue, Thermal Green, Scorching Yellow, Torrid Orange, and the non neon-Lipstick) and grabbed some small 2oz bottles from a grocery store. I put 6 small beads and one large bead in the bottle before adding the paint because I figured it needed a mixing ball. :)

You can see in the photo above how much paint I added to each bottle. I then filled up the bottle with warm water and put the spray lid back on and shook everything up. It sounded like a mixer ball was in the bottle! Yippee! Then I sprayed a scrap piece of paper with each color to see how it worked. 

The purple color was a mix of the Neon Electric Blue and Satin Lipstick with a pinch of Purple Pearl metallic thrown is as well. 
I grabbed my spraying box (fancy name for a paper towel lined cardboard box I use to apply sprays on a canvas) and started spraying. I applied heavy coats of each color and dried between each application except where I wanted the colors to run together. 
Using a Spouncer tool, I applied DecoArt Carbon Black around the edge of the canvas and on some of the textures areas. Using the Carbon Black again and the Spouncer, I added an Andy Skinner Day of the Dead stencil. Go easy on the paint and brush some on before applying to the stencil or some of the paint with seep under the stencil. 

Now I wanted to stamp onto my canvas but that's never worked out for me so I decided to stamp onto some tissue paper and adhere it to my canvas. I didn't have any of DecoArts Media matte medium so I used Duraclear matte varnish. Of course I practiced on a scrap piece of paper first. 
It worked out okay so I went for it! And here's the end result! Very eclectic canvas and an interesting art journey. :)
It really is more vibrant in real life (can you imagine!) and I am glad I tried my hand at these very Bold and Bright and Loud colors. The funny part about this design is I went into it thinking I would do a more abstract design but that wasn't my journey. Lol! Hugz and Carpe Diem! 

I would love to share the neon with these challenges: 


Friday, January 15, 2016

DecoArt at SanDee&Amelie's

Hello y'all! Today starts another challenge at SanDee&Amelie's Steampunk challenge. There have been a few changes but I promise you'll like em. We start with our new sponsor-DecoArt! How cool is that? At SanDee&amelie's Steampunk Challenge, we have the great honour and pleasure of having gained DecoArt as our "one and only" prize sponsor from now on, the whole team decided to put a special spotlight on some of the fabulous products from their wide range of media and paints. 

So this month each DT member not only used DecoArt paints and media on her DT project, but also introduces more closely one of the products she has used. 


Here is what I decided to make. This is my first time trying this Andy Skinner technique (which you can see HERE) and of course I put my spin on it. Enjoy! This is going to be a long journey.
I have had this art journal for over a year and only have 4 pages done in it. So I decided to start with the cover thinking if it looked better, I would be more inclined to use it. Hehe! 
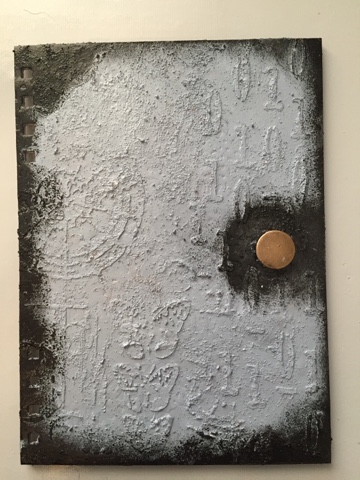
I added some texture paste through 2 stencils, the number stencil is from Andy Skinner. I then added some sand texture paste thus starting the painting technique showcased in the video by Andy Skinner. 
I kept adding paints making sure everything was dry between layers. 
Then came the clock and gear chipboard piece. I watched another video (HERE) and used this technique (first time trying this one as well) but changed up the colors. Yellow green for the base. 
Then Cobalt Turquoise Hue applied using a new texture stamp. This is where I added my own spin to the painting technique because I just kept adding color until I was happy. 
The clock/gear chippie was glued down with DecoArt Liqui Glass and then whitewashed with DecoArt Titanium White antiquing cream. 
This is what it looks like all put together with the rest of my Art journal. The picture above is closer to what it looks like in real life. I don't think the lighting does it justice though as it isn't this washed out and blurry (like the pic below shows). Darn photos. :) 
Here is a quick peek at the prize package you could win! You have to be "In it, to Win It!" Just remember to have fun and enjoy the process. Hugz and Carpe Diem! ~Niki
I would like to share this art journal cover with these lovely challenges:

(I have used 2 new techniques, and a new texture stamp)


(Anything Goes altered art)

(I used numbers, some of the colors from the board and plan to make time to use my art journal) 

(Anything Goes Altered Art/Mixed Media)