Showing posts with label acrylic paint. Show all posts

Tuesday, July 18, 2017

Blues and Metal

Today is the day that I can share my second guest design for Xandeous Crafty Stash! I enjoy working with metal trinkets and tid-bits and Naomi (the owner of XCS) was kind enough to let me have a play. With so many wonderful challenges going on I wanted to create a design that fit all so I decided to keep it blue. For some reasons blues are more easy for me to work with. I have been working on trying to create more layers, texture and composition in my designs. Exploring the possibility is what I am enjoying right now. Here is the final result.
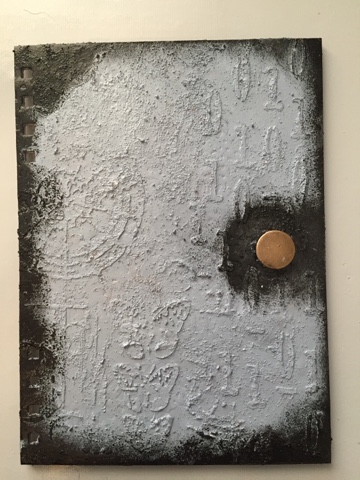
I started by applying black gesso to my background board (compliments of Autumn from Sew Paper Paint) and adding some stenciling with black modeling paste. 
Then I had to decide on the composition of the pieces. Every metal piece you see is from Xandeous Crafty Stash! The paintbrushes are from my stash. Everything was glued down with multi matte medium. 
Once you have everything glued and in its place, apply more black gesso and cover it all up. 
To add even more texture I randomly slopped on some texture paste. That's the white gritty lookin stuff in the picture below. 
A thin coat of DecoArt Prussian Blue Hue was brushed over the entire piece, then another thin layer. Once that was dry I kept using different DecoArt blues to create different layers of blue colors. Cobalt Teal Hue, Cobalt Turquoise Hue and Turquoise Water. Around the edge, where most of the texture paste is I added some Quinacridone Gold. And some Q-gold in other random spots. 
Then came the dry brushing using different shades of white. The best white I use for dry brushing is DecoArt Titanium White.
I would like to share this design with these fun challenges:


*I was inspired by those lovely paintbrushes and the textured wall. 


Sunday, June 19, 2016

Time Moves On

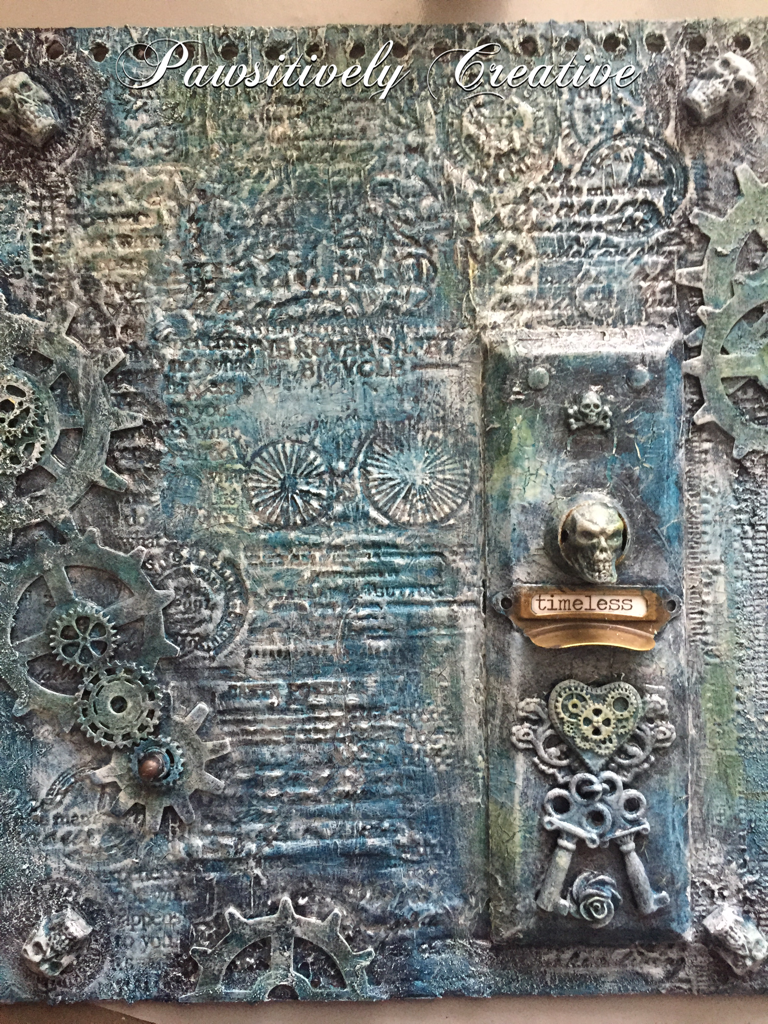
Well it sure has been a busy time here at my house. I am painting and designing my master bedroom and is a big undertaking but the end is in sight! I really wanted to share this Time piece and stamping into modeling paste again. Fun stuff, this is sort of where my stenciling brayer technique came from. Anyhow, I altered this cover. It was black and white with a lot of poof to it, like it was stuffed with something and I figured it was TIME to change it. Lol.
I started with DecoArt black gesso, then some DecoArt modeling paste. Waited for it to dry a bit then grabbed lots of stamps and stamped away! Then added some skulls, an old door plate, some gears and some more skulls, and a pull handle. An eclectic mix but it makes sense in my brain. :) Then painted with black gesso again. This is an Andy Skinner technique.
I then applied a wash of Titanium white paint, let it dry, then a wash of my new favorite DecoArt color Prussian Blue Hue! Gorgeous color!!! I left some areas white for a nice ghostly contrast. 
Random spots of DecoArt Q-gold and Red Oxide. The Media line of acrylic paints from DecoArt are awesome sauce for layering. 
You may have noticed I left the drawer pull alone. This is a play on words. My Skellies and other pieces have been "aged" by time and have essentially died but metal stays around a lot longer hence the sentiment "timeless". Although I did apply some paint to see what it would look like, in the end I wiped the paint off.  Multiple dry bushing with Titanium white was done as the last step. This design took time because of the layers of paint and I wanted to try different colors. There was some Phthalo Green-Blue and Titan Buff but I covered those up. 
Hope y'all are having an amazing weekend and enjoying everything you do! Hugz and Carpe Diem! ~Niki

I would like to share this altered cover with these challenges: 


Thursday, May 26, 2016

Sneaky peek-Anything But Cute Tutorial

Hello lovelies! I hope today finds you all in good spirits and with a happy smile on our face! I am sharing a few tips and tricks over at Anything But Cute for our Spotlight Artist post today, using a most wonderful medium for your mixed media makes! Find out more about this tutorial by visiting here! The picture below is just one of numerous ways to use this product. Enjoy!
And don't forget to join our current challenge "Celebrate Your Style" that runs until June 4th! Our awesome sauce sponsors Alleystamp, Emerald Creek and The Funkie Junkie are giving away some FANTASMIC prizes! Hugz and Carpe Diem! ~Niki

Friday, April 15, 2016

Rusty Tag

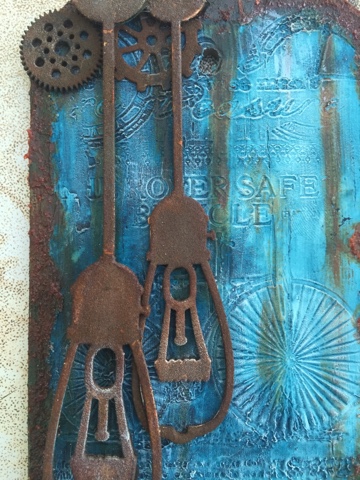
Hello lovelies! I do hope you have been enjoying your day. Seems like April is flying by and the sun sure is out in my neck of the woods. Do you see yourself outside more during the warmer months and creating less? My mojo seems to be out gallivanting right now but I was able to create this rusty tag for our new challenge at SanDee&Amelie's Steampunk challenge.

You can create anything your heart desires as long as there is a Steampunkish, Vintage or Industrial vibe. I started with a canvas tag and applied a layer of modeling paste. Once the paste was almost dry, I used multiple stamps and stamped into the paste. You don't have to push hard to get results. I then applied a wash of Prussian Blue Hue. 
 I then added some texture sand around the edge and when dry painted a thick layer of Quinacridone Gold and used the Q-gold to create my rusty drip lines. I used my trusty rusting powder on all of the die cuts. 

Here is a close up since I forgot to take more process pics. Oops. I need a new phone with more memory so I can take more pictures. Hehe! But don't you just love those rusty drips and the white highlights from dry brushing? SHARED SECRET-those light bulb chippies have been on three, yep, 3, different designs and I have painted, spritzed, powdered and pull off this chippies every time. Thank goodness I was FINALLY able to use em. Whew! I didn't want to throw em away and was getting frustrated. Lol. 
And there you have it, I've never really tried this color combo and am very happy I stumbled into it. I had planned on more paint layers, but once the wash was down I really loved it and decided it was enough. Yippee! Sometimes it sure is hard to add anything to an amazing background. I am sure you all know what I mean! Hugz and Carpe Diem! ~Niki

I would love to share this rusty mixed media tag with the fantabulous challenges:

This tags goin on my Father's Day gift


I used the different shades of blue


Tuesday, April 5, 2016

Earth Day at Anything But Cute

April showers bring May flowers right? And also Earth Day! What do you think of when you hear the words Earth Day? Mother Nature? New growth? Earthquakes? I think of it all, but mostly what natural found items I can try to make art with. Tree branches, moss, flowers, bark and such are among the list that helped me design this reverse canvas.

Our new challenge at Anything But Cute is: Earth Day (celebrated on April 22nd). Hosted by the amazingly talented Samra of Paper Talk with Samra. Here's what she would like to see: Create a mixed media project inspired by this mood board (picture below) and the beauty of our planet. Please tell us what inspired you. Entries for this challenge can be eco friendly, or even recycled/upcycled items, or a depiction of the sea, mountain, river, forest, flowery meadow.....let's celebrate our planet! 
This is my first attempt at a reverse canvas. I placed some elements I knew I wanted to use and took a picture. Not very Earthy yet, but layers and paints and creativity will turn this into a Spring Earth Day design. :)
Now it's time to play with some paper. I trimmed out a rough shape and then cut out the middle section to leave room for my nest. I edged all sides with Ground Espresso Distress Ink and used a Rubber Dance script stamp to add some stamping. Then added some small little butterflies as well. I then used some texture paste that I tinted with Primary Elements to make it blue, I pulled the blue colors from the mood board. 
I used a bit of washi tape on the inner edges to help ground the front of the canvas and get rid of the space between the canvas and wood frame. Then added some moss, some grass (element from the mood board),some flower sprigs, and pieces of a stick. I also painted a chipboard butterfly blue (another element I pulled from the mood board).
The small eggs were made from polymer clay and then painted a light blue. The "spots" on the eggs were made with a brown Archival ink pen. 
I glued everything down with a hot glue gun just because I wanted to see the end result fast and couldn't wait for other glues to dry. Lol! 

The large chipboard in the left corner and on the bottom are painted the same way. I laid down a base of white gesso, applied DecoArt crackle glaze-dried naturally, then added the script stamp.  When the glaze was dry I swiped some Raw Umber antiquing cream over everything, heat dried it and wiped it back. Then I applied the blue paint randomly with my finger. And it is done! Show us what Earth Day means to you and remember to check out what my talented teamies have made! Hugz and Carpe Diem!


Saturday, January 23, 2016

Shabby Something?

Hello y'all! Keeping with my goal to try many different styles and colors, I have decided to delve into a more feminine canvas today. Now, anyone that knows my blog understands I tend toward the darker color palettes but this design is none of that! Eek! I received some new LSG sprays for Christmas (from Alleystamp.com) and am using these today. Talk about a new path, and a new beginning.
I started with a 5x7 canvas and some gesso. Then added some script stamping randomly. I totally forgot to take pictures while I was working on the background. Oops. I then added the HS stencil and some texture paste. Once that was dry, I grabbed my LSG spray and sprayed it through the HS stencil to get a soft pattern. 
I painted the gate with white acrylic paint and the ornate frame was painted with Inka Gold-Turquoise. I used the LSG sprays to spray the small flowers. The leaves are made from a mold and Clay and painted with Luminarte Lucky Apple Primary Elements. The cheesecloth is added for texture. A MS branch punch was also used to create more texture. 
The butterfly was heat embossed and then "painted" in some spots with my new Liquid Pearls-Pewter. The sentiment was stamped onto vellum and little dots of the LP was added to the banner. The square green gems are new as well. I then splattered the entire canvas with all the colors I used and stamped another script stamp with Adirondack Mushroom ink. 
I know I forgot some steps but I was in the zone and just kept trying different things. :) Carpe Diem right? Hugz! ~Niki

I would love to share this design with these challenges: 


Friday, January 15, 2016

DecoArt at SanDee&Amelie's

Hello y'all! Today starts another challenge at SanDee&Amelie's Steampunk challenge. There have been a few changes but I promise you'll like em. We start with our new sponsor-DecoArt! How cool is that? At SanDee&amelie's Steampunk Challenge, we have the great honour and pleasure of having gained DecoArt as our "one and only" prize sponsor from now on, the whole team decided to put a special spotlight on some of the fabulous products from their wide range of media and paints. 

So this month each DT member not only used DecoArt paints and media on her DT project, but also introduces more closely one of the products she has used. 


Here is what I decided to make. This is my first time trying this Andy Skinner technique (which you can see HERE) and of course I put my spin on it. Enjoy! This is going to be a long journey.
I have had this art journal for over a year and only have 4 pages done in it. So I decided to start with the cover thinking if it looked better, I would be more inclined to use it. Hehe! 
I added some texture paste through 2 stencils, the number stencil is from Andy Skinner. I then added some sand texture paste thus starting the painting technique showcased in the video by Andy Skinner. 
I kept adding paints making sure everything was dry between layers. 
Then came the clock and gear chipboard piece. I watched another video (HERE) and used this technique (first time trying this one as well) but changed up the colors. Yellow green for the base. 
Then Cobalt Turquoise Hue applied using a new texture stamp. This is where I added my own spin to the painting technique because I just kept adding color until I was happy. 
The clock/gear chippie was glued down with DecoArt Liqui Glass and then whitewashed with DecoArt Titanium White antiquing cream. 
This is what it looks like all put together with the rest of my Art journal. The picture above is closer to what it looks like in real life. I don't think the lighting does it justice though as it isn't this washed out and blurry (like the pic below shows). Darn photos. :) 
Here is a quick peek at the prize package you could win! You have to be "In it, to Win It!" Just remember to have fun and enjoy the process. Hugz and Carpe Diem! ~Niki
I would like to share this art journal cover with these lovely challenges:

(I have used 2 new techniques, and a new texture stamp)


(Anything Goes altered art)

(I used numbers, some of the colors from the board and plan to make time to use my art journal) 

(Anything Goes Altered Art/Mixed Media)

Thursday, October 15, 2015

Steampunk Skeleton and DecoArt

RHappy October y'all! Thank you to everyone that swings by my little blog and has a gander! And a big thank you to my new followers and my regulars!  Over at SanDee&Amelie's Steampunk Challenge we dare you to create something involving Top Hats and Moustaches. I am super duper excited for this challenge and without further adieu here is Mr. D. Debonair! He knows he looks good and he is the perfect gentleman, although a bit past his prime. :)
I started by making the top hat. If you would like to see more of the process for the hat HERE is a step by step. It all starts with craft foam and some scissors. 
This is the hat almost all glued together. Then the fun begins with paints and accessories! 

I wanted to showcase the DecoArt Media products. I don't have many of the mixed media line supplies (YET) but I make good use of what I have. All it takes is a good product and creativity! I started by painting the entire hat with DecoArt Media Fluid Carbon Black acrylic paint. Then I used DecoArt Media Crackle Paint, thin coats and thicker coats to get lots of different sized cracks and set it to the side to dry, naturally. No heat gun (it will warp the shape of the hat)! The craft foam soaks up paint so some splotches were used instead of covering everything up. 
I then added some lace leftover from my last project. Brads and an old piece of chain from a necklace were used to create the cross-stitched pattern on the front. I adhered the lace with DecoArt Media Matte Medium and added the black beaded piece around the bottom rim with my hot glue gun.
Who knew trying to find a skull stamp would be difficult this time of year?!? I did find this paper bag (set of 12) and knew I could fussy cut the skull out! Winning! I then placed it on the top of the hat and sealed it with DecoArt Media Matte Varnish (I varnished the entire hat before placing the lace).  
While the paper bag skull was drying on top of the hat, I used DecoArt Media White Gesso to paint a wash on the skull head. I wanted him less dirty looking. The picture below is before I painted him. 
I then added the feathers and brooch to the top hat and started working with polymer clay to create a moustache, an eyeball, and a mold of the brooch. This is my first time making any of these polymer clay creations! The eyeball was the most fun but kept rolling around on my art desk. Lol!
Once all the polymer clay elements were baked and cooled down, the details were added to each. I painted the eyeball with white acrylic paint and then added a wash of DecoArt Americana Camel to give the eye an aged look on the sclera. I added red acrylic paint to the iris and drew silver lines around the iris to show pigmentation. The pupil was painted black with a small white highlight to give it a gleam. Mr. D. Debonair's moustache was painted with DecoArt Dazzling Metallics-Shimmering Silver and then dry brushed over with the Carbon Black. I attached the monocle chain to the hat and glued it to the skeleton head with hot glue.
The neck tie bow was a piece of ribbon from my stash, it adds a little sumpthin, sumpthin. I used some Halloween rub ons for the base. The damask pattern is one of my favorites and I have been hoarding it since April!
I added some silver paint to create the small dots around the base and then some washi tape around the very bottom, along with the white bat, skull, spider, and eye.

Thank you for having a look see, and letting me know your thoughts on this design. I sure know that we all put a lot of work into our creations and feedback is greatly appreciated (the bad and the good)! The blog land I know, is a wonderful place, filled with so many creative and inventive peeps! Carpe Diem! ~Niki

I am stoked to be sharing this creation with these wonderful challenges please:


I used the Tic Tac Toe of Halloween (my entire design), Time (a couple of weeks to finish this piece),
Red (the rose and the eye)

Scrapbook.com-October Spooktacular Challenge-Use 1 piece of Bling OR washi tape
I used washi tape around the bottom of the base and also Bling in the form of the cross chain pattern on the front of the hat, as well as the Brooch.