Cheerio mates! I am super excited to be here today as a Guest Designer for the fabulous mixed media challenge blog,
Try It on Tuesday! The challenges are always anything goes medium, but the theme changes so you can make anything (ATCs, scrapbook page, journal LO, tag, OTP, or anything your heart desires) that follows the theme. When Avril asked me to do a guest spot, I happily accepted and was anxious to see what the theme was! The theme for this challenge is
HATS! I am thrilled to share my latest creation with you all!
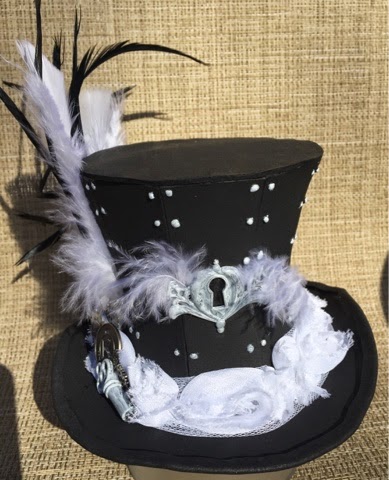
At the beginning of this month I shared with you my first attempt at making a mini top hat as I was preparing for this challenge. This mini top hat featured today is taller than the first, but the process was just as much fun!
I started with my hat template from
LostWax and cut out my pattern using crafters foam. I used red and black foam this time but it doesn't matter what color you use unless you are going to do a white hat, as everything gets covered with paint. Cutting the pattern with precision is key! Using contact cement to glue everything together is very important!
The first step to beautifying this hat was to add the rivets. These were made with Perfect Pearls (I used white but it doesn't matter the color because it gets painted over) then I Gesso'd the whole thing and after it was completely dry, I painted the entire hat with black acrylic paint. Yes, I paint the entire inside of the hat as well because my crafters foam will range in color.
After the black paint was completely dry I went back over the rivets with Marble Vintaj Patina paint. Most of my metal embellies and Tim Holtz trinkets, were also painted with the Marble Vintaj as well. I then added the keyhole and feathers to the front of the hat.
I wanted to use items I had in my stash and not buy anything for this project so I found some rose lace (a gift from a previous swap) and added that to the bottom of the hat with Tombow Multi glue. While the glue was setting up I added my white and black feathers to create some elegance.
After the feathers were held in check, I added the metal embellies and clock pieces.
I then added the black damask ribbon bow on the back because I just love the damask pattern.
The following pictures were taken using different angles, lighting, and settings.
These hats are just fun to make! The possibilities are endless and I am up to my ears with ideas! I do hope you enjoyed this post! Carpe Diem and Happy Crafting!
If you would like to enter this challenge at Try It on Tuesday click
HERE. The DT are just a wonderfully talented group and the challenges are fun!
Thank you for stopping by and leaving your lovely comments! I treasure each and every one and look forward to "meeting" you! Hugz! ~Niki
This project will be shared with the following wonderful challenges:
A Vintage Journey-Anything Tim!
HERE I always think of Top Hats when I think of Tim Holtz so I made a top hat.
Country View Challenges-Anything Goes
HERE Happy Blogaversary #2!
Mixed Media World-Anything Goes
HERE
Beyond Grey Challenges-#66 Mixed Media with more than one medium.
HERE I used Gesso, black acrylic paint, Vintaj Patina Paint, and Perfect Pearls.