Showing posts with label feathers. Show all posts

Thursday, August 31, 2017

Elegant in Gray

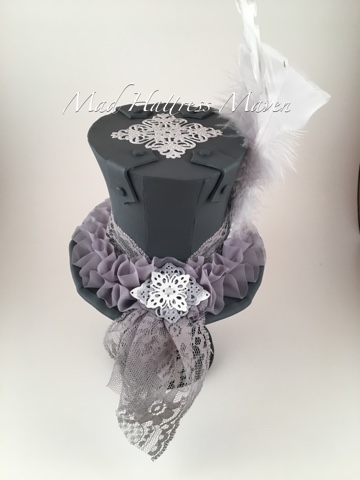
Gray is one of my favorite colors and I have incorporated it into my entire house. Gray and grey can be used interchangeably and that is okay by me. I wanted to make an elegant gray top hat that is more feminine and had some lace and frills. Here is the end result.  
I was lucky enough to be asked to be a guest designer at Xanderous Crafty Stash again and have used metal pieces from there. All of the metal pieces were heat embossed using a mix of white, gray, and silver embossing powders. I layered the metal pieces to create a flower look and used a brad for the middle. 
The hat was painted silver gray in layers. I wanted to make sure the hat had a nice even coat of paint over it. The inside of the hat was painted as well. The lace was adhered to the hat with hot glue and shaped to form around the base of the hat.
The little rivets that are on the top of the hat with the bands are made using a hole punch and glued with glossy accents. This hat was meant to look crisp, clean and ready for a photo shoot.
The largest feather was curled using some tricks I have learned about working with feathers. It creates such a wonderful added dimension to the feather cluster. And feathers can also be colored using food coloring (more about that later).
This mini top hat is the most frilly hat I have designed so far. I do have to say that I like the overall look and feel of the hat. Using quality lace was a must. I don't like that itchy lace stuff!
The back of the hat (above picture) features another metal flower cluster. The lace was gathered in the back and draped over the edge for a nice Victorian feel. And that lace is so soft!
The top view of the hat shows the "rivets" better. Just a regular old one hole punch produced these rivets. You don't need anything fancy to make em.
This side view of the hat shows the gathering of the lace around the base of the hat. Because the hat has a curve to it, I had to figure out a way for the lace to lay flat. By gathering the lace at the back of the hat and only gluing the bottom of the lace, I was able to form it better. Trial and error. Haha! I so enjoy making these hats and trying different designs. The sky really is the limit for my designs. I hope you enjoyed!

I would like to share this altered mini top hat with these amazing challenges:


Tuesday, August 15, 2017

Dark Harlequin Mini Top Hat

It sure has been a bit since I made a mini top hat. I have been itching to design a new one. With a new challenge at Mix It Up, I figured this would be a great time to get started! I didn't use the twist of Paper Piecing but the stencil sure was pieced together!
I started with my usual craft foam and drew out the template. Then I painted everything with red acrylic paint (2 layers) and grabbed a Tim Holtz Harlequin stencil. I used black texture paste through the stencil.

Once the texture paste was dry, I cut out the different pieces. The hardest part was waiting for the texture paste to dry! I didn't use a heat tool because the foam will change shape. 
I glued all the pieces together with contact cement. That is the ONLY glue that will hold this hat together. Nope, don't try hot glue. It doesn't work well.

I grabbed some metal pendants and such from my stash and used black alcohol ink on the pendant hanging on the front of the hat. The skull is from Emerald Creek and I applied Snow Cap AI to it. 
The "ribbon" around the base of the hat is leftovers from another project. I also made a little bow out of it.
The skull lady pendant is from Tim Holtz. The feathers were glued together and shaped with the back of my dull scissors. The skeleton hand is leftover from Halloween and painted black with white highlights for the bones.
The top of this hat has a Creative Embellishment rose chippie. I used Emerald Creek Classic embossing powder-Candy Red and adhered it with Tombow glue. Ta-da! Sounds easy but this took me awhile to create. Carpe Diem! ~Niki

I want to share this design with these wonderful challenges:

My process is the making of a hat from scratch. Try it! You won't be disappointed. 


Monday, May 15, 2017

Mix It Up!

Today is the day that the Mix It Up challenge blog goes live with the first challenge and Team B's projects. We are a monthly technique challenge blog featuring various techniques on mixed media projects, altered art, and paper crafts such as cards, tags, mini albums, ATCs, 3-D projects and scrapbook layouts! Are you excited? I sure am! We would love to see you enter this challenge and it's a good one. The challenge is to use embossing. You can do heat embossing, dry embossing, or think outside the box as well.
I started with a canvas and glued a piece of paper to it. Not sure of the designer of the paper though. Then I used a chicken wire stencil and some adirondack ink to add some interest. Pinks, purples and Blues were my main colors.
The frame chippie is from Creative Embellishments and I painted acrylic paint in two colors. Once the paint was dry I stamped some script stamps onto it with adirondack Watering Can ink. The frame was popped up on foam dots.  The feathers, bits of flowers and bits of picks were from my stash. I did end up adding some stamping to the feathers. The little jar is filled with magical fairy dust (embossing powder) and the lid was glued and a bow added to it. The butterfly is from Reneaboquets store. 
I used two different colors of embossing powder through the CW stencil. Layering powders is a fun way to create new color combos and enjoy your powders. 
The clock mold in the top right corner is made from an IOD mold and polymer clay (I prefer clay that needs to be baked). I painted it pink and then applied white antiquing cream to it. Smudged some ink in it and glued it to the cheesecloth. Then added another flower cluster. And ta-da! Done!
Looks different in the sunlight in the picture below. It is more true to color in the picture above. 
Enjoy the journey and Carpe Diem! Hugz! ~Niki

I would like to share this canvas with these amazing challenges:

I need to learn to explore outside of my comfort zone. 


I used stencils, embossing, and about 4 different stamps on the background


I used about 4 different stamps on the background and 2 different stamps on the flowers and the chippie frame


Friday, February 5, 2016

Grungy Love at Anything But Cute #10

Well it's that time of the year where Cupid is flying around acting all sorts of crazy. So at Anything But Cute #10 we are celebrating love-grunge style! Our fantabulously amazing hostess this month is: Sara Emily of Sara's Closet and here's what she would like to see: To celebrate Valentine's Day, we would like to see you make a Grungy Valentine's project for your sweetheart! It can be a card, tag, or anything else you might give a loved one to show them how much you care. Just be sure it's Grungy!


I decided to try mending a heart (artistically). My best friend just had an 8 year relationship end and I thought she might be cheered up with this design. Her Destination in love is Unknown as of now, but I am confident she will find the right dude!
I started with a 5x7 canvas and used the TCW brick stencil then made my heart out of cardboard and some of the Cold Country papers. Love that paper set! I then added some holes so I could stitch my heart back together. I used elastic thread and a rather large needle so I could double up on the thread and my fingers wouldn't hurt so bad. The holes were pre-punched with a hammer and a nail. Smashing success it was! Lol

I then sprayed my canvas with some black DecoArt spray and wiped off the excess. When that was dry, I sprayed with some Colour Arte Primary Elements-Hunter Gray that I put in a mini mister. Random bricks were painted with Silks-Black Emerald (my new favorite color!) and some were painted with white acrylic paint. I added the hooks in the bottom left corner with Glossy Accents. 
I wasn't sure where to go next with this design, so I walked away for a bit. When I came back to the canvas it screamed at me-flowers! I am not a big flower person but that is what my canvas was telling me. So, I went to my small flower stash and pulled out a few and painted those with the Colour Arte-Black Emerald as well. The feather was inked with Alcohol ink and then lightly dry washed with the Emerald Black. I added some Black Prima Art Ingredients Mico Beads with Mod Podge.
The "corset" lace up was a blast to make and something I am going to be doing again and again, and maybe again. I used embroidery floss doubled up and tied it into a bow. The bow was glued to the canvas just in case, I didn't want it to come apart and fall off. The entire canvas was then splattered with white and black acrylic paints. I covered the heart, flowers, and corset with scrap papers so it would stay nice and clean while splattering. The plaque at the top is chipboard and stamped with my sentiment, with brads in the corners and the edges are dabbed with black acrylic paint. I sure hope you enjoyed this design as much as I did making it. My new favorite piece. Don't forget to see what my amazeballs teamies have come up with for their Grungy Love designs! What will you be making?

Come to think of it, those hooks look like what you see on your bra, hmmm, well I believe I used these bra hooks in a more unusual way. :) Hugz and Carpe Diem! ~Niki

I would love to share this canvas with these delightful challenges:


Saturday, December 5, 2015

You've Got Happy Mail! #8 at Anything But Cute

Can y'all believe it is December already!?! December is too cold for me where I live but Christmas is my favorite holiday! The lights, the atmosphere, the cozy fires, and the Happy Mail all make this time of year special. With that in mind I wanted to create a challenge for you lovelies to share some of that Happy Mail. I am your hostess this month over at Anything But Cute and our challenge #8 is:

We all like Happy Mail right? That feeling of being spoiled rotten when you receive a handmade card from someone is better than being wrapped up in a soft blanket near a fire, sipping on a hot latte. So, for this challenge I would love to see some mixed media Christmas cards, tags, ATC's or whatever papercraft you are mailing to a friend, inspired by the spirit of the season! Happy Holidays and Merry Christmas! 

I'll be completely honest here-making Cards scares me! There, I said it. I have no rational explanation for this but it is true. I have done a few in the past but nothing crazy. So, I wanted to challenge myself and cards it was! For this design I decided to go non-traditional for Christmas. Black/White/Red are my fave color combo (I even used it for my wedding) and the Damask print is my fave as well (also used for my wedding).I started by painting some cardboard pieces with Black Gesso and then applied DecoArt Liquid Glass to get the shine. I kept telling my mind I was making a plaque. :)


The Damask background was inspired by Samra's design (HERE) and also my love of the pattern. It is a TH stencil, with DecoArt crackle paste applied through it. I added some Distress Rock candy to the paste while it was wet and set it aside to dry naturally. 
The wreath is part of a feather boa than I cut apart and glued to a round template I made. I just used the bottom of a cup and traced around it. :) I then used my new MS branch punch and metallic red cardstock to create the blinged branches peeking through the feathers. The snowflake in the center is a BoBunny design that is heat embossed with Red Tinsel EP. 
Here is a close up of the Damask crackle and Distress Rock candy. Awesome sauce! 
The back of the card was heat embossed with a TH stamp and Black Tinsel EP then edged with Black Soot DI. My thoughts are still with Paris and the horrible attacks. They stood behind America during our September 11th attacks and we stand by them. 

I made the base of the card with some matboard, not sure if this is suitable for cardmaking but it sure is sturdy! The inside of the card has a sentiment stamped and this will be mailed out to a dear friend. I don't seem to have the best of luck with the parcel service. Lol!

Spread the Happy Mail cheer and join in on the fun! I know how happy I get when there is a package in the mail for me. A big thank you to all of my peeps and to my new peeps! You all are so very sweet and the positive reinforcement comments sure make me happy as well. Hugz! Happy Crafting and Carpe Diem!
HAPPY HOLIDAYS AND MERRY CHRISTMAS 

I would love to share this card with these amazing challenge


Thursday, October 15, 2015

Steampunk Skeleton and DecoArt

RHappy October y'all! Thank you to everyone that swings by my little blog and has a gander! And a big thank you to my new followers and my regulars!  Over at SanDee&Amelie's Steampunk Challenge we dare you to create something involving Top Hats and Moustaches. I am super duper excited for this challenge and without further adieu here is Mr. D. Debonair! He knows he looks good and he is the perfect gentleman, although a bit past his prime. :)
I started by making the top hat. If you would like to see more of the process for the hat HERE is a step by step. It all starts with craft foam and some scissors. 
This is the hat almost all glued together. Then the fun begins with paints and accessories! 

I wanted to showcase the DecoArt Media products. I don't have many of the mixed media line supplies (YET) but I make good use of what I have. All it takes is a good product and creativity! I started by painting the entire hat with DecoArt Media Fluid Carbon Black acrylic paint. Then I used DecoArt Media Crackle Paint, thin coats and thicker coats to get lots of different sized cracks and set it to the side to dry, naturally. No heat gun (it will warp the shape of the hat)! The craft foam soaks up paint so some splotches were used instead of covering everything up. 
I then added some lace leftover from my last project. Brads and an old piece of chain from a necklace were used to create the cross-stitched pattern on the front. I adhered the lace with DecoArt Media Matte Medium and added the black beaded piece around the bottom rim with my hot glue gun.
Who knew trying to find a skull stamp would be difficult this time of year?!? I did find this paper bag (set of 12) and knew I could fussy cut the skull out! Winning! I then placed it on the top of the hat and sealed it with DecoArt Media Matte Varnish (I varnished the entire hat before placing the lace).  
While the paper bag skull was drying on top of the hat, I used DecoArt Media White Gesso to paint a wash on the skull head. I wanted him less dirty looking. The picture below is before I painted him. 
I then added the feathers and brooch to the top hat and started working with polymer clay to create a moustache, an eyeball, and a mold of the brooch. This is my first time making any of these polymer clay creations! The eyeball was the most fun but kept rolling around on my art desk. Lol!
Once all the polymer clay elements were baked and cooled down, the details were added to each. I painted the eyeball with white acrylic paint and then added a wash of DecoArt Americana Camel to give the eye an aged look on the sclera. I added red acrylic paint to the iris and drew silver lines around the iris to show pigmentation. The pupil was painted black with a small white highlight to give it a gleam. Mr. D. Debonair's moustache was painted with DecoArt Dazzling Metallics-Shimmering Silver and then dry brushed over with the Carbon Black. I attached the monocle chain to the hat and glued it to the skeleton head with hot glue.
The neck tie bow was a piece of ribbon from my stash, it adds a little sumpthin, sumpthin. I used some Halloween rub ons for the base. The damask pattern is one of my favorites and I have been hoarding it since April!
I added some silver paint to create the small dots around the base and then some washi tape around the very bottom, along with the white bat, skull, spider, and eye.

Thank you for having a look see, and letting me know your thoughts on this design. I sure know that we all put a lot of work into our creations and feedback is greatly appreciated (the bad and the good)! The blog land I know, is a wonderful place, filled with so many creative and inventive peeps! Carpe Diem! ~Niki

I am stoked to be sharing this creation with these wonderful challenges please:


I used the Tic Tac Toe of Halloween (my entire design), Time (a couple of weeks to finish this piece),
Red (the rose and the eye)

Scrapbook.com-October Spooktacular Challenge-Use 1 piece of Bling OR washi tape
I used washi tape around the bottom of the base and also Bling in the form of the cross chain pattern on the front of the hat, as well as the Brooch.


Tuesday, March 17, 2015

Mini Hat and Guest Designer for Try It On Tuesday

Cheerio mates! I am super excited to be here today as a Guest Designer for the fabulous mixed media challenge blog, Try It on Tuesday! The challenges are always anything goes medium, but the theme changes so you can make anything (ATCs, scrapbook page, journal LO, tag, OTP, or anything your heart desires) that follows the theme. When Avril asked me to do a guest spot, I happily accepted and was anxious to see what the theme was! The theme for this challenge is HATS! I am thrilled to share my latest creation with you all!

At the beginning of this month I shared with you my first attempt at making a mini top hat as I was preparing for this challenge. This mini top hat featured today is taller than the first, but the process was just as much fun!

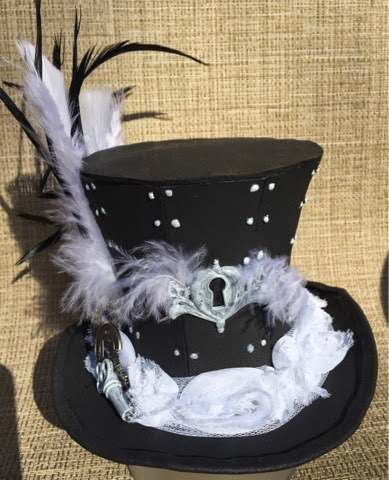
I started with my hat template from LostWax and cut out my pattern using crafters foam. I used red and black foam this time but it doesn't matter what color you use unless you are going to do a white hat, as everything gets covered with paint.  Cutting the pattern with precision is key! Using contact cement to glue everything together is very important! 

The first step to beautifying this hat was to add the rivets. These were made with Perfect Pearls (I used white but it doesn't matter the color because it gets painted over) then I Gesso'd the whole thing and after it was completely dry, I painted the entire hat with black acrylic paint. Yes, I paint the entire inside of the hat as well because my crafters foam will range in color. 

After the black paint was completely dry I went back over the rivets with Marble Vintaj Patina paint. Most of my metal embellies and Tim Holtz trinkets, were also painted with the Marble Vintaj as well. I then added the keyhole and feathers to the front of the hat. 

I wanted to use items I had in my stash and not buy anything for this project so I found some rose lace (a gift from a previous swap) and added that to the bottom of the hat with Tombow Multi glue. While the glue was setting up I added my white and black feathers to create some elegance. 

After the feathers were held in check, I added the metal embellies and clock pieces. 

I then added the black damask ribbon bow on the back because I just love the damask pattern. 

The following pictures were taken using different angles, lighting, and settings. 


These hats are just fun to make! The possibilities are endless and I am up to my ears with ideas! I do hope you enjoyed this post! Carpe Diem and Happy Crafting!

If you would like to enter this challenge at Try It on Tuesday click HERE. The DT are just a wonderfully talented group and the challenges are fun!

Thank you for stopping by and leaving your lovely comments! I treasure each and every one and look forward to "meeting" you! Hugz! ~Niki 

This project will be shared with the following wonderful challenges:

A Vintage Journey-Anything Tim! HERE I always think of Top Hats when I think of Tim Holtz so I made a top hat.

Country View Challenges-Anything Goes HERE Happy Blogaversary #2!

Mixed Media World-Anything Goes HERE

Beyond Grey Challenges-#66 Mixed Media with more than one medium. HERE I used Gesso, black acrylic paint, Vintaj Patina Paint, and Perfect Pearls.