Showing posts with label design team. Show all posts

Sunday, October 1, 2017

Vampire Hunter Journal

What a wonderful October! So happy that Halloween is so close (even though I will be spending this Halloween in the hospital with my husband while he gets a new hip). I have wanted to create a Vampire Hunting Kit for almost 2 years now and figured with the new challenge at Mix It Up, this would be the perfect time to get a start on it. And every hunting kit needs a journal, or two or three journals! Happy October y'all!
I started with a piece of leather and embossed it with a new embossing folder. You can't really see the embossing well in these photos and in retrospect, it looks like the leather didn't take the embossing well. Lesson learned.
I then hand bound 20 white 82lb pages with wax thread and added those to the inside of the journal because lets be honest, who the heck would want the pages outside the journal? Not me! Defeats the purpose. I am in a weird mood while writing this. Haha!
While the pages were sewn into the journal, I added a Tim Holtz metal tag to the seam of the outside of the journal. Nothing fancy, just some knots to make it stay in place.
This vampire hunting journal was downloaded from How to Haunt Your House (they have some amazing downloads for Halloween!) I printed it on a laser printer and then bound it just like the leather journal. Each page was distressed and grunged up.
I used some distress inks, distress stains, archival inks, acrylic paints for splatters, and even some dirt from my yard. The edges of the journal were given an aged look with a pair of scissors. I think I pulled out all of my browns, yellows, and dark colors and just kept layering until I liked the look.
The pages with a vampire that have been killed are highlighted with a red skull and a capital D. The book tells you how to kill the supernatural and also who is deceased. Such a cool and interesting read.
I had to add some red alcohol ink and red distress ink to each page to give it a sinister feel. If any Vampire Hunter had a journal, it sure wouldn't look all nice a pristine! Hard work means dirty items! Bwahaha!
Hopefully you all have a wonderful and fun October! I know I will be adding to my vampire hunting kit, guess you will just have to visit again if you want to see what else is going to be in the kit! Carpe Diem! Thanks for reading and visiting! HAPPY HALLOWEEN!

I would like to share this with these challenges:


I was inspired by the quote. "Give it a try said the heart". I have been wanting to make this and finally gave it a try! 

Monday, May 15, 2017

Mix It Up!

Today is the day that the Mix It Up challenge blog goes live with the first challenge and Team B's projects. We are a monthly technique challenge blog featuring various techniques on mixed media projects, altered art, and paper crafts such as cards, tags, mini albums, ATCs, 3-D projects and scrapbook layouts! Are you excited? I sure am! We would love to see you enter this challenge and it's a good one. The challenge is to use embossing. You can do heat embossing, dry embossing, or think outside the box as well.
I started with a canvas and glued a piece of paper to it. Not sure of the designer of the paper though. Then I used a chicken wire stencil and some adirondack ink to add some interest. Pinks, purples and Blues were my main colors.
The frame chippie is from Creative Embellishments and I painted acrylic paint in two colors. Once the paint was dry I stamped some script stamps onto it with adirondack Watering Can ink. The frame was popped up on foam dots.  The feathers, bits of flowers and bits of picks were from my stash. I did end up adding some stamping to the feathers. The little jar is filled with magical fairy dust (embossing powder) and the lid was glued and a bow added to it. The butterfly is from Reneaboquets store. 
I used two different colors of embossing powder through the CW stencil. Layering powders is a fun way to create new color combos and enjoy your powders. 
The clock mold in the top right corner is made from an IOD mold and polymer clay (I prefer clay that needs to be baked). I painted it pink and then applied white antiquing cream to it. Smudged some ink in it and glued it to the cheesecloth. Then added another flower cluster. And ta-da! Done!
Looks different in the sunlight in the picture below. It is more true to color in the picture above. 
Enjoy the journey and Carpe Diem! Hugz! ~Niki

I would like to share this canvas with these amazing challenges:

I need to learn to explore outside of my comfort zone. 


I used stencils, embossing, and about 4 different stamps on the background


I used about 4 different stamps on the background and 2 different stamps on the flowers and the chippie frame


Sunday, April 9, 2017

New Challenge Blog!

Why hello there crafty people's. I sure hope your weekend is going well. I have some BIG news to share about a new blog in blogland. It's called Mix It Up Challenge. This is a technique based challenge blog that will make you want to try new things. Cool right? Yeppers. I happen to be on the Design Team (yippee!) and just wanted to share the news.
The challenges start in May but we are doing a "Just For Fun" challenge for April.  You can design anything your heart wants. Mix It Up and try something new if you feel up for it. Anything Goes with this Just For Fun challenge. And you can also become a follower. You could even possibly win a prize! Awesome sauce! 

Click HERE for the link to the challenge.


Happy Crafting and Carpe Diem! Hugz. ~Niki


Thursday, May 26, 2016

Sneaky peek-Anything But Cute Tutorial

Hello lovelies! I hope today finds you all in good spirits and with a happy smile on our face! I am sharing a few tips and tricks over at Anything But Cute for our Spotlight Artist post today, using a most wonderful medium for your mixed media makes! Find out more about this tutorial by visiting here! The picture below is just one of numerous ways to use this product. Enjoy!
And don't forget to join our current challenge "Celebrate Your Style" that runs until June 4th! Our awesome sauce sponsors Alleystamp, Emerald Creek and The Funkie Junkie are giving away some FANTASMIC prizes! Hugz and Carpe Diem! ~Niki

Friday, February 20, 2015

Steampunk Design Team and Giveaway!

Hello and happy day to you all! my exciting exciting news day is here! I am so very excited and thrilled that I am now on the Design Team for Sandee&Amelie's Steampunk Challenge!

We all know that I really love Steampunk and try to incorporate it into most of my designs so this is the perfect team for me! If you haven't checked out this Steampunk blog head on over HERE or click under my DT badge at the bottom of this post and it will take you to the challenge blog. Never tried Steamounk before? It is okay. We welcome all makes and manners of Steampunk inspired art. Want to win a prize? You have to be in it to win it!

As a way to say hello and thank you, I decided to make something! 

I am going to give this tag to one of my amazing followers (due to shipping costs I can only ship to USA). Just leave a comment and I will announce the winner next week. I purposefully left most of this tag blank so the winner could add to it. 

Hopefully you will check out our challenge and Steampunk it up! Carpe Diem!
My first DT badge! How cool is that? Steampunk cool!


Monday, September 1, 2014

Falling Leaves

Hello! I started this project with a mad hatter theme in mind but switched it up to Fall to fit with the theme for Mixed Media Mojo-Fall/paste, where I am a new Design Team member. Thrilled is not even close to how happy I am to be with this team! Enjoy!

First I use gesso on my 8x10 canvas, then painted small strips of blue to show the "sky" between the wood panels I applied. 

The wood panels were made out of chipboard. I used a Mod Podge stencil and made my texture paste a light brown color. I use homemade texture paste made from baby powder, white acrylic paint and Elmer's glue. I then added a layer of gesso over that, dried it and then used Archival brown ink to add some color. 

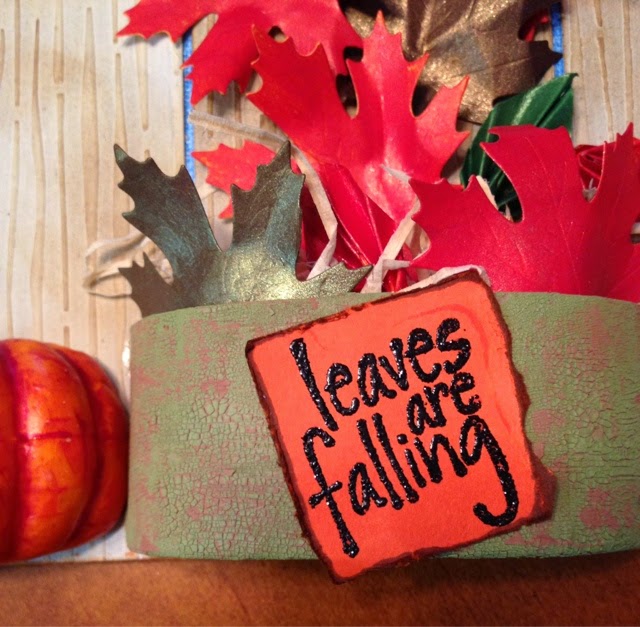
I cut out plenty of leaves with my Cuttlebug using a Momenta die from Hobby Lobby. The pumpkin was from the Dollar Tree, I just cut it in half and painted it with Silks Spiced Pumpkin. The original pumpkin is the bottom one. 

I found these amazing top hats and bought every last one they had (4 total, lol!) because I knew I could do lots with it. I cut the hat in half and sprayed the hat with Smooch Spritz copper (not a fan of their bottles-too messy but the color is wonderful) and added a red stitching design, a leaf, and a gold band to fill it out. 

Next comes the box holding the leaves. I purchased this with the top hats. I applied Distress Crackle paint in Peeled Paint and Vintage Photo to the box and added  the words "Leaves are Falling". I embossed the words with black glittery embossing powder and edged the orange paper with brown Archival ink. Adding the straw (Dollar Tree) put the finishing touch on this box. 

Thanks for stopping by and leaving your lovely comments, it brightens my day! Carpe Diem!~€

I will be sharing this project with the following:

Rhedds Creative Spirit-Anything Goes. HERE

Artistic Stamper-Autumn Colors and use a rubber stamp HERE My stamp in Leaves are Falling that I embossed.

Inspiration Journal-Fall is in the Air HERE

Try It on Tuesdays-Use Your Stash HERE. I have had the leaf die cut in my stash but never thought I would use it. Thank goodness I had it and the orange construction paper is from an art class I took in High School, yes, I save everything art related and orange is not a favorite color for me. :)

Altered Eclectics-Anything Goes HERE