Showing posts with label gears. Show all posts

Sunday, May 15, 2016

Mini Anxiety Art Book

Hello lovelies! Today is the middle of the month reminder for our challenge over at SanDee&Amelie's Steampunk challenge.  You can create anything industrial/steampunk. Let your mind go and have fun! Here's what I came up with.
 I wanted to share a new idea I had and also tell you a little bit about myself in the process. This idea was generated because of a recent diagnosis that I got. I knew I was having problems breathing and my heart felt like it might run right out of my chest, not to mention the sweaty hands and constant barrage of questions in my head. I felt hopeless and confused because I know I am a strong person. So what in the world was happening to me? My wonderful DH convinced me to go see a Doc. That was an event in itself and a story for another day. The 3rd Doc I ended up going to (all in the same day) told me I had anxiety and was having a full blown anxiety attack. We talked for a bit and she mentioned medication and also possibly seeing a therapist. I declined the therapist and asked if I could do something else. She said sure. So I can up with this idea to do an Anxiety Book. This is a small enough (3.5x2.5) book to carry around with me and I can draw in it, write in it, scribble, or even throw it. Lol! Now you know where the idea came from and here's the process.

I started by cutting some brown leather paper and then embossed it. Then I cut some pages down to size. I don't measure stuff with a ruler, mostly by eyeballing it. I made 4 signatures and then got to binding my book. It took a few mistakes that had to be corrected but I get er done. 

Then out came some distress inks and metal elements. The silver flourish frame was brushed with Frank Garcia Artisan powder-La Chapelier ,as were the gears piece. 

I added some springs the the metal pieces. A couple of stencils from Andy Skinner and some stamps on the inside cover. The corner pieces were bright silver stickers that I applied Alcohol ink to. 

And a small closure that I sewed to the back with a Finnabair mini knob on the front to keep the book closed. Below is a picture of the binding. 

I have only done 1 page in my anxiety book. I used a TH stamp and cut the heart out and raised it with small foam dots. I hand wrote the word Brave in pencil, not totally brave enough to write it in pen yet, but I feel brave sharing this and brave going to the doctor. 


I plan on sharing this design with these amazing challenges: 


I used real hand stitching on the Coptic binding and to add the elastic closure.


Remember to Steampunk it up and have an amazing day! Hugz and Carpe Diem! ~Niki

Friday, January 15, 2016

DecoArt at SanDee&Amelie's

Hello y'all! Today starts another challenge at SanDee&Amelie's Steampunk challenge. There have been a few changes but I promise you'll like em. We start with our new sponsor-DecoArt! How cool is that? At SanDee&amelie's Steampunk Challenge, we have the great honour and pleasure of having gained DecoArt as our "one and only" prize sponsor from now on, the whole team decided to put a special spotlight on some of the fabulous products from their wide range of media and paints. 

So this month each DT member not only used DecoArt paints and media on her DT project, but also introduces more closely one of the products she has used. 


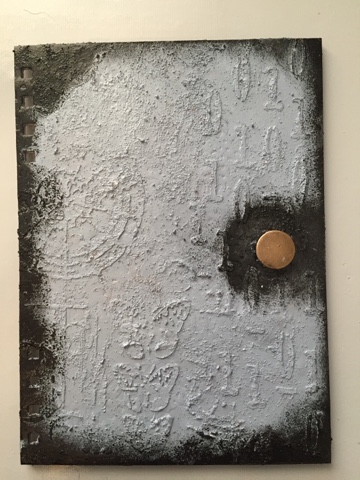
Here is what I decided to make. This is my first time trying this Andy Skinner technique (which you can see HERE) and of course I put my spin on it. Enjoy! This is going to be a long journey.
I have had this art journal for over a year and only have 4 pages done in it. So I decided to start with the cover thinking if it looked better, I would be more inclined to use it. Hehe! 
I added some texture paste through 2 stencils, the number stencil is from Andy Skinner. I then added some sand texture paste thus starting the painting technique showcased in the video by Andy Skinner. 
I kept adding paints making sure everything was dry between layers. 
Then came the clock and gear chipboard piece. I watched another video (HERE) and used this technique (first time trying this one as well) but changed up the colors. Yellow green for the base. 
Then Cobalt Turquoise Hue applied using a new texture stamp. This is where I added my own spin to the painting technique because I just kept adding color until I was happy. 
The clock/gear chippie was glued down with DecoArt Liqui Glass and then whitewashed with DecoArt Titanium White antiquing cream. 
This is what it looks like all put together with the rest of my Art journal. The picture above is closer to what it looks like in real life. I don't think the lighting does it justice though as it isn't this washed out and blurry (like the pic below shows). Darn photos. :) 
Here is a quick peek at the prize package you could win! You have to be "In it, to Win It!" Just remember to have fun and enjoy the process. Hugz and Carpe Diem! ~Niki
I would like to share this art journal cover with these lovely challenges:

(I have used 2 new techniques, and a new texture stamp)


(Anything Goes altered art)

(I used numbers, some of the colors from the board and plan to make time to use my art journal) 

(Anything Goes Altered Art/Mixed Media)

Tuesday, September 1, 2015

Tag It!

Hello one and all! Hooray for September! I have been looking forward to this month since April! My birthday present was: tickets to ComiCon! Yippee! Excited dance! My first time going. So I made this tag with my birthday celebration in mind.

Anyway, this month sees another awesome sauce challenge at SanDee&Amelie's Steampunk challenge. You all know how to make a tag right? Join us for Tag It! Create a tag that is vintage, industrial and/or Steampunk. Easy peasy no? 

I decided to put some color into my tag and not use my comfort palette of rust and patinas. The background was stamped and then heat embossed with Snow EP. 
I then added Cracked Pistachio to the middle to draw your eye to those gorgeous Steampunk'd butterflies (thanks Debbie!)

The outside color is Rust (couldn't stay away Lol) DI and edged the tag with Hickory Smoke DI. I added black cardstock as a backing and to give it more depth, this is a first for me.

The ribbon bow was made with my Bowdabra and inked with the same Cracked Pistachio. First time I have ever used a bow like this on anything except a Christmas gift. The middle embellishment on the bow is a metal rose. 

This tag was a blast to make because I didn't have much of a plan and wasn't sure what it would look like. The journey was the destination. Haha! 

Hope to see you all join in the tag-erific fun! Hugz! ~Niki

I am going to pass this tag around to the following challenges:

Mixed Media World #6-Gorgeous Textures

Anything But a Card Challenge #50-CELEBRATION This is their last challenge but they want to go out with a Bang so we should help make it happen!


Friday, June 19, 2015

Fathers Day

Hello all and welcome to a crazy post. My laptop decided to catch on fire last night so this post may be a bit wonky as I am doing it from my phone. Hehe! Craft on right?

I had to make a Fathers Day card because I have never made one and my Pop will be very surprised to see this. He has everything he could possibly want so this is my gift to him. :)

I started with a cardboard base and then used some Tattered Times paper as the first layer. Then I dry embossed some white cardstock with a new SpellBinders EF and added Distress Inks and LSG sprays. 

The chippboard pieces were painted black and then I added Twisted Citron Distress Ink over it to give it a greenish look. I stamped a script stamp here and there for interest using Black Archival Ink. 

I wanted to do a different take on a Fathers Day card so I used the word Father to create words that describes my father. 
Of course "awesome" would be included. It is one of my go to words. Haha! 

I then added a clock and gear I have been hoarding (special occasion and all) and the clock hands. 
The nail heads were made using crafters foam and my scissors made a tiny cut in the middle (I learned this sweet technique from Bubbles aka Pamellia). Painted those with DP and DI. 

Awesome sauce! I hope Pop likes it. He would kill me (not really) if he knew I called him Pop. Lol! 

I will add a handmade gift card for one homemade meal made by me for his other gift. Grilled steaks sounds awesome right now. Yummy! 

 Thanks for stopping by! Carpe Diem! ~Niki

I would like to share this piece with the following challenges: 


Sprinkle of Imagination-Anything Goes. I used Distress Paints and Ink and black Archival Ink. 

Monday, June 15, 2015

Ravaged Patina

So happy to share this piece with you all because it is one of my new favorites and also because I tried so many new ideas and techniques! The challenge at SanDee&Amelies Steampunk Challenge this month is-Ravages of Time. Think of crackle, patina, rust, worn out, peeled paint, peeling wallpaper, kapeesh?


This piece started out quite dull and un-interesting but the awesome part is a crafty friend of mine gave it to me to see what I could turn it into. Phone not included. Lol

I painted the box with black gesso and while it was wet added some white tissue paper to create some texture. Then sealed it with matte mod podge. 
While that was drying I started on the clock face, a Creative Embellishment chippie (love their Steampunk collection!). I added special effect paste and texture sand randomly to give it, well, Texture! :)
Once it was dry I used my finger to "paint" gold modeling creme over the entire piece. The bad news is I forgot to take pictures of the painting process because I was in the Zone! I spritzed and sprayed it with everything but the kitchen sink. 

Add some Cheery Lynn gears and cogs (I believe that a Tim Holtz cog is in there as well) with some foam dots to create depth of the gears and painted those the same way as the clock, kinda. 

To achieve a patina look I decided to do my own version, as I couldn't find any tutorial that suited what I saw in my mind.  I just kept adding and dabbing sprays, mists, Inka gold, Silks, and distress paint until I was happy. 

Here are some of the supplies I used, but not even 1/10 of everything I used. :)

I then swiped black StazOn to the raised tissue paper for definition. 

The last item added was the "time" sticker and "love the journey" rub in the bottom right corner. 

Here are some close ups and more pics:
Love that texture!
Depth and layers. 
Sun
It is amazing how different this patina looks in the sun vs indoors. Amazeballs!


I have never said this before about a piece I have made BUT-the pictures do not do it justice! Hopefully you are inspired to join in the fun at our Steampunk corner! 


Thank you to all that have read through this entire post, I know it is a long one! Hugz and Carpe Diem! 
~Niki

I would like to share this design with the following, wonderful challenges:

Friday, May 15, 2015

Eyes Tested

Eyes Tested is the new challenge at SanDee&Amelie's Steampunk Challenge this month. We would like to see anything related, like: monocles, eye charts, goggles, eyes, get it? Lol! I was going to do goggles but it didn't work out so I decided to do an eye and monocle.
 I started with a Manila folder I cut down to make the tag size I wanted. I then added all the die cuts, metal trinkets and flowers. And I added the monocle and cut out a circle where the monocle goes.
I stamped my Snellen eye chart on black cardstock and embossed it with copper embossing powder. I then painted the entire tag, elements and all, with black gesso. 

I grabbed some Inka Gold, Silks, and Primary Elements powders and kept adding here and there until I liked the look of my tag. 

The top of the tag has more gold to it and also some green/yellow tint. 

The bottom of the tag has more blues. I wanted to create a sort of gradient (I need more practice with that technique!)
The little banner was embossed and the sentiment says-it's all perspective. Haha! So fitting for me during the time I made this tag as my art mojo seemed to leave me for a month. 


I do hope you pop over to SanDee&Amelie's Steampunk Challenge and have a go! Carpe Diem!