Thursday, November 26, 2015

Spotlight Post at Anything But Cute

You may be wondering what in the world these 3 pictures are doing here all by themselves! Well, this may not be a pretty post but if you would like to see what the end result is head over to our Spotlight Post at Anything But Cute!
What am I doing? 
Storage idea or just a bunch of random products? The guess is yours!
Happy Crafting and Carpe Diem! ~Niki


Saturday, November 21, 2015

Christmas Tag


My art studio sure is getting used right now. Today was a very successful day and I am pumped to do some more but I am about to watch a movie with my DH and it is almost 10pm. I just wanted to share this Christmas tag real quick. Hope you enjoy and all of you are staying warm!

I wanted to try something new and get really messy. I started by heat embossing a Rubber Dance script stamp with Champagne EP. The edges of the tag were inked with Ground Espresso DI. 
I then started on my ornate frame. I tried some different color combos and wasn't liking the results.....Too yellow! 
I ended up using my Primary Elements-Olive Vine and am happy I did! This set me on the path to the colors you see in the final tag. I also used Emperor's Gold. While the frame was drying I flicked a bit  of Primary Element colors onto my tag  Gorgeous shimmer! 

I die cut "Joy to the World" (a new die that my hubby bought me today) 3 times and layered those cuts. It was inked up with DI and then heat embossed with Red Tinsel. 
The sprigs greenery and glitter leaves were remnants of a Christmas pick I had in my stash. I love adding the picks to my Christmas wrapped gifts! The ribbon was hand died with the Primary Elements and then splattered with them as well. I am hoping to get a better picture tomorrow when the sun is out!
Updated pictures of this tag while the sun was out. Ahhhh the shimmer and glitter!

I hope you are all having an amazing weekend! Hugz and Carpe Diem! 

This tag would love to be in these challenges: 


I used the Festive Red color and the Optional Theme


Many Thanks!

Oh boy have things been busy here! My DH has surprised me with Christmas lights on our new house, he knows how much I adore lights during the Christmas holiday. Such a sweetie he is! Now, onto this design.

We just celebrated Veterans Day here in the States and I am honoring all my heroes with this tag. This is my way of saying Many Thanks and I applaud your dedication through everything. Without you, I would not be free. My brother was in the service and all soldiers should be thanked repeatedly.
I started with a manila tag and covered it with my rusty patina aluminum tape. To create the rusty tape I embossed aluminum tape, applied Pool and Rust Alcohol Ink, then sprinkled some rusting powder randomly. Once everything was dry I stuck it to the tag and trimmed the edges. 
To create my center "ornament", I used some metal filigree corners and a TH sticker frame to form my bell shape ornament. The 3 gentlemen were inked onto some tissue paper and then painted over with a glaze to create my vintage image. See, you can use certain elements to create something completely different! I never would have thought all these different pieces could make such a nice ornament! Can you see the bell shape? 
I added the propeller with Glossy accents and the greenery is a pick. The sentiment is self explanatory. 

The rusty orange ribbon/bow was in some Happy Mail I received in a swap, I just sprayed it with Carbon Black DecoArt mister and applied some Rust Alcohol Ink to it. How do you honor your heroes?
Just a reminder, over at SanDee&Amelie's Steampunk challenge we are having our winter special! The challenge is Anything Goes and runs for 2 months, until the end of December. Check it out HERE

I would really enjoy sharing my tag with the following challenges


I have altered the metal filigree corners into a bell ornament featuring these wonderful 3 wise men

I just went to a local craft store and purchased the greenery pick I have used in this design and a new bottle or Rust Alcohol ink was used as well. 

I am celebrating Veterans Day, Thanksgiving and Christmas all in one. 


Thursday, November 19, 2015

CAS Christmas Card

Well it sure is chilly outside today but perfect weather to create some Christmas cards. This is my first ever attempt at an almost white card. Happy Holidays! I do have to apologize for the photos. It is snowing outside and kind of dark.
The background was embossed with a new EF from TH-Joy A2. Then I added some DecoArt Snow Writer to the word Holiday. While it was wet some Clear Rock Candy was sprinkled over it. I edged the card base with Fired Brick DI and added the silver filigree corners. 
I just got the MS branch punch (it has been on my wish list for a year) and constructed the tree by layering the branches. I added some red bling gems to represent ornaments and painted the snowflake topper with Stickles.
The trunk of the tree was made from a stick I found in my yard and painted with DecoArt white acrylic paint. 
Hope you all are warm and happy! It is a cold one here today! For the length of time this card took me, this sure is a short post. I have been up to my elbows in balls, ummm, with glitter! Christmas Balls y'all!  I am making a Steampunk Christmas tree and need lots of ornaments. Hehe! Hugz and Carpe Diem! 

This card will be shared with these lovely challenges: 


 My song is-White Christmas by Bing Crosby of course. 

Sunday, November 8, 2015

Light and Dark Autumn Leaves

Wowzers! Can you believe it is almost December!?! What! Where did the time go? The leaves are falling here and the days are growing colder. I don't really enjoy Fall or Winter but there are 2 special holidays during this cold time that I very much look forward to, Thanksgiving and Christmas! I was out in my back yard today watching the leaves fall and the dogs play and grabbed a maple leaf. It was so textural and pretty, I decided to use it on my design. It also reminded me of having to rake leaves when I was younger. We had more than enough trees, but the fun part was when my Golden Retriever decided to play in the piles of leaves. Good memories!
When Daylight Savings happened on November 1st, I knew the light change would alter how I photographed my art so this design was inspired by the leaves and the light change. I started with my leaf and painted it with Gold modeling paste. Then cut out a square from some thick paperboard and added the gold paste to it as well. I used my Emperors Gold silks to go over the gold paste (note the bumps and textures-my Gold Silks isn't so silky anymore, it seems to be drying out) :( Then came a wash of Spiced Pumpkin Silks. After the paste and Silks was dry, I added some DecoArt Antiquing Cream Raw Umber to the edges. 
The leaf was popped up a bit with foam dots and a metal filigree charm was added. The A is self explanatory.  I was able to use my new Dymo labeler by adding the word "Autumn".
 While all of this was happening I had also cut out my base and applied the Silks Pumpkin to it as well. The crackle is a TH stamp and coffee archival ink. 
 Adding layers is my new challenge for myself, so I went about it. I used DecoArt crackle paste and the TH flourish stencil around the edge of the base. I did add some Distress Glitter to the wet paste. When it was dry I lightly sponged over it with coffee Archival ink. 
The gold tassel is just for fun! The Gold frame is from a local craft store and "painted" with Gold Alcohol Ink then washed with the Emperors Gold Silks after applying some DecoArt Crackle Glaze.  
I used my favorite glue, TomBow Multi to adhere the frame to the leaf piece. 
The frame looks rather vintage now! Awesome sauce! I do hope you aren't too cold wherever you are and you maybe had some fun while reading this post. Happy Holidays and Carpe Diem! ~Niki

I would love to share this wall hanging with these amazing challenges: 


Thursday, November 5, 2015

It's Ornamental!

Hello peeps! I do hope you enjoyed your Halloween and all that it entailed. Today starts a new challenge at Anything But Cute #7-It's Ornamental and the super sweet, and talented Cec is our hostess! Here is what she said, "Since the holiday will be coming up pretty quickly, we want you to create a mixed media ornament for your Christmas tree or a Christmas decor item for your house or table.
I love, love, love the Christmas holiday and go all out for it! So without further adieu here is my design! Who knew I could go from shock horror to soft and pretty!?! Lol. Grab a cuppa, this is a long one. :)

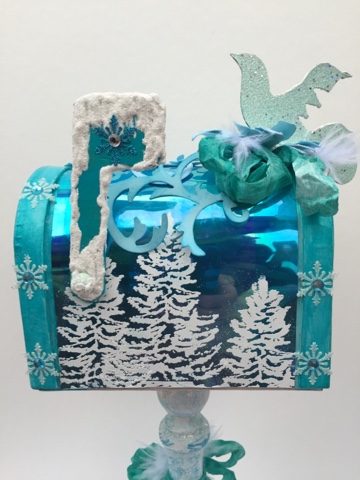
I started with a paper mâché mailbox. Applied some gesso and LSG sprays to the front and back. Then started on the Shimmer Sheetz. 
Using 3 different colors of embossing powder and a tree stamp, I got to stamping. The EP adds some nice texture to the Sheetz. TIP-Shimmer Sheetz don't hold up to heat embossing and will warp a bit but it can still be done! I used two sheetz to cover the sides of the mailbox and overlapped those at the top. Then came the die cuts. 
The flower was made with TH Tattered Flowers die. I layered three pieces and added some EP randomly, as well as some Stickles. The bird is a new Sizzix die. The bottom layer of the bird die was painted with DecoArt Media Cobalt Teal Hue (my cuttlebug didn't cut it all the way through but I used it anyway). The top die cut was heat embossed with a Recollections EP. Glossy Accents was liberally applied and I put the pieces together. The glossy accents gooped out through the holes in the top die cut which resulted in a glass like appearance and added some nice texture to the bird. 
The mailbox edges were painted with DecoArt Media Cobalt Teal Hue as well and then snowflake stickers were added. 
The filigree die cuts were made from white and a pale blue cardstock. Both were then lightly edged with Mermaid Lagoon DI. My ribbon was hand died with LSG sprays and helped to create my birds "nest". The flower has a bit of bling added and some small feathers. So many luscious layers! More layers help create nice texture and depth to any design. 
The snow on the mailbox flag (as well as the top of the candlestick) was created by using DecoArt Snow-Tex
This is the front of the mailbox. I used another die cut and lightly edged it with Mermaid Lagoon DI as well. The "Merry Christmas" sentiment is a TH rub on (thanks Samra!)
Let it snow, let it snow, let it snow! Although, I don't really like snow IRL-too cold for me. Brrrr! 
The back of the mailbox had a snowflake rub on and an embossed sentiment as well. 
The candlestick was painted white and then Cobalt Teal Hue, I then added a layer of white crackle paint. Once that was dry, I took a damask print stamp (inked with ML DI) and randomly applied it to the entirely awkward shape. Stickles added some glitter and Snow-Tex added some more texture. Pretty! 
And now for
THE SURPRISE: 
I created a false front to the opened mailbox and it raises up when the lid is closed. The reindeer, trees, and moon (actually my thumbprint, lol) are heat embossed onto vellum. The mini tree was sprayed with LSG sprays, and texture was added with the DecoArt Snow-Tex. I painted the mini lights with Cobalt Teal Hue and gesso. The floor was made to look like ice by sprinkling EP and layering DecoArt Liquid Glass over it. The cobblestones were hand cut and lightly pushed into the "ice". 
Whew! You made it to the end! Congrats! I hope you had a fun journey and create some amazing designs! Thanks for stopping by. Hugz and Carpe Diem! ~Niki

I will be sharing this altered design with these challenges:


I used Glossy accents to adhere almost everything in this design, as well as adding dimension to the bird die cuts


I used lots of glitter, diamonds and gems, as well as luscious embossing powder that has bling in it.

I used 3 different dies on this design.


Sunday, October 25, 2015

Book of Horror!

Ohhhh October, how I enjoy thee! I wanted to design something really gory and disgusting. The other night I was watching Hocus Pocus and thought to myself "what would the sisters book look like for a rated R movie?" And here is what came to mind. This is the Book of Horror, enjoy or be disgusted-the choice is yours! (Evil laugh in the background) And some exciting news at the end of this post!
I started with a plain paper mâché book, added some gesso to the entire thing and some black leather to the edge. The leather lends a vintage feel to the spine of this wicked creation and also adds age. Can you see the bloody hand print on the spine?
Then I started sculpting with polymer clay. Now I have never done this before so there is always room for improvement but this is the first take. I lightly drew out where the eyes, nose, and mouth would go then went at it. 
I kept pushing the clay around until I was satisfied (kinda) with the results. Then it went into the oven to bake. While the grotesque face was baking I started on the back of the book. I glued down some interesting lace stuff, painted over it with gesso, and added some more polymer clay. I had to use air dry clay on the back and I am not a fan of it, I much prefer Sculpty. 
Next came adding the skin color and let me tell you, skin is hard to paint. There are so many shades and hues to skin. I used DecoArt Media line colors: Red Iron Oxide, Yellow Iron Oxide, Quinacridone Burnt Orange, Quinacridone Gold, Paynes Grey, Carbon Black, and Raw Umber Antiquing Cream. The flesh tone was achieved by mixing a pale pink and Americana Zinc with a dab of Adirondack Hazelnut. You just have to play with the colors and go with your gut. 
The picture below is when the entire back section was done. I really am diggin the "wet" look of the exposed flesh. This wet look was achieved by using DecoArt Liquid Glass and DecoArt Media Mister-Red. I added some paint splatters to break up the skin color and give it some depth with the colors mentioned above. The "sutures" are made with rusty wire from my stash, with each one hand shaped and glued with Glossy Accents to the pulled and stretched skin!
I did work on the front and back pieces intermittently but didn't glue the front piece until it was entirely done. The teeth were a sore spot for me. I wanted it to look like the teeth had realistic gums so I added some more clay and pushed my "teeth" into the clay to create grooves. I will send something to the first person to guess what the teeth are made from.
I pulled all the teeth out and baked the clay, then added the teeth back to their spot. The teeth got a makeover (or make-under) with a wash of DecoArt Media-Yellow Iron Oxide and Quinacridone Gold. The gums, eye sockets, nose socket, and exposed flesh were painted Red with the DecoArt Media mister (love that Red! And I also love that after it is dry, none of the red seeps into my paintbrush when I layer colors over it!) The skin was painted the same way a the back of the book. The eyeball was aged with a wash of Yellow Iron Oxide and made to look gooey with Liquid Glass.
The "page" part of this book was made by applying thick and thin amounts of DecoArt Crackle Paste. Once that was dry I gave it a wash with DecoArt Paynes Grey and Old Paper DI. Then I rubbed on some DecoArt Raw Umber Antiquing Cream and wiped off the excess with a paper towel. (you may have noticed that I use the Antiquing Cream as a wash, paint, and dry brush-very versatile stuff!)
Creepy little guy! In the picture below you can see the colors from the washes I gave the "pages". Lastly I added DecoArt matte Varnish to all the edges. 
The spine was distressed with texture paste and the Andy Skinner stencil-Code Breaker. I aged the texture paste with DecoArt English Red and Titanium White Antiquing Cream as well as dry brushing it with DecoArt Red Oxide and the hand print on the spine was made by painting my hand with the Red Oxide and grabbing the spine on this Book of Horror.
The face kinda has a sad look to him. I hope you don't meet this Horror out and about on Halloween night! You may be the next in line to be skinned! Mwaha ha ha! Hopefully you weren't too disgusted that you blew chunks, although if you did I would like to know. Happy Haunting and Carpe Diem! ~Niki
                                               

This delightfully grotesque book will be shared with these horrific challenges: 


A darker art blog spot, so check it out!


I have been accepted into the DecoArt Blogger Outreach program and this is my first design! I am happy to share and learn more about their products. I have to say that as of right now my favorite supplies are-Liquid Glass and Red Oxide.