Showing posts with label Canvas. Show all posts

Thursday, June 15, 2017

Mix It Up #2

What a lovely week it has been and I am thrilled that the weather is so much more to my liking of being hot. Summer is my favorite season and then Spring. Anyway, today is the day for the Mix It Up Team B's designs and our technique focus this month is stamping! Rubber stamps, cling stamps, hand made stamps-just no digi stamps. :) So without further ado here is my design. Enjoy!

This is my very first time using Gelatos and I have to say I enjoyed it immensely! The colors for this design are all from the iridescent collection. Everything from Black Hole, Lunar, Blue Moon to Satellite, Nebula and Supernova. Cool names for such gorgeous colors!
I used a watercolor canvas and applied a layer of gesso first. I then just slapped on all the colors that came in this set and sprayed it with water letting the drips happen here and there. 

Next came a brand new stencil. I used a white color box ink through the stencil. Since this is a pigment ink it sits on top of the canvas and doesn't dry fast at all. I waited a few days for it to dry.
While my canvas was drying, I decided to try my hand at making a dream catcher. First time doing this as well. I used some broken grape vines I had leftover in my stash and some embroidery thread. I wrapped the thread around the vines and made a circle. I then wove a greenish blue embroidery thread through the circle and made the inside of the dream catcher. It worked! Surprise surprise! I used a Prima word sign and some clear bead things to add some texture to the dream catcher. 
Raiding my feather stash produced some teal feathers, some teal feathers with polka dots, some white feathers and some small metal trinkets from TH Ideaology.
I attached those to the bottom of the dream catcher and then added the silver rose (from Emerald Creek). 

The dream catcher was popped up on foam dots and the middle feather was adhered to the canvas with a hot glue gun. 

The last thing I added was some stamping with random rubber word stamps. I used Distress Ink and slapped down some script. 
You can see the stamping much better in real life but here are more close ups as well.
I used contrasting colors so everything would stand out and the stamping would be visible. 
So get out your stamps and enjoy a good play day, or week! You never know where your paints and colors will take you! Carpe Diem and Hugz! ~Niki

I would enjoy sharing this design with these challenges:


I used Dream Road because creating my own version of art is a dream road I journey down for every piece. 

Tuesday, March 8, 2016

Neons and Sprays

Well there comes a day when you try something completely new and find out some helpful tricks among the way. I've never worked with NEON colors before but today's their lucky day! I wanted to join in a couple of challenges and a new one that Andy Skinner is hosting. Here we go! Sit back and enjoy.

I used an old ruler to create the lines and texture in the DecoArt modeling paste. It was a fun and new experience. My canvas is a chunky one with thick edges. Then I left it overnight to dry completely.
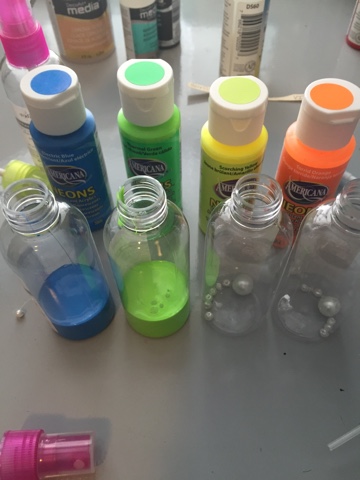
 I knew I wanted to use sprays because I just have more fun with em than a brush. I figured I could make some sprays with the Americana Neon paints (Electric Blue, Thermal Green, Scorching Yellow, Torrid Orange, and the non neon-Lipstick) and grabbed some small 2oz bottles from a grocery store. I put 6 small beads and one large bead in the bottle before adding the paint because I figured it needed a mixing ball. :)

You can see in the photo above how much paint I added to each bottle. I then filled up the bottle with warm water and put the spray lid back on and shook everything up. It sounded like a mixer ball was in the bottle! Yippee! Then I sprayed a scrap piece of paper with each color to see how it worked. 

The purple color was a mix of the Neon Electric Blue and Satin Lipstick with a pinch of Purple Pearl metallic thrown is as well. 
I grabbed my spraying box (fancy name for a paper towel lined cardboard box I use to apply sprays on a canvas) and started spraying. I applied heavy coats of each color and dried between each application except where I wanted the colors to run together. 
Using a Spouncer tool, I applied DecoArt Carbon Black around the edge of the canvas and on some of the textures areas. Using the Carbon Black again and the Spouncer, I added an Andy Skinner Day of the Dead stencil. Go easy on the paint and brush some on before applying to the stencil or some of the paint with seep under the stencil. 

Now I wanted to stamp onto my canvas but that's never worked out for me so I decided to stamp onto some tissue paper and adhere it to my canvas. I didn't have any of DecoArts Media matte medium so I used Duraclear matte varnish. Of course I practiced on a scrap piece of paper first. 
It worked out okay so I went for it! And here's the end result! Very eclectic canvas and an interesting art journey. :)
It really is more vibrant in real life (can you imagine!) and I am glad I tried my hand at these very Bold and Bright and Loud colors. The funny part about this design is I went into it thinking I would do a more abstract design but that wasn't my journey. Lol! Hugz and Carpe Diem! 

I would love to share the neon with these challenges: 


Saturday, February 27, 2016

Coffee Time in Venice

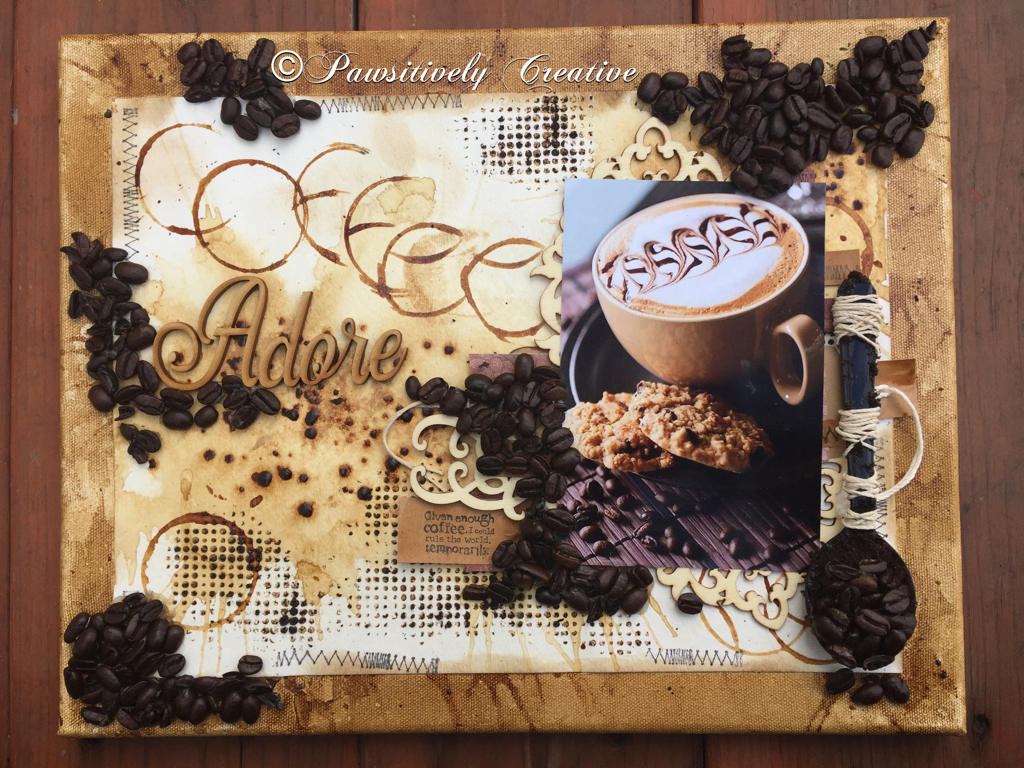
Never thought I would say this but, I just made a canvas using only coffee! Instant coffee, coffee beans, ground coffee, and coffee archival ink! Yeppers, and it smells delicious!!!!

I tried a couple of new techniques and had plenty of fun on this canvas journey. I started with watercolor paper (first time using this) and plopped and splattered on some instant coffee, spritzed it with water and then blew on the paper to get my drips! HUGE TIP-remember to breath during this and not get overexcited, I kinda got dizzy because I just kept going. Hahaha! I used this same technique on the canvas but ended up adding more coffee over the top and edging the canvas with Coffee Archival ink. 
The next step was to use some coffee grounds and DecoArt crackle glaze mixed together and smooshed through a stencil! My art studio smells divine! Yummy! Then I used the instant coffee and dipped a small coffee cup bottom into it and created the circles. The word Coffee was created with the bottom of the cup as well. I used the word Adore, because I adore coffee and am a cranky lady if I don't have any.
While this was drying I got to work on the spoon. I didn't have a silver spoon so I used one I found in my kitchen leftover from takeout. I smooshed some coffee grounds on the handle and into the top of the spoon and then added coffee beans to the lower portion. And finally I wrapped twine around the spoon for more texture. 


I found this lovely image that reminded me of good coffee times and knew I had to use it. My husband and I had our first date at a coffee shop. :) The chippies were left raw under the image and I layered some papers under the frame. I used a stitch stamp randomly around the edge. I really wanted to use my sewing machine but it didn't work out this time. Oops, I need a new needle. 

Then I poured some coffee beans out and glued the beans where they fell. I used some Liquitex Super Heavy Gel but it didn't work well so I had to go back over all the beans, one at a time with TomBow Multi! Talk about time consuming but it was worth it. I got the beans for free from my favorite coffee shop. Aren't they sweet (the baristas not the beans, but the beans are wonderful!) And of course I was drinking my favorite coffee drink, a Caramel Macchiato, while making this canvas! Hugz and Carpe Diem! ~Niki

I couldn't have finished this canvas without the help of a dear friend, Sara, from Sara's Closet. Thank you for the nice text, it came at the perfect time! Cheers to puppy breath! and huge hugz to you muffin! One day we'll share a cup of coffee, well tea for you and coffee for me!


I would like to share a cup of coffee with these challenges:


I used everything!

Mixed Media World #11-Love is in the Air
I think my love for coffee is apparent with this design, it is also where my DH and I started our relationship and every year on our anniversary we go to our local coffee shop and order exactly what we ordered the first day we met. Aww!

Kort-O-Mania Challenge #147-Anything Goes


Sunday, January 24, 2016

Dark and Radiant

You know how you have those days where your head is full of new creative ideas and you just keep going? This weekend has been like that for me. I love it when my muse is working overtime! I have been on a canvas kick for a little bit and today is another 5x7 canvas.


How I wish you could see the shimmer and radiant awesomeness of the gel thats in the background (it's like texture paste)! Gorgeous and more gorgeous! I set up my design first to see where everything would go. 

 I used white gesso to cover my canvas, then added some white texture paste and when that was dry I painted the entire canvas with black gesso. After the black gesso was dry, I used a palette knife to add the Colour Arte Radiant Gel-Guatemalan Green. 
 When the green paste was dry, I added back all of my black gessoed elements and glued everything down. 

Using Colour Arte Silks- Wisteria and Vintage Mint I painted the flowers and the dragonfly. I added the gems last.

The crown was painted with Inka Gold-Violet, as were the clock hands. The clock face was painted with Colour Arte Silks-Warm Gray. Black Finnabair micro beads completed the canvas.

I also tried a new idea. I used a script stamp from Rubber Dance Art stamps and inked it with the Radiant Gel then randomly stamped along the side of my canvas. I've done it with paint but never paste. :) It didn't turn out as well as I expected but I am going to try it again!
This was a fun play in the art studio this weekend. I tried so many ideas, some went in the reject pile and some are still a WIP but it was a joy to just spend some time enjoying the way my brain thinks, some good me time. Hugz and Carpe Diem! ~Niki


I would enjoy sharing this design with these fantastic challenges: 


(all of the Colour Arte paints and the gel are new)

(all of the Colour Arte paints and the gel are new) 


(my heart sings for a darker color palette)


Saturday, January 23, 2016

Shabby Something?

Hello y'all! Keeping with my goal to try many different styles and colors, I have decided to delve into a more feminine canvas today. Now, anyone that knows my blog understands I tend toward the darker color palettes but this design is none of that! Eek! I received some new LSG sprays for Christmas (from Alleystamp.com) and am using these today. Talk about a new path, and a new beginning.
I started with a 5x7 canvas and some gesso. Then added some script stamping randomly. I totally forgot to take pictures while I was working on the background. Oops. I then added the HS stencil and some texture paste. Once that was dry, I grabbed my LSG spray and sprayed it through the HS stencil to get a soft pattern. 
I painted the gate with white acrylic paint and the ornate frame was painted with Inka Gold-Turquoise. I used the LSG sprays to spray the small flowers. The leaves are made from a mold and Clay and painted with Luminarte Lucky Apple Primary Elements. The cheesecloth is added for texture. A MS branch punch was also used to create more texture. 
The butterfly was heat embossed and then "painted" in some spots with my new Liquid Pearls-Pewter. The sentiment was stamped onto vellum and little dots of the LP was added to the banner. The square green gems are new as well. I then splattered the entire canvas with all the colors I used and stamped another script stamp with Adirondack Mushroom ink. 
I know I forgot some steps but I was in the zone and just kept trying different things. :) Carpe Diem right? Hugz! ~Niki

I would love to share this design with these challenges: