Thursday, August 10, 2017

Octopoda

Hello lovelies and welcome to my blog! Some of you may know about my mini top hat obsession. I wanted to challenge myself even further and add a more prominent sculpt to a hat. I set about creating Octopoda! Hope you enjoy because this was by far the most fun I have had designing a top hat! When I make these hats I am a Mad Hattress Maven, hence the new copyright.
I started with the usual foam template and glued everything together. Then I set about using my new Finnabair Patina pastes! These pastes are awesome and dry super fast! Two of the paints have texture included in it. I just added color where I wanted it and the texture was an added bonus!

I used the brass color last instead of first like some people do. I always seem to do things backward. Haha! I added the pastes with my fingers and also with some different brushes. Then the pastes got a dusting of Artisan powder-La Chapelier. This added a nice grunge to the hat. 
I then grabbed some random metal pendants and pieces and coated those with the same pastes and powders. Everything looks like it goes together well but all were painted differently. Then I started on the sculpt of the octopus. I have never tried this before and was overwhelmed.. 
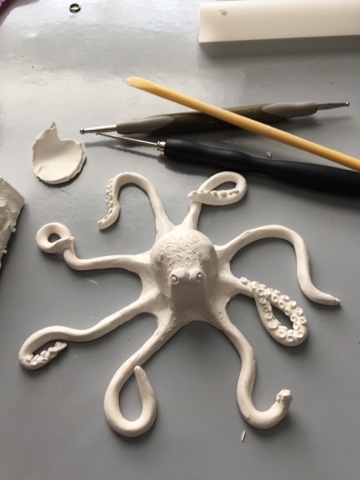
I ended up watching multiple YouTube videos about sculpting an octopus and came across a video by Stephanie Kilgast that helped immensely! I was then able to to begin my sculpt and just have a good play with the clay. The legs took forever because I kept breaking the darn things off! Oops. I realized I was making my legs way too small! Haha! The little suction cups took a lifetime to create, well it seemed like a lifetime and my fingers were sore. Next time I may try some beads instead. 
The octopus was painted with Finnabair Art Alchemy paints-Metallic Mermaid and Deep Water. I kept layering the colors until I was happy. I added some white dots around the head of the octopus because it looked good to me and helped define the head. 
Top of the hat
All of the trinkets and tid bits you see were altered (painted) with the patina pastes and artisan powders. The netting was leftover from a project I did about a year ago. The shells are real and are a gift from a friend of mine. I also added some "pearls' and blue "bubbles"
Side view of the hat
The pictures of this hat really don't capture the essence of the piece, but I am probably my own worst critic. Aren't we all? Every time I look at this design I am surprised to say that I MADE this piece! 
Back of the hat
The back of the hat shows more of the netting and adds a nice texture as well. I think the netting was what made me decide to create a sea themed design. 
The octopus
A closer look at the octopus. It was a doozy creating those legs but in the end, the effort was totally worth it and then some! Those little suctions are awesome sauce and little devils as well.
Side view of the octopus
Can you see the little white dots that help to define the head of this octopus? I also added some to his body as well and then painted a light coat of the Metallic Mermaid over the dots so it wasn't such a stark contrast.
Top side view of the octopus
Do enjoy the journey and stop to learn from different artists. I so enjoy seeing what others are making and different ways to incorporate new ideas into my designs! Hugz and Carpe Diem!

I would like to share this design with these challenges:

Mixed Media Place July Challenge-Moodboard
I was inspired by the ocean and the quote. 


I have been reading the Shade series (a total of 45 books) and they talk about these evil mermaids
that live in the sea and have sea pets. This octopus looks like one of their pets. 


I was inspired by the gears and overall Steampunk vibe of this board. 


Tuesday, July 18, 2017

Blues and Metal

Today is the day that I can share my second guest design for Xandeous Crafty Stash! I enjoy working with metal trinkets and tid-bits and Naomi (the owner of XCS) was kind enough to let me have a play. With so many wonderful challenges going on I wanted to create a design that fit all so I decided to keep it blue. For some reasons blues are more easy for me to work with. I have been working on trying to create more layers, texture and composition in my designs. Exploring the possibility is what I am enjoying right now. Here is the final result.
I started by applying black gesso to my background board (compliments of Autumn from Sew Paper Paint) and adding some stenciling with black modeling paste. 
Then I had to decide on the composition of the pieces. Every metal piece you see is from Xandeous Crafty Stash! The paintbrushes are from my stash. Everything was glued down with multi matte medium. 
Once you have everything glued and in its place, apply more black gesso and cover it all up. 
To add even more texture I randomly slopped on some texture paste. That's the white gritty lookin stuff in the picture below. 
A thin coat of DecoArt Prussian Blue Hue was brushed over the entire piece, then another thin layer. Once that was dry I kept using different DecoArt blues to create different layers of blue colors. Cobalt Teal Hue, Cobalt Turquoise Hue and Turquoise Water. Around the edge, where most of the texture paste is I added some Quinacridone Gold. And some Q-gold in other random spots. 
Then came the dry brushing using different shades of white. The best white I use for dry brushing is DecoArt Titanium White.
I would like to share this design with these fun challenges:


*I was inspired by those lovely paintbrushes and the textured wall. 


Saturday, July 15, 2017

Galaxy Card with Distress Ink

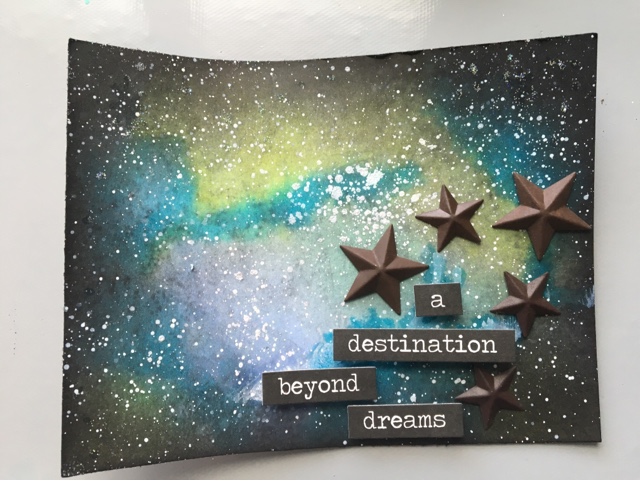
Wowzers! Can you believe we are more than halfway through 2017!?! Say what! Pretty soon the summer will be over and that means back inside out of the cold. But enough about that glum price of news. I wanted to try to create a galaxy card using distress ink and because our new challenge over at Mix It Up is all about Distress Inks/Distress Tool, I had a go. Enjoy!

I started with some heavyweight white card stock and began blending distress ink colors. I went from the lightest color to the darkest and spritzed my card stock with water along the way. 
Next time I'll try using watercolor paper instead. :) I heat dried my card and then added the darkest distress ink-black soot. 
Then I smooshed black soot and mermaid lagoon onto my craft mat and spritzed with water. I added the ML randomly to the card to create an almost blue swirl. Then I did the same with the black soot. And heat dried it again. I then watered down some white heavy acrylic paint and splatter the entire card to create some "stars". 
While my card was drying (under a heavy book) I got started on the stars. I used some Snow Cap alcohol ink on the rusty stars and poured some DecoArt glitter to those while wet. Once everything was dry I added some TH chitchat stickers and glued the stars down with a hot glue gun. Viola!
 My first attempt at a galaxy card. Whew! The best part about this technique is there is no set pattern or colors to use. Just enjoy the process. Hugz and Carpe Diem! ~Niki
I would like to share this design with these wonderful challenges:

What is more beautiful than the galaxy we live in. :)


I was inspired by the night sky fireworks and the stars. 


Saturday, July 1, 2017

Altered Tree Bark

Hello all! My have the hands been busy this summer! Between my crafting and my power tools, I don't know what keeps me more happy. I have decided to alter a piece of a tree trunk that was leftover from a recent cut down. The tree was dead and needed to be taken down because it was so close to the house. This piece is for my guest spot over at Xanderous Crafty Stash. She has everything from metal trinkets, bling bling, rhinestones, lace appliques and so much more!
I started with applying a white wash to the bark just to lighten it up a bit.
 After the wash I used multiple stamps with black Archival ink and added some more interest to the bark. 
While that was drying I started heat embossing all of the wonderful metal trinkets from Xanderous Crafty Stash. Each metal piece got at least two coats of embossing powder just so I could make sure none of the metal peeked through.
I layered the metal pieces to create a butterfly and some metal coral colored flowers. Then I added some moss and grass. The sign "This Way" is from Prima. 
Hugz and Carpe Diem! ~Niki
The stamping is subtle but in real life it pops more. Hopefully this picture below shows the stamping okay. 

I would like to share this design with:


I was inspired by all things nature


Thursday, June 15, 2017

Mix It Up #2

What a lovely week it has been and I am thrilled that the weather is so much more to my liking of being hot. Summer is my favorite season and then Spring. Anyway, today is the day for the Mix It Up Team B's designs and our technique focus this month is stamping! Rubber stamps, cling stamps, hand made stamps-just no digi stamps. :) So without further ado here is my design. Enjoy!

This is my very first time using Gelatos and I have to say I enjoyed it immensely! The colors for this design are all from the iridescent collection. Everything from Black Hole, Lunar, Blue Moon to Satellite, Nebula and Supernova. Cool names for such gorgeous colors!
I used a watercolor canvas and applied a layer of gesso first. I then just slapped on all the colors that came in this set and sprayed it with water letting the drips happen here and there. 

Next came a brand new stencil. I used a white color box ink through the stencil. Since this is a pigment ink it sits on top of the canvas and doesn't dry fast at all. I waited a few days for it to dry.
While my canvas was drying, I decided to try my hand at making a dream catcher. First time doing this as well. I used some broken grape vines I had leftover in my stash and some embroidery thread. I wrapped the thread around the vines and made a circle. I then wove a greenish blue embroidery thread through the circle and made the inside of the dream catcher. It worked! Surprise surprise! I used a Prima word sign and some clear bead things to add some texture to the dream catcher. 
Raiding my feather stash produced some teal feathers, some teal feathers with polka dots, some white feathers and some small metal trinkets from TH Ideaology.
I attached those to the bottom of the dream catcher and then added the silver rose (from Emerald Creek). 

The dream catcher was popped up on foam dots and the middle feather was adhered to the canvas with a hot glue gun. 

The last thing I added was some stamping with random rubber word stamps. I used Distress Ink and slapped down some script. 
You can see the stamping much better in real life but here are more close ups as well.
I used contrasting colors so everything would stand out and the stamping would be visible. 
So get out your stamps and enjoy a good play day, or week! You never know where your paints and colors will take you! Carpe Diem and Hugz! ~Niki

I would enjoy sharing this design with these challenges:


I used Dream Road because creating my own version of art is a dream road I journey down for every piece. 

Monday, May 15, 2017

Mix It Up!

Today is the day that the Mix It Up challenge blog goes live with the first challenge and Team B's projects. We are a monthly technique challenge blog featuring various techniques on mixed media projects, altered art, and paper crafts such as cards, tags, mini albums, ATCs, 3-D projects and scrapbook layouts! Are you excited? I sure am! We would love to see you enter this challenge and it's a good one. The challenge is to use embossing. You can do heat embossing, dry embossing, or think outside the box as well.
I started with a canvas and glued a piece of paper to it. Not sure of the designer of the paper though. Then I used a chicken wire stencil and some adirondack ink to add some interest. Pinks, purples and Blues were my main colors.
The frame chippie is from Creative Embellishments and I painted acrylic paint in two colors. Once the paint was dry I stamped some script stamps onto it with adirondack Watering Can ink. The frame was popped up on foam dots.  The feathers, bits of flowers and bits of picks were from my stash. I did end up adding some stamping to the feathers. The little jar is filled with magical fairy dust (embossing powder) and the lid was glued and a bow added to it. The butterfly is from Reneaboquets store. 
I used two different colors of embossing powder through the CW stencil. Layering powders is a fun way to create new color combos and enjoy your powders. 
The clock mold in the top right corner is made from an IOD mold and polymer clay (I prefer clay that needs to be baked). I painted it pink and then applied white antiquing cream to it. Smudged some ink in it and glued it to the cheesecloth. Then added another flower cluster. And ta-da! Done!
Looks different in the sunlight in the picture below. It is more true to color in the picture above. 
Enjoy the journey and Carpe Diem! Hugz! ~Niki

I would like to share this canvas with these amazing challenges:

I need to learn to explore outside of my comfort zone. 


I used stencils, embossing, and about 4 different stamps on the background


I used about 4 different stamps on the background and 2 different stamps on the flowers and the chippie frame