Sunday, August 30, 2015

Mr. Captain Man 12 Tags of 2015

Ever have one of those months where anything you try to create goes haywire? Grrr! It seems like that has happened to me this month. I skipped last months Tims Tag-I just didn't connect with it at all so I was determined to do this months. Check out the original Here. This is my 2nd take, the first ended up in the recycle bin.
For the life of me, the background just did not turn out anything like the original but I had none, none, none, of the supplies he used. I only have 8 dies and 6 embossing folders so I did my own thing and it took forever. Lol. I didn't even have multi matte medium. When I opened the bottle is was hard and not usable at all, so I used Mod Podge. 
I hand glued all of those little cutouts that usually get thrown away. Crazy much? And I did the technique like he explained but mine looks a lot different. :) It was an interesting time in my art room during this entire tag making session. 
The man is a retired Captain that loved life on the open ocean. He excelled in many aspect of being  a Captain but his favorite was learning how the entire shipped worked and fixing it if needed.  He had to use what was around because he didn't always have access to parts or tools if his ship broke down (much like me not having the supplies used in the original tag) Maybe he is even thinking about how steam could have powered his ship.......then he could 
come out of retirement and be the Captain of a Steampunk ship! 
Too bad the weekend is over because my DH gave me an art gift for our anniversary and it is: Chemistry 101 with Tim Holtz! Yippee! But back to work tomorrow so I don't have time until Thursday to start this amazing new adventure. My first art "class". Thanks for stopping by and laughing along with my crazy antics. Y'all are awesome sauce! Carpe Diem! ~Niki

I would very much enjoy sharing this tag with these challenges:

Between all the mediums I used and extra bits this surprisingly has lots of texture. 


I had to think waayyy outside the box for this tag and get very creative to complete this design. I used 7 different inks for this. Whew!


Wednesday, August 5, 2015

Making Magic at Anything But Cute #4

The fourth challenge is here at Anything But Cute! Can you believe we started this only four months ago? Wowzers! This month the skilled artisan, Georgie, from Little Blue Craft Box is our hostess! She has chosen the theme MAKING MAGIC and this is what she had to say, "Most of us are drawn to the magic of fairy tales and fantasy. The colours are often hypnotic and your mind is free to explore outside the limits of reality. For this challenge, I would like you to create a magical mixed media project strongly inspired by the moodboard. Be inspired by the theme, the colours, the textures or all three. Lets bring a little magic back!"

To me, Knowledge is magic. It opens the doors to so many wonderful adventures and the most magical adventures I have had the pleasure of taking, are usually through a book. That is how I came up with my design for this month. 
This is my first altered book. My background is made from polymer clay that I stamped into, first time with this technique as well. I inked up the clay with Silks, LSG sprays, Inka Gold, DecoArt Metallic paint, and so much more.
The large TH butterfly die was purchased at Alleystamp.com. The lady that runs this store (Janine) is so very sweet and has such amazing prices on her items, plus she loves animals! Wowzers. I just love how versatile this die and embossing folder are (you will see plenty more of this butterfly die!) I sprayed the butterfly and used Inkagold then used UTEE over the entire piece. I added the pen nib for the body after rubbing Inkagold over it.
The dew drops that you can sort of see are made by using glossy accents and randomly dripping a drop here and there. The chippie word was embossed and then embossed again. The chippie clock was painted with gold modeling paste, then I added some sand texture paste and used LSG sprays to age it and patina it. I left the roman numerals raw.
I wanted to do something different to represent the inside of the book so I used Twisted Citron DI and applied it over some tissue paper that was already stamped (this tissue paper was what my stamp was wrapped in from my win over at 12 Tags of 2015) I then used the end of a paintbrush to make rolls from the tissue paper. I applied some glue and glued the rolled up piece to the top and side of the book=pages!!
I do hope you enjoyed this post and join in the magical fun! My teamies have designed some wonderful mixed media pieces so don't forget to stop by their neck of the woods. Thank you for stopping by! Hugz and Carpe Diem! ~Niki

I would be thrilled to share this design with the following challenges:

That Craft Place-Mixed Media Anything Goes

The Artistic Stamper-August-Anything Goes

ABC Challenge-"O" is for Open-Anything Goes

Simply Create Too #91-Anything Goes

Sisters of Craft-August Anything Goes


Saturday, August 1, 2015

Rhedd's Creative Spirit-Guest Designer-Altered Box

Why hello y'all!

I am super duper excited to be a guest designer for August for Rhedd's Creative Spirit! This is a mixed media/altered art challenge blog and the challenges are always anything goes. Hope to see your creations! 

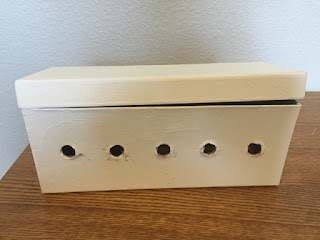
I decided to Upcycle a box ribbon dispenser into a cell phone charger storage station. This is a gift for a 13 year old and her Birthday is today! 
I started with a box that had holes in the front. I had to ask an employee at the craft store what the holes were for. Lol! Ribbon dispenser is what she told me. I took out the metal rivets so I could add my paint with no worries. 
The birthday girl is a girlie girl so I went with purples and whites (mostly). The modeling paste was applied through a damask stencil and left to dry. I totally forgot to take pictures of the process. Oops! 
The same modeling paste was used on the lid and applied through the CWS stencil Art Is. I then painted some DecoArt metallic paint over the entire bottom piece just to give it a shimmer. 

For the front of the box I used the mixed media die from Tim Holtz and added a large rose and the stamped sentiment from SU. 
The lid was decorated with cheesecloth and flowers that I sprayed with ColorBloom. The roses on the lid were hand made and edged with Stickles glitter. I used the black roses to add some grunge to this piece just because that is me. 
The plaque was made out of polymer clay and stamped with a script stamp, then it was sprayed with the ColorBloom and LSG sprays. The frame was painted with a dry brush of the DecoArt metallic paint. I added the alpha A to personalize the box for the Birthday girl since her name starts with an A. I attached the plaque with some thick cardboard folded in half behind the plaque. 
I do hope she enjoys this hidden phone charger! Her mother says the Birthday girl loves handmade items. Fingers crossed! 

Here is a picture of the box in action! Looks like a decoration and not a phone charging station when the lid is on! Isn't my girl Raj adorable? I wish she was here with me again. 

Thanks so very much for stopping by and having a gander! Hugz and Carpe Diem! ~Niki

I am going to share this make with the following amazing challenges: 


Stamps & Stencils-Happy Holidays/Summer Time-this holiday (Birthday) is always in the Summer time!

The Artistic Stamper-Anything Goes