Thursday, October 19, 2017

Guest Designer at Stamps and Stencils!

Hello again! 2 posts in one day! I am happy to say that I am a guest designer over at Stamps and Stencils today. They asked me some interesting questions about being a creative person. Feel free to head over there and read my answers. I was also asked to share some of my favorite designs. 
This feathery black hat is one of my favorite designs because I enjoy making hats and also because of the elegant gothic feel to the design. It is a really soft hat and only weighs 3 oz! Wearable art is fantabulous!

Jack Skellington and the Nightmare Before Christmas are a classic in my book. This was the first wired armature I had ever made and I learned a lot in the process of creating Jack. Of course this is perfect for October and Halloween!

Thanks for stopping by and having a look at my blog! Ya'll are awesome sauce! Keep on creating and Carpe Diem! ~Niki

A hunting we will go!

Happy Halloween ya'll! I just love this time of year and it reflects in my art! The world of fantasy comes alive this time of the month. From gouls, goblins, ghosts, vampires, and vampire hunters! Yes, I have finally made a Vampire Hunting Kit! Read on if you dare to see what is in this vintage handmade suitcase!

I am excited to be a guest designer for Frilly and Funkie's challenge "Tis Near Halloween" with Sara Emily as the hostess. I know we both love Halloween so this was a perfect fit! I have finally finished this design. Picture heavy post so grab a cuppa and enjoy the wonderful fantasy world of the supernatural!
My vampire hunting kit started out life as a regular ole wood suitcase. I saw so much potential in this a splurged an entire 0.50cents on it! I removed all of the hardware and the added some padding to the outside of the suitcase. I then wrapped it in a faux leather fabric to give it a vintage feel.
Once the outside of the box was done, I started laying out everything I wanted to feature on the inside. This is an absolute must for this design! I have been saving and collecting items for this design for years. I did decide to leave some items out and add some others. (Hence the leg bones missing)
I glued a lovely red plush velvet in to line the top and bottom of the suitcase. The padding was recycled from some happy mail I received. I the traced around my objects and cut out the padding where the objects were going to lay. This was only done for the bottom of the suitcase.
I then adhered the velvet fabric to the padding to create my indentions. It was a process but it worked! Use foam if you decide to try this! All of these items you see in the pictures were altered in some way. Paint, embossing powder, alcohol ink, mod podge, stains, melted crayon, antiquing cream, you name it and I probably used the mixed media product!
The dissection kit is the real deal but I have painted, distressed and made it look more vintage. I did end up adding a cover over the scalpel blade though! I did cut my finger, oops.
The most important part of a vampire (or supernatural) hunting kit is to have a stake. I used a dowel and a sharp knife to whittle away at the tip to create my stake. I added some leather and wax thread to the handle and the skull is a lucky charm to help while using the stake. It keeps the aim of the wielder true.
The old image of a wiccan symbol was aged with distress inks and alcohol inks. The nails that are holding it in place are so vintage looking, I just had to use em.
Each bottle has a special purpose. Everything from snake skins, to rats, owl feathers, garlic, holy water with silver and more are featured here! The bottle labels were inked and aged with archival and distress inks.Each lid is sealed with glossy accents, just in case!

The skeleton rib cage and vertebrae are used to help new hunters learn where to hit their mark of the heart and also to help dismember any bodies that need it. There is a helpful labeled skeleton next to the rib cage so new recruits make sure to cut in the correct spots!
The bottles in the above picture are used to help with healing, should a hunter become injured whilst out fighting. And everyone needs a glass skull to hold some holy water infused with silver.
The cauldron above features an evil eye to help with black magic incantations. The vial of blood is from a vampire and ready to be used in the next spell.
These bottles are among my favorite. One features snake skin (dried mod podge I tinted with some paints) an the other features a bloody finger. Hope ya'll have a spooktacular Halloween and enjoy! Me and my little pumpkin helper say "Danger doesn't lurk at every corner, it's just hanging out waiting for fear and horror to show up"! HAPPY HOWL-OWEEN !!!!!!!!!!

I would like to share this vampire hunting kit with these challenges:

I was inspired by the dark trees and lanterns in the bottom right picture. This would be the perfect world for my vampire hunter!

I think I used about 6 different EC embossing powders in this design. 

Sunday, October 1, 2017

Vampire Hunter Journal

What a wonderful October! So happy that Halloween is so close (even though I will be spending this Halloween in the hospital with my husband while he gets a new hip). I have wanted to create a Vampire Hunting Kit for almost 2 years now and figured with the new challenge at Mix It Up, this would be the perfect time to get a start on it. And every hunting kit needs a journal, or two or three journals! Happy October y'all!
I started with a piece of leather and embossed it with a new embossing folder. You can't really see the embossing well in these photos and in retrospect, it looks like the leather didn't take the embossing well. Lesson learned.
I then hand bound 20 white 82lb pages with wax thread and added those to the inside of the journal because lets be honest, who the heck would want the pages outside the journal? Not me! Defeats the purpose. I am in a weird mood while writing this. Haha!
While the pages were sewn into the journal, I added a Tim Holtz metal tag to the seam of the outside of the journal. Nothing fancy, just some knots to make it stay in place.
This vampire hunting journal was downloaded from How to Haunt Your House (they have some amazing downloads for Halloween!) I printed it on a laser printer and then bound it just like the leather journal. Each page was distressed and grunged up.
I used some distress inks, distress stains, archival inks, acrylic paints for splatters, and even some dirt from my yard. The edges of the journal were given an aged look with a pair of scissors. I think I pulled out all of my browns, yellows, and dark colors and just kept layering until I liked the look.
The pages with a vampire that have been killed are highlighted with a red skull and a capital D. The book tells you how to kill the supernatural and also who is deceased. Such a cool and interesting read.
I had to add some red alcohol ink and red distress ink to each page to give it a sinister feel. If any Vampire Hunter had a journal, it sure wouldn't look all nice a pristine! Hard work means dirty items! Bwahaha!
Hopefully you all have a wonderful and fun October! I know I will be adding to my vampire hunting kit, guess you will just have to visit again if you want to see what else is going to be in the kit! Carpe Diem! Thanks for reading and visiting! HAPPY HALLOWEEN!

I would like to share this with these challenges:


I was inspired by the quote. "Give it a try said the heart". I have been wanting to make this and finally gave it a try! 

Thursday, September 7, 2017

Ruffled in Darkness

Well hello there lovelies! I have been on a hat making kick and am going strong with so many designs. You all will probably get sick of me posting these. Hehe! I have wanted to make a totally black and soft hat featuring a more elegant gothic feel and so I decided to play with lots and lots of feathers. I was inspired by all of the beautiful ravens that are cawing around my neighborhood. Here is the finished design. Enjoy!
I started with the usual foam. I used the taller black top hat for this feathered design. The shorter white hat will be featured at a later date. 
I glue my hat together and the grabbed a load of black feathers. You can dye your feathers using food coloring if you would like to make a certain color. The draw back is, the lack of certain colors in food coloring, and it makes the feathers more of a light color. But anyway, it is a fun thing to try!
As you can see in the picture above, it was a feathery good time! Those feathers ended up everywhere! Each feather was laid exactly where I wanted it and surgically glued into place. I didn't want any of the stem to show so there is a lot of overlap. The feathers were bent and curled to fit the curve of the hat.
The skull and wings were given a special treatment and then I added some dark blue rhinestones to it. The circle under the beak was inlaid with Prussian blue paint and highlighted with glossy accents. I added some soft black lace around the base of the hat and also tied some black leather into knots to give it more texture. It is hard to see in the picture.
The sides of the hat feature a TH skull and crossbone. The eyes are ice blue rhinestones from Xanderous Crafty Stash. Those little gems are so little and were very interesting to work with. The eyes were glued in with glossy accents as well. I did trim off the loop at the top of the skull.
The back of the hat showcases the large lace bow and another skull and crossbone. The lace is extra long to give the hat a nice added form of elegant goth. I do hope you enjoyed this journey with me! Thank you for looking! Carpe Diem!

I would like to share this hat with these challenges:


With so many ravens about in my neck of the woods, I thought this would fit into the Nature part. 


Friday, September 1, 2017

Inlaid Die Cuts

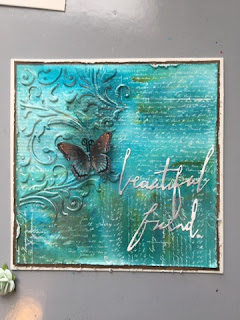
Hello! A new challenge started at Mix It Up. The challenge is to use an inlaid die cut. To be completely honest, I had never heard of this technique and so google helped me. Haha! What an interesting and fun time I had. I should have gone for a more simple die cut, but I never take the easy way! Haha!
I started with a Prima watercolor paper that already had a resist on it. I added some Lindy's magicals from my favorite Steampunk set and got to adding some color. The paper took the water like a champ! I totally enjoy how the magicals flow together and work so beautifully together!

Now comes the inlaid die cut part. After google, and my team explained this technique to me, I was intrigued to try it! So, I used a Sizzix Tim Holtz MM#2 die and cut it out of my paper. I saved all of those little tiny pieces and then cut the die again using white fun foam. I was able to keep the fun foam in the die cut and then just laid that into the paper die cut. Whew! That saved some time. 
Then I started to add the paper die cut on top of the inlaid foam die cut. Very time consuming but also kind of relaxing. I knew where the pieces needed to go and just went at it. I used TomBow glue for this step. 
I added a Reneabouquets butterfly and another die cut for the sentiment (thank you to Sara Emily for that one!). The sentiment die cut was heat embossed using white and gray powders. It is a bit wonky but so am I.

I then added some lovely flowers (also from Reneabouquets) and a handmade bow I made from some crinkle ribbon. I used Lindys Stamp Gang mists for the ribbon.

And there is my take on the inlaid die cut technique. Have you tried this before? I may be the only to have not heard about this technique. Lol! Carpe Diem! Hugz! ~Niki

I am going to share this creation with these lovely challenges:

I was inspired by the colors from the peacock feathers and the swirls in the tree picture.


Of course my favorite color combo is blue with hints of grungy rust and white


Thursday, August 31, 2017

Elegant in Gray

Gray is one of my favorite colors and I have incorporated it into my entire house. Gray and grey can be used interchangeably and that is okay by me. I wanted to make an elegant gray top hat that is more feminine and had some lace and frills. Here is the end result.  
I was lucky enough to be asked to be a guest designer at Xanderous Crafty Stash again and have used metal pieces from there. All of the metal pieces were heat embossed using a mix of white, gray, and silver embossing powders. I layered the metal pieces to create a flower look and used a brad for the middle. 
The hat was painted silver gray in layers. I wanted to make sure the hat had a nice even coat of paint over it. The inside of the hat was painted as well. The lace was adhered to the hat with hot glue and shaped to form around the base of the hat.
The little rivets that are on the top of the hat with the bands are made using a hole punch and glued with glossy accents. This hat was meant to look crisp, clean and ready for a photo shoot.
The largest feather was curled using some tricks I have learned about working with feathers. It creates such a wonderful added dimension to the feather cluster. And feathers can also be colored using food coloring (more about that later).
This mini top hat is the most frilly hat I have designed so far. I do have to say that I like the overall look and feel of the hat. Using quality lace was a must. I don't like that itchy lace stuff!
The back of the hat (above picture) features another metal flower cluster. The lace was gathered in the back and draped over the edge for a nice Victorian feel. And that lace is so soft!
The top view of the hat shows the "rivets" better. Just a regular old one hole punch produced these rivets. You don't need anything fancy to make em.
This side view of the hat shows the gathering of the lace around the base of the hat. Because the hat has a curve to it, I had to figure out a way for the lace to lay flat. By gathering the lace at the back of the hat and only gluing the bottom of the lace, I was able to form it better. Trial and error. Haha! I so enjoy making these hats and trying different designs. The sky really is the limit for my designs. I hope you enjoyed!

I would like to share this altered mini top hat with these amazing challenges:


Tuesday, August 15, 2017

Dark Harlequin Mini Top Hat

It sure has been a bit since I made a mini top hat. I have been itching to design a new one. With a new challenge at Mix It Up, I figured this would be a great time to get started! I didn't use the twist of Paper Piecing but the stencil sure was pieced together!
I started with my usual craft foam and drew out the template. Then I painted everything with red acrylic paint (2 layers) and grabbed a Tim Holtz Harlequin stencil. I used black texture paste through the stencil.

Once the texture paste was dry, I cut out the different pieces. The hardest part was waiting for the texture paste to dry! I didn't use a heat tool because the foam will change shape. 
I glued all the pieces together with contact cement. That is the ONLY glue that will hold this hat together. Nope, don't try hot glue. It doesn't work well.

I grabbed some metal pendants and such from my stash and used black alcohol ink on the pendant hanging on the front of the hat. The skull is from Emerald Creek and I applied Snow Cap AI to it. 
The "ribbon" around the base of the hat is leftovers from another project. I also made a little bow out of it.
The skull lady pendant is from Tim Holtz. The feathers were glued together and shaped with the back of my dull scissors. The skeleton hand is leftover from Halloween and painted black with white highlights for the bones.
The top of this hat has a Creative Embellishment rose chippie. I used Emerald Creek Classic embossing powder-Candy Red and adhered it with Tombow glue. Ta-da! Sounds easy but this took me awhile to create. Carpe Diem! ~Niki

I want to share this design with these wonderful challenges:

My process is the making of a hat from scratch. Try it! You won't be disappointed.