Thursday, January 28, 2016

Wicked Wonderland

Ohhhh dearies, today has been a day. A day of frustration and everything that could go wrong, did. But that is okay because tomorrow is a new day and it's also Friday! TGIF! I really wanted to design something with a glass bottle, probably going to be years before I do it again. I also wanted to use polymer clay (it didn't turn out so it may show up on another project). Here is the end result.

I used gesso first but that didn't work well, so I added tissue paper around the entire bottle. I created an ombré effect around the bottom of the bottle using DecoArt paints and then added crackle paste over that.  

After the paste was dry, I washed it with diluted DecoArt Cobalt Teal Hue and then layered over that with DecoArt Interference Turquoise. It sure does shimmer and shine! 

I added the antiquing cream to the bottom of the bottle and then wiped off until I was happy. I used antiquing cream Titanium white on the lid. I added some snowflake rub ons as well. 

The snowflakes were painted to mimic the ombré paints of the bottle and glued down. SnowTex was used to add some faux snow and while it was wet Glamour Dyst was liberally sprinkled over it. More shimmer! 

I totally forgot to take in action pictures. Oops! Hope you enjoyed otherwise. Lol! Hugz and Carpe Diem! ~Niki

DecoArte products used: 
Media Acrylic-Cobalt Teal Hue, Media Acrylic Interference Turquoise, Media Acrylic-Cobalt Turquoise Hue, Media Acrylic Shimmer Mister-Turquoise, Media Antiquing Cream-Carbon Black, Media Antiquing Cream-Titanium White, Americana Satin-Turquoise Waters, Media Crackle Paste, Dazzling Metallic-Shimmering Silver, Dazzling Metallic-Purple Pearl, SnowTex-Snow Writer, Glamour Dust. 

I would like to share this altered bottle with: 


Sunday, January 24, 2016

Dark and Radiant

You know how you have those days where your head is full of new creative ideas and you just keep going? This weekend has been like that for me. I love it when my muse is working overtime! I have been on a canvas kick for a little bit and today is another 5x7 canvas.


How I wish you could see the shimmer and radiant awesomeness of the gel thats in the background (it's like texture paste)! Gorgeous and more gorgeous! I set up my design first to see where everything would go. 

 I used white gesso to cover my canvas, then added some white texture paste and when that was dry I painted the entire canvas with black gesso. After the black gesso was dry, I used a palette knife to add the Colour Arte Radiant Gel-Guatemalan Green. 
 When the green paste was dry, I added back all of my black gessoed elements and glued everything down. 

Using Colour Arte Silks- Wisteria and Vintage Mint I painted the flowers and the dragonfly. I added the gems last.

The crown was painted with Inka Gold-Violet, as were the clock hands. The clock face was painted with Colour Arte Silks-Warm Gray. Black Finnabair micro beads completed the canvas.

I also tried a new idea. I used a script stamp from Rubber Dance Art stamps and inked it with the Radiant Gel then randomly stamped along the side of my canvas. I've done it with paint but never paste. :) It didn't turn out as well as I expected but I am going to try it again!
This was a fun play in the art studio this weekend. I tried so many ideas, some went in the reject pile and some are still a WIP but it was a joy to just spend some time enjoying the way my brain thinks, some good me time. Hugz and Carpe Diem! ~Niki


I would enjoy sharing this design with these fantastic challenges: 


(all of the Colour Arte paints and the gel are new)

(all of the Colour Arte paints and the gel are new) 


(my heart sings for a darker color palette)


Saturday, January 23, 2016

Shabby Something?

Hello y'all! Keeping with my goal to try many different styles and colors, I have decided to delve into a more feminine canvas today. Now, anyone that knows my blog understands I tend toward the darker color palettes but this design is none of that! Eek! I received some new LSG sprays for Christmas (from Alleystamp.com) and am using these today. Talk about a new path, and a new beginning.
I started with a 5x7 canvas and some gesso. Then added some script stamping randomly. I totally forgot to take pictures while I was working on the background. Oops. I then added the HS stencil and some texture paste. Once that was dry, I grabbed my LSG spray and sprayed it through the HS stencil to get a soft pattern. 
I painted the gate with white acrylic paint and the ornate frame was painted with Inka Gold-Turquoise. I used the LSG sprays to spray the small flowers. The leaves are made from a mold and Clay and painted with Luminarte Lucky Apple Primary Elements. The cheesecloth is added for texture. A MS branch punch was also used to create more texture. 
The butterfly was heat embossed and then "painted" in some spots with my new Liquid Pearls-Pewter. The sentiment was stamped onto vellum and little dots of the LP was added to the banner. The square green gems are new as well. I then splattered the entire canvas with all the colors I used and stamped another script stamp with Adirondack Mushroom ink. 
I know I forgot some steps but I was in the zone and just kept trying different things. :) Carpe Diem right? Hugz! ~Niki

I would love to share this design with these challenges: 


Saturday, January 16, 2016

Rich Grunge Tag

Well it has been freezing in my neck of the woods and I have been in the art studio creating away. I'm trying new techniques and types of designs because I don't want to be boxed into a certain genre (more to come about that later this month). With that said, I finished my tag for this months Tim Holtz tags of 2016. I didn't finish last years, oops. Who knows what the new year will bring? :)
I just had to try this design because of the dark colors and papers used. So happy that I finally got some Black Soot DP! Whoot whoot! I used a new EF from Sizzix (
For the chalkboard technique I went and did my own thing. I used my stamp and some white ColorBox ink. I always smudge it so it reminded me of a chalkboard. I stamped 2 images and fussy cut the butterflies and watch. All three are popped up on foam dots. I finished by adding the sentiment.
This is a tag I really enjoyed making, dark and elegent at the same time. Hugz and Carpe Diem! ~Niki

I would like to share this dark and saucy tag with these challenges: 

 (I used my new brads, new Black Soot DP and a new embossing folder)


(Must use rubber stamping)


BLOGGER CHANGES-Due to the recent changes made by Google, it seems that my Follow By Email button is not working and those that follow me through email are not getting an email. I am not sure how to rectify this situation but I will keep looking for an answer. Maybe try to follow me by email again? 

Friday, January 15, 2016

DecoArt at SanDee&Amelie's

Hello y'all! Today starts another challenge at SanDee&Amelie's Steampunk challenge. There have been a few changes but I promise you'll like em. We start with our new sponsor-DecoArt! How cool is that? At SanDee&amelie's Steampunk Challenge, we have the great honour and pleasure of having gained DecoArt as our "one and only" prize sponsor from now on, the whole team decided to put a special spotlight on some of the fabulous products from their wide range of media and paints. 

So this month each DT member not only used DecoArt paints and media on her DT project, but also introduces more closely one of the products she has used. 


Here is what I decided to make. This is my first time trying this Andy Skinner technique (which you can see HERE) and of course I put my spin on it. Enjoy! This is going to be a long journey.
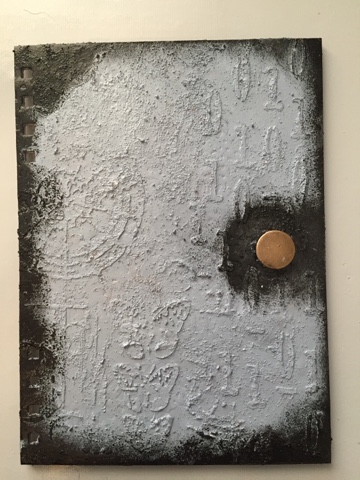
I have had this art journal for over a year and only have 4 pages done in it. So I decided to start with the cover thinking if it looked better, I would be more inclined to use it. Hehe! 
I added some texture paste through 2 stencils, the number stencil is from Andy Skinner. I then added some sand texture paste thus starting the painting technique showcased in the video by Andy Skinner. 
I kept adding paints making sure everything was dry between layers. 
Then came the clock and gear chipboard piece. I watched another video (HERE) and used this technique (first time trying this one as well) but changed up the colors. Yellow green for the base. 
Then Cobalt Turquoise Hue applied using a new texture stamp. This is where I added my own spin to the painting technique because I just kept adding color until I was happy. 
The clock/gear chippie was glued down with DecoArt Liqui Glass and then whitewashed with DecoArt Titanium White antiquing cream. 
This is what it looks like all put together with the rest of my Art journal. The picture above is closer to what it looks like in real life. I don't think the lighting does it justice though as it isn't this washed out and blurry (like the pic below shows). Darn photos. :) 
Here is a quick peek at the prize package you could win! You have to be "In it, to Win It!" Just remember to have fun and enjoy the process. Hugz and Carpe Diem! ~Niki
I would like to share this art journal cover with these lovely challenges:

(I have used 2 new techniques, and a new texture stamp)


(Anything Goes altered art)

(I used numbers, some of the colors from the board and plan to make time to use my art journal) 

(Anything Goes Altered Art/Mixed Media)

Tuesday, January 5, 2016

Ring Out the Old, Bring in the New at Anything But Cute #9

I do hope everyone totally enjoyed their holidays! We are back at it again and our lovely sweet and talented hostess this month at Anything But Cute is: Anne. She has created a wonderful challenge theme to help you use those wonderful art product Christmas gifts you received! Ring Out the Old, Bring in the New

Here is what Anne says "To celebrate the New Year, we would like you to create a mixed media card or project using something 'new'. Perhaps you got some fabulous new craft item for Christmas or you have something new that you have not used yet - just remember to tell us what the new item is!"

Exciting isn't it? I had an extremely lovely and generous Christmas this year. My DH felt bad about last year so he kinda went all out. Hehe! Everything I used for this design is new, well almost. Even a new craft mat!


Lets get started on the process! I started with these canvas tags and applied gesso to one. Dried it with my new heat gun and then used some new modeling paste and a Ledger stencil, dried that with my new gun as well. The base of these canvas tags are made of some very sturdy material, not sure exactly what it is but, dang are they sturdy little suckers. 

The Liquitex modeling paste is exquisite! I usually make my own but this is awesome sauce stuff! Thick, easy to spread and dries kinda fast.  

The real fun started with these new LSG magicals from the Industrail Chic set. Those have been on my wish list for over a year! I sprinkled Steampunk Sepia and Shabby Turbine Teal onto the tag and spritzed with water. Heat dried and then dabbed on some LSG starburst Bachelor Button Blue and Cowabunga Copper and sprayed with water. Always dry between layering colors, even though you will get some merging of the colors even if they are dry. Next came the Rusty Lantern Lime magicals, I applied this color over the texture paste with my new Waterbrush (detailed tip). Took me a bit to figure out how to use the thing but it was fun.
The cheesecloth was also colored with the Rusty Lantern Lime magicals and hot glued to the tag. I added a metal anchor between the cheesecloth and layered my heart knot on top. The heart knot was kinda hard to tie but after about 20 failed attempts, I did it! Thank you YouTube for the tutorial. I watched so many I have to give credit to anyone that made a video about it. :)
The last little bit added was really micro! These new micro beads are fantastical to add some texture but those little, I mean LITTLE, buggers are a handful! Finally I just put some mod podge onto my craft mat and dipped my brush straight into the bead container and "painted" 'em onto my tag. Whew! I had a bit of a mess going for a minute. I ended up using Copper, Bronze, and Splash micro beads. 
The photo below shows a closer look at the heart knot. Hopefully you can actually see that it resembles a heart shape? This is also a close up of the micro beads. The anchor is an old piece from my stash.
Cheers to 2016 and all of the new journeys everyone will be taking, whether it be through art, life, or a planned adventure! Hugz to you all and don't forget to check out my what talented teamies have designed! Carpe Diem! ~Niki

I would thoroughly enjoy sharing this tag with these lovely challenges:

Our Creative Corner-Make Time Moodboard Challenge
(I thought the picture from the wonderful moodboard looked like a sea captains navigation compass, I also made time for myself to design this, being sick and under the weather had me out for a bit)

613 Avenue Create #157-Anything Goes w/ optional twist Create a CAS card/project

Crafty Boots Challenge-Something Old, Something New
(my cheesecloth and metal anchor are the something old, everything else is something new)

Craft Your Passion #293-Anything Goes

Crafting from the Heart #93-Anything Goes

Simon Says Stamp Monday Challenge-Something New