Sunday, October 25, 2015

Book of Horror!

Ohhhh October, how I enjoy thee! I wanted to design something really gory and disgusting. The other night I was watching Hocus Pocus and thought to myself "what would the sisters book look like for a rated R movie?" And here is what came to mind. This is the Book of Horror, enjoy or be disgusted-the choice is yours! (Evil laugh in the background) And some exciting news at the end of this post!
I started with a plain paper mâché book, added some gesso to the entire thing and some black leather to the edge. The leather lends a vintage feel to the spine of this wicked creation and also adds age. Can you see the bloody hand print on the spine?
Then I started sculpting with polymer clay. Now I have never done this before so there is always room for improvement but this is the first take. I lightly drew out where the eyes, nose, and mouth would go then went at it. 
I kept pushing the clay around until I was satisfied (kinda) with the results. Then it went into the oven to bake. While the grotesque face was baking I started on the back of the book. I glued down some interesting lace stuff, painted over it with gesso, and added some more polymer clay. I had to use air dry clay on the back and I am not a fan of it, I much prefer Sculpty. 
Next came adding the skin color and let me tell you, skin is hard to paint. There are so many shades and hues to skin. I used DecoArt Media line colors: Red Iron Oxide, Yellow Iron Oxide, Quinacridone Burnt Orange, Quinacridone Gold, Paynes Grey, Carbon Black, and Raw Umber Antiquing Cream. The flesh tone was achieved by mixing a pale pink and Americana Zinc with a dab of Adirondack Hazelnut. You just have to play with the colors and go with your gut. 
The picture below is when the entire back section was done. I really am diggin the "wet" look of the exposed flesh. This wet look was achieved by using DecoArt Liquid Glass and DecoArt Media Mister-Red. I added some paint splatters to break up the skin color and give it some depth with the colors mentioned above. The "sutures" are made with rusty wire from my stash, with each one hand shaped and glued with Glossy Accents to the pulled and stretched skin!
I did work on the front and back pieces intermittently but didn't glue the front piece until it was entirely done. The teeth were a sore spot for me. I wanted it to look like the teeth had realistic gums so I added some more clay and pushed my "teeth" into the clay to create grooves. I will send something to the first person to guess what the teeth are made from.
I pulled all the teeth out and baked the clay, then added the teeth back to their spot. The teeth got a makeover (or make-under) with a wash of DecoArt Media-Yellow Iron Oxide and Quinacridone Gold. The gums, eye sockets, nose socket, and exposed flesh were painted Red with the DecoArt Media mister (love that Red! And I also love that after it is dry, none of the red seeps into my paintbrush when I layer colors over it!) The skin was painted the same way a the back of the book. The eyeball was aged with a wash of Yellow Iron Oxide and made to look gooey with Liquid Glass.
The "page" part of this book was made by applying thick and thin amounts of DecoArt Crackle Paste. Once that was dry I gave it a wash with DecoArt Paynes Grey and Old Paper DI. Then I rubbed on some DecoArt Raw Umber Antiquing Cream and wiped off the excess with a paper towel. (you may have noticed that I use the Antiquing Cream as a wash, paint, and dry brush-very versatile stuff!)
Creepy little guy! In the picture below you can see the colors from the washes I gave the "pages". Lastly I added DecoArt matte Varnish to all the edges. 
The spine was distressed with texture paste and the Andy Skinner stencil-Code Breaker. I aged the texture paste with DecoArt English Red and Titanium White Antiquing Cream as well as dry brushing it with DecoArt Red Oxide and the hand print on the spine was made by painting my hand with the Red Oxide and grabbing the spine on this Book of Horror.
The face kinda has a sad look to him. I hope you don't meet this Horror out and about on Halloween night! You may be the next in line to be skinned! Mwaha ha ha! Hopefully you weren't too disgusted that you blew chunks, although if you did I would like to know. Happy Haunting and Carpe Diem! ~Niki
                                               

This delightfully grotesque book will be shared with these horrific challenges: 


A darker art blog spot, so check it out!


I have been accepted into the DecoArt Blogger Outreach program and this is my first design! I am happy to share and learn more about their products. I have to say that as of right now my favorite supplies are-Liquid Glass and Red Oxide. 

Thursday, October 15, 2015

Steampunk Skeleton and DecoArt

RHappy October y'all! Thank you to everyone that swings by my little blog and has a gander! And a big thank you to my new followers and my regulars!  Over at SanDee&Amelie's Steampunk Challenge we dare you to create something involving Top Hats and Moustaches. I am super duper excited for this challenge and without further adieu here is Mr. D. Debonair! He knows he looks good and he is the perfect gentleman, although a bit past his prime. :)
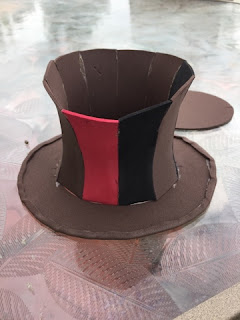
I started by making the top hat. If you would like to see more of the process for the hat HERE is a step by step. It all starts with craft foam and some scissors. 
This is the hat almost all glued together. Then the fun begins with paints and accessories! 

I wanted to showcase the DecoArt Media products. I don't have many of the mixed media line supplies (YET) but I make good use of what I have. All it takes is a good product and creativity! I started by painting the entire hat with DecoArt Media Fluid Carbon Black acrylic paint. Then I used DecoArt Media Crackle Paint, thin coats and thicker coats to get lots of different sized cracks and set it to the side to dry, naturally. No heat gun (it will warp the shape of the hat)! The craft foam soaks up paint so some splotches were used instead of covering everything up. 
I then added some lace leftover from my last project. Brads and an old piece of chain from a necklace were used to create the cross-stitched pattern on the front. I adhered the lace with DecoArt Media Matte Medium and added the black beaded piece around the bottom rim with my hot glue gun.
Who knew trying to find a skull stamp would be difficult this time of year?!? I did find this paper bag (set of 12) and knew I could fussy cut the skull out! Winning! I then placed it on the top of the hat and sealed it with DecoArt Media Matte Varnish (I varnished the entire hat before placing the lace).  
While the paper bag skull was drying on top of the hat, I used DecoArt Media White Gesso to paint a wash on the skull head. I wanted him less dirty looking. The picture below is before I painted him. 
I then added the feathers and brooch to the top hat and started working with polymer clay to create a moustache, an eyeball, and a mold of the brooch. This is my first time making any of these polymer clay creations! The eyeball was the most fun but kept rolling around on my art desk. Lol!
Once all the polymer clay elements were baked and cooled down, the details were added to each. I painted the eyeball with white acrylic paint and then added a wash of DecoArt Americana Camel to give the eye an aged look on the sclera. I added red acrylic paint to the iris and drew silver lines around the iris to show pigmentation. The pupil was painted black with a small white highlight to give it a gleam. Mr. D. Debonair's moustache was painted with DecoArt Dazzling Metallics-Shimmering Silver and then dry brushed over with the Carbon Black. I attached the monocle chain to the hat and glued it to the skeleton head with hot glue.
The neck tie bow was a piece of ribbon from my stash, it adds a little sumpthin, sumpthin. I used some Halloween rub ons for the base. The damask pattern is one of my favorites and I have been hoarding it since April!
I added some silver paint to create the small dots around the base and then some washi tape around the very bottom, along with the white bat, skull, spider, and eye.

Thank you for having a look see, and letting me know your thoughts on this design. I sure know that we all put a lot of work into our creations and feedback is greatly appreciated (the bad and the good)! The blog land I know, is a wonderful place, filled with so many creative and inventive peeps! Carpe Diem! ~Niki

I am stoked to be sharing this creation with these wonderful challenges please:


I used the Tic Tac Toe of Halloween (my entire design), Time (a couple of weeks to finish this piece),
Red (the rose and the eye)

Scrapbook.com-October Spooktacular Challenge-Use 1 piece of Bling OR washi tape
I used washi tape around the bottom of the base and also Bling in the form of the cross chain pattern on the front of the hat, as well as the Brooch.


Sunday, October 11, 2015

October Tim Tag 2015

This months is all about experimentation for me, and lots of skulls. I do enjoy the gothic, dark side of art and feel more confident about my darker art. With that in mind I knew I would create something completely different than the tag that Tim created but alas, I do not have the dies or most of the supplies he used this month. So here is what I did!  Mwahahaha!
Here is a link to the original and there is a video this month as well. Go on and check it out. 
 I used my new die, TH Sizzix Pendiments die and glued those to my tag. Note to self: DI does not like to attach to TomBow Multi glue. Oops! I then used the wrinkle free distress technique and swiped away. Inky and messy = fun art.
I also used the same technique for the Alcohol Ink glossy paper that my skull is mounted to. More messy fun. Such a good day in the art studio today! Yippee! 
I added some leftover lace type stuff to the bottom of my tag after inking it up with Twisted Citron DI. The numbers 31 are a die cut (I layered 3 thick pieces together) and are painted with DecoArt Metallic paint and then I used crackle paint and when that was dry I added some Pool Alcohol ink to the top. The blood splatters are from flinging the end of a spray bottle at the tag with red paint. The circle pattern is from a TCW stencil-Mini Specimens inked with DI Fired Brick.The little 'Help Me" frame is a Halloween sticker from last year.
Stay tuned because on the 15th of this month, I have the most interesting skull to share! It is a doozey and may even send chills up your spine! Thanks again for popping over to this section of blogland! Have a wonderful week and Carpe Diem! ~Niki

Challenges I would like to share this tag with:


I went with Halloween and Dark

I chose Freaky

Our Creative Corner-Horror

CuttleBug Mania-No Squares
I used my CuttleBug and the Tim Holtz Sizzix Pediments die

Monday, October 5, 2015

31 Day of Halloween at Anything But Cute

October is here and that means another challenge at Anything But Cute. Our super inspirational, and Halloween loving hostess is Sara Emily! For this challenge she would like you to make a mixed media card or project for Halloween. It can be spooky or not, but you MUST include the number "31" somewhere in your project. Let your creativity take over and enjoy! 

Let me take you through "31 Halloween Hauntings!" Mwahahahaha! Enter if you dare!
I started with a Tim Holtz assemblage clock and applied so many different sprays, inks, DecoArt crackle glaze, DecoArt texture paste, and acrylic paints as well. Let's see the process! 
I applied 3 coats of gesso and dabbed some texture paste and texture sand here and there. Then waited forever for it to dry! 
This is after the first coat of LSG sprays and DecoArt Turquoise Waters Satin acrylic paint and DecoArt Patina Green Antiquing Cream (I used the Cream after all the layers were on the clock as well as before)
While the clock was drying (when you heat metal it gets hot so I opted to wait for some stages to dry, my fingers thanked me), I started on my moon background using Distress inks and TH crackle paint for the tree. The moon is yellow and orange and the black smudges are dark clouds. The smallest gravestone includes the number 31. 
The graves are all handmade out of polymer clay, I used various objects to create the graves and then I "aged" the graves using a wash of DecoArt acrylic paint in Zinc and gesso, as well as LSG spray. 
The skeletons were purchased at a local dollar store (4 on a string) and I sprayed those with Heidi Sawpp's Black Velvet spray, I dry brushed both skeletons with DecoArt black acrylic paint. I made the females clothes with leftover fabric tidbits from other projects. Both skeletons accessories are made from polymer clay. 
The small pumpkins are made from polymer clay and painted with black DecoArt acrylic paint and the brushed over with Silks-Spiced Pumpkin. You can see one of the pumpkins beside the lady skeletons head and one in the graveyard.
I added some Halloween stickers and moss that I handpicked near a friends cabin, and some Spanish moss was used for the floor of the gaveyard. The bats are inked with alcohol inks and attached to rusty wire that I twisted around the end of a paintbrush. I adhered those to the clock with a glue gun. 
Here is a close up of the inside of the clock. These 3D designs are sometimes hard to photograph!
I do hope you have enjoyed reading this post and it gets you to thinking about the number 31 and also Halloween, which is right around the corner! I have my hat almost done for October 31st! I wear a hat for the trick or treaters that come to my house, never too old to join in the fun! 
Thank you all for reading this, I know it was a long one! Hope you all have a terrific October and remember: this month candy has no calories, right? Snickers and Milk Duds here I come! What is your favorite candy? Carpe Diem! ~Niki

I would really love to share this altered clock design with the following challenges:


I used the center of Bat, Free Space, Moon

I chose to go LOC with the Halloween theme and Horror theme

DecoArt Mixed Media Haunts Challenge-Showcase their mixed media product line