Friday, April 15, 2016

Rusty Tag

Hello lovelies! I do hope you have been enjoying your day. Seems like April is flying by and the sun sure is out in my neck of the woods. Do you see yourself outside more during the warmer months and creating less? My mojo seems to be out gallivanting right now but I was able to create this rusty tag for our new challenge at SanDee&Amelie's Steampunk challenge.

You can create anything your heart desires as long as there is a Steampunkish, Vintage or Industrial vibe. I started with a canvas tag and applied a layer of modeling paste. Once the paste was almost dry, I used multiple stamps and stamped into the paste. You don't have to push hard to get results. I then applied a wash of Prussian Blue Hue. 
 I then added some texture sand around the edge and when dry painted a thick layer of Quinacridone Gold and used the Q-gold to create my rusty drip lines. I used my trusty rusting powder on all of the die cuts. 

Here is a close up since I forgot to take more process pics. Oops. I need a new phone with more memory so I can take more pictures. Hehe! But don't you just love those rusty drips and the white highlights from dry brushing? SHARED SECRET-those light bulb chippies have been on three, yep, 3, different designs and I have painted, spritzed, powdered and pull off this chippies every time. Thank goodness I was FINALLY able to use em. Whew! I didn't want to throw em away and was getting frustrated. Lol. 
And there you have it, I've never really tried this color combo and am very happy I stumbled into it. I had planned on more paint layers, but once the wash was down I really loved it and decided it was enough. Yippee! Sometimes it sure is hard to add anything to an amazing background. I am sure you all know what I mean! Hugz and Carpe Diem! ~Niki

I would love to share this rusty mixed media tag with the fantabulous challenges:

This tags goin on my Father's Day gift


I used the different shades of blue


Monday, April 11, 2016

Craftroom Decor from an old Kitchen Cabinet

Hello lovelies! I have been breaking out of my norm of doing mixed media and have tried my hand at some home decor items. I have 3 projects going right now. One is complete, the second is almost there-just waiting on new handles, and the third is somewhere in-between. Today I am sharing my new/old kitchen cabinet that's been turned into an art room storage facility. :)
For this design I used the DecoArt Chalky Paint in Everlasting and Relic. I applied 3 coats of the Everlasting (white) because the original color of the cabinet was a dark tone and took a bit to cover up. I applied the paint with a roller but IMHO using a paintbrush is better because the roller sucks up so much paint! 
After the Everlasting Chalky paint was dry, I used a DecoArt-Old French Script stencil to add the design to the sides and front of the cabinet. My art room is mostly grays, whites and some black so I wanted to stick with that color palette. 

The handles were a bronze color but I applied 2 coats of Everlasting with a foam brush and got a nice shabby look. I drilled the holes for the handles and screwed em in. For some reason the cabinet had no drill holes but it was an easy fix. 

The front door inlays are the DecoArt Chalky Paint in Relic. I hand painted the sides with a brush and boy did that take some time. Lol! I really enjoy the chalky paint because it will adhere to anything, even a varnished surface but that is a story for another time and that project is the almost finished one. 
I added some small rounded balls to the bottom of the cabinet for feet and also to make it easy to open the doors without rubbing on the carpet. Those were painted with Everlasting. And there you have it a kitchen cabinet makeover! I was able to thrown away my very broken book shelf that held all of the goodies that are now in this cabinet. The end of it was leaned against my wall so it wouldn't 
fall over. Lol! Into the trash it went. Spring cleaning is in full swing at my house. Thanks for looking and Carpe Diem! Hugz! ~Niki

I would love to share this trash to treasure piece with

Tuesday, April 5, 2016

Earth Day at Anything But Cute

April showers bring May flowers right? And also Earth Day! What do you think of when you hear the words Earth Day? Mother Nature? New growth? Earthquakes? I think of it all, but mostly what natural found items I can try to make art with. Tree branches, moss, flowers, bark and such are among the list that helped me design this reverse canvas.

Our new challenge at Anything But Cute is: Earth Day (celebrated on April 22nd). Hosted by the amazingly talented Samra of Paper Talk with Samra. Here's what she would like to see: Create a mixed media project inspired by this mood board (picture below) and the beauty of our planet. Please tell us what inspired you. Entries for this challenge can be eco friendly, or even recycled/upcycled items, or a depiction of the sea, mountain, river, forest, flowery meadow.....let's celebrate our planet! 
This is my first attempt at a reverse canvas. I placed some elements I knew I wanted to use and took a picture. Not very Earthy yet, but layers and paints and creativity will turn this into a Spring Earth Day design. :)
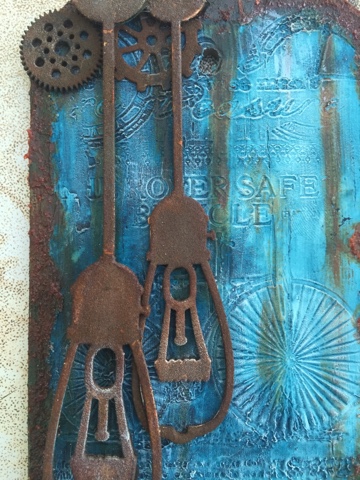
Now it's time to play with some paper. I trimmed out a rough shape and then cut out the middle section to leave room for my nest. I edged all sides with Ground Espresso Distress Ink and used a Rubber Dance script stamp to add some stamping. Then added some small little butterflies as well. I then used some texture paste that I tinted with Primary Elements to make it blue, I pulled the blue colors from the mood board. 
I used a bit of washi tape on the inner edges to help ground the front of the canvas and get rid of the space between the canvas and wood frame. Then added some moss, some grass (element from the mood board),some flower sprigs, and pieces of a stick. I also painted a chipboard butterfly blue (another element I pulled from the mood board).
The small eggs were made from polymer clay and then painted a light blue. The "spots" on the eggs were made with a brown Archival ink pen. 
I glued everything down with a hot glue gun just because I wanted to see the end result fast and couldn't wait for other glues to dry. Lol! 

The large chipboard in the left corner and on the bottom are painted the same way. I laid down a base of white gesso, applied DecoArt crackle glaze-dried naturally, then added the script stamp.  When the glaze was dry I swiped some Raw Umber antiquing cream over everything, heat dried it and wiped it back. Then I applied the blue paint randomly with my finger. And it is done! Show us what Earth Day means to you and remember to check out what my talented teamies have made! Hugz and Carpe Diem!