Saturday, January 31, 2015

Paper pleating Mixed Media

Hello y'all! Seems like 2015 is just galloping by. Our new challenge for February at Mixed Media Mojo is the theme: RED with a twist to use WINGS!

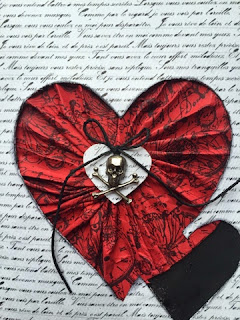
This canvas is part of my gift to my husband for Valentines Day. Awwww! I started by painting my entire canvas with gesso and then painting the sides with black acrylic paint. I added FolkArt Metallic Red over the black just to add some sparkle. 


Then I grabbed some paper from my stash with script on it (I was thinking along the lines of a love letter) and ripped the edges. 

I have wanted to try paper pleating for a couple of months now after watching a video from Gabrielle and thought this was the perfect time for it. 

I cut out two hearts from some scrap paper and then traced those to the back side of my script paper. I cut out my hearts and was left with a heart hole to put my pleated papers. Can you see the "fix" I had to do in the bottom left corner? In the end it gets covered for the most part. We should all submit a Mixed Media Mistake shot for a blooper page. Hehe!

I started with the smaller heart. I cut my red paper down to a size I thought would work. I cut two strips and sprayed water onto both sides of my paper (it is easier to shape) and started pleating. I didn't take pics of this because I do the same thing with the large heart. 

For the large heart I stamped my red paper first, then cut it around the 2 inch-ish mark and sprayed water on both sides. I cut 3 strips just in case things went wonky but you only need 2 


I then pleated all three strips. I put my script paper on my canvas (not glued down yet) and found the center of the large heart and made a mark on my canvas. The mark on my canvas is where the tip of my pleated paper will go. Shape both strips into a circle around the mark on the canvas. 

I cut a smaller heart out of leftover script paper for the center of the pleated heart (it also covers the hole that was left from the pleating). I then added a small skull and black hemp tied in a bow. I painted the spot where the smaller heart will go with black acrylic paint. I did this because the smaller heart is on dimensional dots and I didn't want any white to show through. I glued my script paper to the canvas at this point. Then stuck my small heart where it belonged. I added metal wings to the small heart as well.

I then made my 3 roses with the Tim Holtz Tattered Florals die. Red Stickles were used on the edges of the large rose. I used glittery black embossing powder on my chipboard. I adhered the roses and the chipboard with Glossy Accents. 

I used a red rose puffy heart (Dollar Tree)that I grunged up with black ink in the bottom corner. The red paper is cut into banner shapes and red Stickles were applied to that. The stamp, "Pass Some Love Around",  is a new one and I used white embossing powder on it. Then found some leftover lace trimmings and viola! We are done. Go check out our Mixed Media Mojo challenge HERE

Thank you for stopping by and peeking into my neck of the wood. Carpe Diem! 

This project will be shared with the following:

Shopping Our Stash-Theme: Love HERE. Everything I used was in my stash already except for the new stamp.

Time Out Challenge-Valentines Day with a twist to use hearts HERE and take some time out to create!

We Do Doobadoo-Romance HERE

Frilly and Funkie-Be My Valen-Twine HERE


Tuesday, January 20, 2015

Rusting Powder?!?

I have been itching to do a Steampunk inspired piece even more so than I usually want to because of a new product I got during Christmas: Rusting Powder!

I started with my leftover red paper and used the TH embossing folder Riveted Metal. 

I painted the first piece with silver DS and then Metallic FolkArt copper. When dry I then added glossy accent to adhere my rusting powder. I sprayed the powder with vinegar to activate it and set it aside for an hour to let magic happen. (while it was drying I did add some AI-Pool for the  patina part). Awesome!!!

For the other red paper I just applied glossy accent and the powder, again activating it with vinegar (TIP:Work in a well ventilated area! The vinegar stinks). When the powder was dry I sprayed the entire piece with Smooch Spritz-Copper
(Forgot to take a picture of that piece so here is what I have leftover)

Next I started on the clock piece. I used the TH Weathered Clock die and my leftover piece of cardboard from Christmas. I painted it with gesso and then dabbed DP-Bundled Sage to part of it. After it was dry I sprayed it with the Smooch spray and Perfect Pearl Mist-Perfect Copper. Then edged the entire clock with black StazOn ink. 

All this rusting turned out really good IMO! So I adhered all the papers to my canvas and added the "Unique" muse token with a brad. I glued the metal corner pieces after applying a small amount of Rub N Buff, and got started on the gears and cogs. The chipboard cogs are from Creative Embellishments.


3 cogs were rusted with the rusting powder, 3 other cogs were painted with the metallic copper, some were left raw and I used metal ones as well. 

I put some dimension dots on the clock so I could fit the gears under it (I like to make it look like they actually can work) and adhered all the gears with glossy accents. I added the sentiment, "live the life you've imagined" with some brads and foam dots. 
The first picture is my layout of where I thought everything would go and the second is the end result.


I have to say I would recommend the rusting powder to anyone that likes what it can do. Like what you see? Leave a comment because it sure brightens my day! Carpe Diem!

This project will be shared with the following: 

Craft Your Passion: Anything Goes HERE Love me some Steampunk mixed media.

Our Creative Corner-Christmas Leftovers HERE (I used paper leftovers and a canvas leftover-I was trying to make waves, it didn't work so I scrapped this piece and that is how I got this canvas and a piece of cardboard that was the backing from my calendar for 2014)

Artful Times-Time HERE. I used a clock and a lot of time to get the rusting powder to do it's magic.

SanDee and Amelie's Steampunk Challenge-3's My Lucky Number HERE (I used 3 different rusting techniques, 3 cogs were colored with Metallic Copper FolkArt paint, 3 cogs were embossed and rusted)

Creative Embellishments-Inspiration Board HERE. I used the brown, greens, and reds from the picture and the chipboard gears/cogs are from CE
10668670_10203875341556079_6459179616512836293_o

Sunday, January 18, 2015

50 Shades of Grey or Sprays?

As per my title, this piece was influenced by the book. Sometimes I don't even know how I think of these things. Lol!

This tag was a handful and took me longer than expected due to drying times and so many new techniques. Something went wrong with the tag background and I ended up with a sticky mess. Lesson learned. I fixed it though, gel medium!

I used so many supplies I can't list it all but at the bottom is a pic with most of the supplies I used. 

This is my first time layering. Yes I have layered before but this is Layering. Know what I mean? I knew I was going to stay with black, whites and greys because of my book theme. But first I started with the polymer clay bits. My first time making handcuffs and also a mask. The tie didn't make it to the finished product.  

I painted all of those and added some chains, designs, and character. No whips though, I didn't have any leather. 

Then I started on my layered tag. The tag was sprayed, inked, misted, grunged up, stenciled, and heated. Whew, what a workout!


Then I grabbed some papers that went with my train of thought and cut all of those to the size I liked. I don't measure anything, sometimes it is a surprise at how something came to be so far off from what I wanted but that is the fun of it. Hehe!

I distressed all the sides with the TH edging tool and inked all the sides with black StazOn ink. My fingers were messy and havin fun. 

I laid out everything before glueing and then flipped the entire piece over and worked from the bottom so I knew where all my elements would go. Does that even make sense?

I handmade some flowers with the TH die and painted, sprayed, glued, and sprayed some more. There seems to be a lot going on huh? Yeppers! 

The feathers were another new for me. I have used feathers in the past but this time I curled the edges (I wish I could find the lady that did a post about curling feathers because she is where I got the idea!! Hats off to her please!) with my scissors. Neat curls happened!

I added lace, sticks with small pearls, ribbon, and that tulle stuff between layers. 

Now for the "weird" part. The sentiment, she believed she could, so she did.", is my interpretation of how the leading lady of the book could make the decision to do what she does. Ka-peesh? I stamped it and then embossed it with  new silverish-grey embossing powder. 

Here are some of the supplies I used: 


This tag was a challenge for me but I am kinda likin the end result. If you have to ask about the mask and the handcuffs I know you haven't read the book. Lol! Carpe Diem!

This project will be shared with the following: 

Frosted Designs-A new_______. HERE My new is pretty much everything, the clays bits, the layering, the color combo, the feathers, techniques. 

Artist Trading Post-Fresh Beginnings HERE. Hopefully this is a fresh new way to not be intimidated by layers. :)

Through the Craft Room Door-Anything Goes HERE 

Natalie and Amy's Challenge-All Things New HERE I used new supplies (new stamp, new embossing powder, new techniques)

Open Minded Crafting Fun-Movie Challenge HERE I have watched the trailers for this movie and it is to be released on Feb 13, 2015. Who's excited? Or is it a guilty pleasure?

Wednesday, January 14, 2015

Mixed Media Tag #1

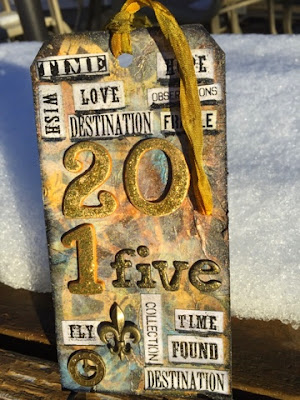
Another new for me is joining in the 12 Tags of 2015 with Tim Holtz. I have seen many a wonderful tag made for this challenge and thought I would give it a go this year! 1 down, 11 more to go. And this fits our theme at Mixed Media Mojo-NEW with a twist to use 15.

I started my going to the tutorial that TH (Tim Holtz) put up on his blog and then put my own creative twist on this tag. 

I don't have all the art supplies that were used by TH but that didn't stop me. I stamped my own white tissue paper using a TH stencil and adhered it to my tag using gel medium. 

I then grabbed 3 distress paints (broken China, bundled sage, wild honey) and started adding some color to my tag. I used my fingers to spread the paint and then misted with water to get all the colors to blend. Then came the Distress Stain (Vintage photo, crushed olive, spiced marmalade). I used the same DS for my crinkle ribbon. Some TH rub ons were used for my chitchat items (TIP: if you don't have certain supplies for a challenge think outside the box and use what you can) and glued those using Glossy Accents. 

After that was dry I painted my number chipboards with a copic marker then Metallic gold Alcohol Ink and applied gold Stickles. I set that off to the side to dry while I finished my tag. 

I added a small dab of the AI to my craft mat and mixed it with some water so I could use a paintbrush and add the paint splatters. I used the Glossy Accents to adhere the metal pieces and my chippies. I then spritzed the entire tag with Shimmerz Frost to give it a glossy shine because I don't have the Glue N Seal. I used black Archival ink around the tag edges and I was done!

I do hope you enjoyed this process and much as I did while creating it. Thanks for stopping by! Carpe Diem! ~Niki

This project will be shared with:

Tim Holtz-12 Tags of 2015 HERE

Craft Hoarders Anonymous-Choose Your Challenge (awesome idea!) HERE  I used Ink, Ribbon, Stamping, Chipboard and Bling. I also wanted to enter this challenge because I made a promise to myself that I would not buy any supplies until April.

Anything But a Card-New Beginnings HERE My new beginnings are: a new career path, not buying art supplies until April, and learning new techniques

Sunday, January 11, 2015

Dreams and Wishes

I have much time on my hands now and have been sequestered away in my Craftroom having loads of fun. This piece I have been working on for a bit but never finished it until today! Whew!

I started out with a blank canvas and applied my damask stencil with homemade texture paste. I stenciled the entire canvas and the sides. 

While that was drying I set to work on my cheesecloth. I sprayed it with Lindys Stamp Gang Tea Pot Purple and Saltwater Taffy. I also used Heidi Swapp's Black Velvet. I added a piece of coordinating fabric on top of the cheesecloth. This piece falls into my craft room makeover colors. 

I then started on my chippies. For the title piece I painted it with gesso and then used LSG ST on it but it was too pink so I added perfect pearls (Grape Fizz) and Primary Elements (Ginger Flower) to give it a gradient look that showed the pink as well. 

 For the black swirl chippies I painted it with black acrylic paint and used sparkling black embossing powder to give it some bling. 

Lastly I added my gear clock chipboard after using the same colors on it as I did on my Dreams and Wishes chippy. I wanted it to be darker so I added some Primary Elements to it as well. Then the brad went in the middle and I adhered it to the canvas with some foam dimensional dots. 

Finally it is finished and so is my craftroom makeover. Viola! Carpe Diem!

This project will be shared with the following:

Artist Trading Post-Fresh Beginnings-HERE (new career path, newly refreshed Craftroom)

Frosted Designs-White as a Snowflake HERE I am trying a new technique of using white space. 

The Mirror Crack'd-Stencils HERE I used the damask stencil

Lindys Stamp Gang January Color Challenge HERE

Saturday, January 10, 2015

New Beginnings

This past week has started me down a new path in life and I am excited for it. So this piece signifies my new beginning, off the beaten path.


I was going to do a WOW (white on white) but wasn't feeling it today, maybe tomorrow. 

I started with a small black canvas and my inspiration was the butterfly ($1.00 bin score!) and my FolkArt Metallic paints. 

 I used my new BoBunny stamp and Very Berry chalking ink to stamp the purple hash marks (don't forget the sides!) Then another BoBunny stamp and the Blue Topaz FolkArt paint to add the corner stamp.  

While that was drying I worked on my sentiment "Off the Beaten Path" that is another new stamp. I used the Amethyst FolkArt paint on that stamp. I tore the paper down to the size I wanted, then used a clear embossing powder over the sentiment to give it a glossy appearance. Shiny!


Lastly I added some cheesecloth and the butterfly. I shaped the butterfly with my fingers to make the wings stand off the canvas. 

 Pictures below are the supplies I used. 


Here is another close up, the light is reflecting off the butterfly and it makes it look like there are yellows and reds but that isn't true. The butterfly is all purple and blue. The color spectrum is a wonderful thing!


Thank you for stopping by and leaving your lovely comments. It brightens my day! Carpe Diem!

This project will be shared with the following:

Frilly and Funkie-Anything Goes. HERE This is a frilly and Funkie piece for me and not my usual. 

Inspiration Emporium Inspiration Journal-Fresh Start HERE So perfect for where I am right now on the new path and hopefully a totally fresh start

Sweet Stampin-Girly but no Pink! HERE This piece is what I would call-Elegant Girly.  

Through the Craft Room Door-Anything Goes HERE


Friday, January 9, 2015

New Steampunk technique

Now that Christmas is over and I have used all my wonderful gift cards shopping for new supplies, I can finally begin creating with said supplies because my goodies came in the mail! Yippee!


I joined an ATC swap and knew I wanted to do something in the realms of Steampunk so I created these three ATCs. They measure 2.5x3.5

I used a NEW embossing folder from TH (Postcard) for all 3 backgrounds. I then tried a NEW technique of heat embossing the silver one and distressing it to create a tarnished look. TIP: Heat emboss the ATC before running it through your die machine. 
I used 3 pieces of washi tape on this one and also 3 metal gears under the rose. 
This greenish one was achieved using Inka Gold Metallic rub green/yellow. I used 3 gears on this one (under the rose)


This gold one was made using Rub-N-Buff European Gold. I used 3 gears on this one as well.  

Thank you for stopping by and leaving your lovely comments, it brightens my day. Carpe Diem!

This project will be shared with the following: 

SanDee and Amelie's Steampunk Challenge -Three's My Lucky Number HERE (I used 3 ATC's, 3 roses, 3 metal gears on each ATC, 3 clocks, and 3 new techniques using rubs, embossing powder, and Inka Gold

Mixed Media Monthly Challenge #8-Something New for the New Year HERE (I used new embossing techniques, a new embossing folder, and new metal embellies)

NBUS-anything goes using Never Before Used Schtuff (this blog is hilarious!) HERE


Try It on Tuesday-My Favorite Things HERE (My favorite "thing" isn't a thing but a theme or way of life for some-STEAMPUNK! Love everything about steampunk and I try to incorporate it into most of my art.