Showing posts with label stamping. Show all posts

Thursday, June 15, 2017

Mix It Up #2

What a lovely week it has been and I am thrilled that the weather is so much more to my liking of being hot. Summer is my favorite season and then Spring. Anyway, today is the day for the Mix It Up Team B's designs and our technique focus this month is stamping! Rubber stamps, cling stamps, hand made stamps-just no digi stamps. :) So without further ado here is my design. Enjoy!

This is my very first time using Gelatos and I have to say I enjoyed it immensely! The colors for this design are all from the iridescent collection. Everything from Black Hole, Lunar, Blue Moon to Satellite, Nebula and Supernova. Cool names for such gorgeous colors!
I used a watercolor canvas and applied a layer of gesso first. I then just slapped on all the colors that came in this set and sprayed it with water letting the drips happen here and there. 

Next came a brand new stencil. I used a white color box ink through the stencil. Since this is a pigment ink it sits on top of the canvas and doesn't dry fast at all. I waited a few days for it to dry.
While my canvas was drying, I decided to try my hand at making a dream catcher. First time doing this as well. I used some broken grape vines I had leftover in my stash and some embroidery thread. I wrapped the thread around the vines and made a circle. I then wove a greenish blue embroidery thread through the circle and made the inside of the dream catcher. It worked! Surprise surprise! I used a Prima word sign and some clear bead things to add some texture to the dream catcher. 
Raiding my feather stash produced some teal feathers, some teal feathers with polka dots, some white feathers and some small metal trinkets from TH Ideaology.
I attached those to the bottom of the dream catcher and then added the silver rose (from Emerald Creek). 

The dream catcher was popped up on foam dots and the middle feather was adhered to the canvas with a hot glue gun. 

The last thing I added was some stamping with random rubber word stamps. I used Distress Ink and slapped down some script. 
You can see the stamping much better in real life but here are more close ups as well.
I used contrasting colors so everything would stand out and the stamping would be visible. 
So get out your stamps and enjoy a good play day, or week! You never know where your paints and colors will take you! Carpe Diem and Hugz! ~Niki

I would enjoy sharing this design with these challenges:


I used Dream Road because creating my own version of art is a dream road I journey down for every piece. 

Sunday, March 26, 2017

Simple Little Card

Well simple is a relative term when it comes to me and cards but that is okay. Last night a friend came over and we ended up in my art room with me showing her how to use different products. I asked her if she wanted to make a quick card and this is the result. She kept her card and I didn't get to take pictures but we used the same techniques.

Using watercolor paper, I showed her how to stamp with Versamark and heat emboss an image (I think that was her favorite part) and then we used LSG magical to add some color. Her color choices were purples, pink, and blue. We spritzed our paper with water first then added some of the Magicals powder. We created drips and I showed her how to smoosh her paper onto the craft mat to get all of the excess powder that  accidentally flew off the brush. Haha! 
I then made us both a shabby twine bow and showed her how to spray white flowers to create any color she wanted. We also added some glitter to her flower cluster. 
The chit chat sticker I used was edged with ink and the flower cluster was glued with a glue gun. The edges were distressed on the base of the card and the panel. I used the word delightful because this was a fun experience and also because this card is going to be mailed to my dear Grandma whom is a delight to me. The card was finished with some white splatter paint. :) 

I would like to share this card with these wonderful challenges:


 I used green on the background and the flowers


Tuesday, March 7, 2017

Broken Art

Well I have been back in my art room for the first times since December. I lost my mojo, it plum left me for a few months. I didn't even really want to look at anything art related. Rock bottom is what it was like, but just for art and not anything else. I am not sure why this happened or if it will again, but I have an inkling about what started it. So now I am trying new things and even took an online course from Andy Skinner (more to come on that). We shall see what happens. The design I am sharing today has been remade about 8-9 times. This piece has been on multiple journey's, color schemes, details added and taken away. Only today was I able to see a clear picture of what it wanted to be. Thank goodness! Lol. I give you
  Broken Art


The frame was found at a thrift store and I saw so much potential.

 FIRST IDEA: The initial project was going to be a Valentine's Day gift. Ever see those frames on Pinterest that say "Spooning Since ..."? Well that idea didn't pan out because my metal stamping stamps wouldn't stamp into the spoons. 

2ND IDEA: lots of chippies and a frame to hang jewelry. The metal mesh that is inside the frame wouldn't hold anything and actually broke rather easy. No pics. 

3RD IDEA: soft pastel colors to create a Prima inspired design. That was nixed almost immediately when I went to gather supplies. I have no pastels. Lol!

4-7TH IDEA-didn't work

8TH IDEA: altered rusty paintbrush. Hmmmm, that is feelin about right! Here is how it went down. 
I am not sure exactly what I did because everything you see in the picture above was used. The frame got some paint and stamps were added with Versamark. Then I used about 3-4 embossing powders. The metal corner pieces are from Emerald Creek and heat embossed with Charred Gold.

Stamps, stencils, metal tidbits, paints, sprays, micas, texture paste, crackle paste, embossing powders, and on and on. I did add some white paint around the edge of the paintbrush to define the edges because it was getting lost in the pictures. What a journey! 
The end result was so very different than what I had started with. I am okay with that. Add in the flinging of the splattered paints and drips and drops, it was fun, and fun is what I was after. That was the journey that I wanted to take. 
Thanks for stopping by and Carpe Diem! Enjoy the journey. We all have Broken Art somewhere just waiting for that light bulb to go off in our brain. Hugz! ~Niki

I want to send this piece on more journey's so I took it to a few different places to get my photos. I will be sharing it with these challenges: 


I came "aboard" by reaching my own destination for learning to "art" again and have fun doing it after a dry spell.

I believe I used 4 stamps, maybe 5 and that is just on the frame alone. Not counting the stamps hidden under the paint on the altered paintbrush.

I was inspired by the dark background with the highlights of the purples, blues and teals. I used a CE leafy vine frame chippie as the focal point of the altered paintbrush.   

Sunday, June 19, 2016

Time Moves On

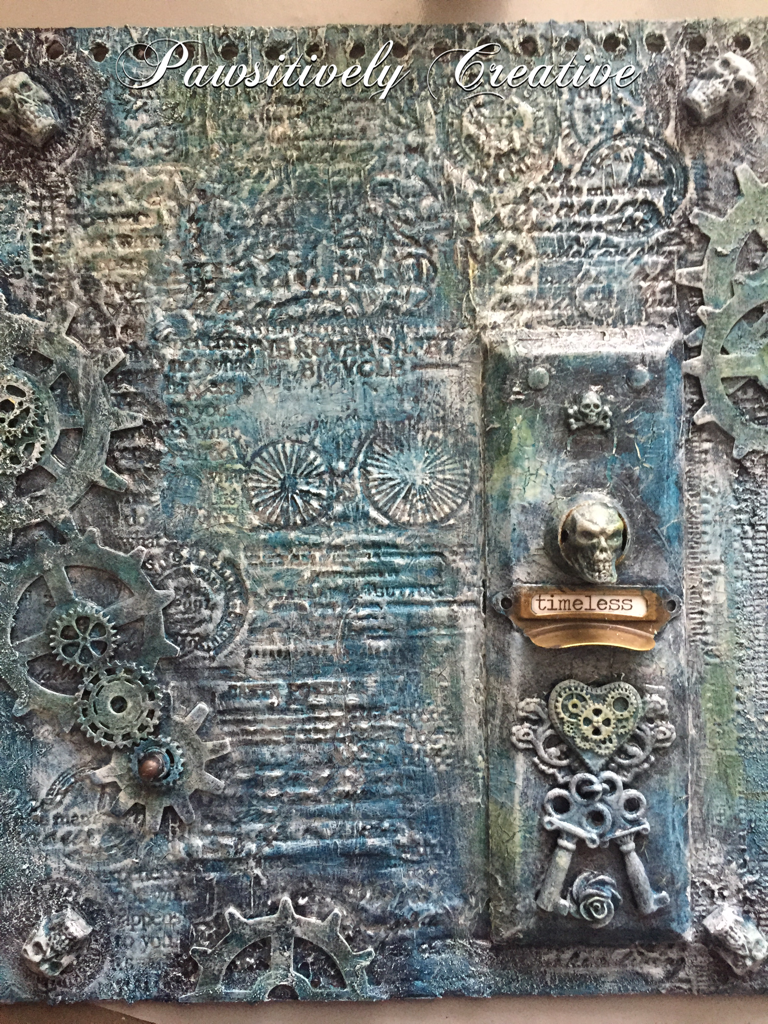
Well it sure has been a busy time here at my house. I am painting and designing my master bedroom and is a big undertaking but the end is in sight! I really wanted to share this Time piece and stamping into modeling paste again. Fun stuff, this is sort of where my stenciling brayer technique came from. Anyhow, I altered this cover. It was black and white with a lot of poof to it, like it was stuffed with something and I figured it was TIME to change it. Lol.
I started with DecoArt black gesso, then some DecoArt modeling paste. Waited for it to dry a bit then grabbed lots of stamps and stamped away! Then added some skulls, an old door plate, some gears and some more skulls, and a pull handle. An eclectic mix but it makes sense in my brain. :) Then painted with black gesso again. This is an Andy Skinner technique.
I then applied a wash of Titanium white paint, let it dry, then a wash of my new favorite DecoArt color Prussian Blue Hue! Gorgeous color!!! I left some areas white for a nice ghostly contrast. 
Random spots of DecoArt Q-gold and Red Oxide. The Media line of acrylic paints from DecoArt are awesome sauce for layering. 
You may have noticed I left the drawer pull alone. This is a play on words. My Skellies and other pieces have been "aged" by time and have essentially died but metal stays around a lot longer hence the sentiment "timeless". Although I did apply some paint to see what it would look like, in the end I wiped the paint off.  Multiple dry bushing with Titanium white was done as the last step. This design took time because of the layers of paint and I wanted to try different colors. There was some Phthalo Green-Blue and Titan Buff but I covered those up. 
Hope y'all are having an amazing weekend and enjoying everything you do! Hugz and Carpe Diem! ~Niki

I would like to share this altered cover with these challenges: 


Thursday, May 26, 2016

Sneaky peek-Anything But Cute Tutorial

Hello lovelies! I hope today finds you all in good spirits and with a happy smile on our face! I am sharing a few tips and tricks over at Anything But Cute for our Spotlight Artist post today, using a most wonderful medium for your mixed media makes! Find out more about this tutorial by visiting here! The picture below is just one of numerous ways to use this product. Enjoy!
And don't forget to join our current challenge "Celebrate Your Style" that runs until June 4th! Our awesome sauce sponsors Alleystamp, Emerald Creek and The Funkie Junkie are giving away some FANTASMIC prizes! Hugz and Carpe Diem! ~Niki

Tuesday, April 5, 2016

Earth Day at Anything But Cute

April showers bring May flowers right? And also Earth Day! What do you think of when you hear the words Earth Day? Mother Nature? New growth? Earthquakes? I think of it all, but mostly what natural found items I can try to make art with. Tree branches, moss, flowers, bark and such are among the list that helped me design this reverse canvas.

Our new challenge at Anything But Cute is: Earth Day (celebrated on April 22nd). Hosted by the amazingly talented Samra of Paper Talk with Samra. Here's what she would like to see: Create a mixed media project inspired by this mood board (picture below) and the beauty of our planet. Please tell us what inspired you. Entries for this challenge can be eco friendly, or even recycled/upcycled items, or a depiction of the sea, mountain, river, forest, flowery meadow.....let's celebrate our planet! 
This is my first attempt at a reverse canvas. I placed some elements I knew I wanted to use and took a picture. Not very Earthy yet, but layers and paints and creativity will turn this into a Spring Earth Day design. :)
Now it's time to play with some paper. I trimmed out a rough shape and then cut out the middle section to leave room for my nest. I edged all sides with Ground Espresso Distress Ink and used a Rubber Dance script stamp to add some stamping. Then added some small little butterflies as well. I then used some texture paste that I tinted with Primary Elements to make it blue, I pulled the blue colors from the mood board. 
I used a bit of washi tape on the inner edges to help ground the front of the canvas and get rid of the space between the canvas and wood frame. Then added some moss, some grass (element from the mood board),some flower sprigs, and pieces of a stick. I also painted a chipboard butterfly blue (another element I pulled from the mood board).
The small eggs were made from polymer clay and then painted a light blue. The "spots" on the eggs were made with a brown Archival ink pen. 
I glued everything down with a hot glue gun just because I wanted to see the end result fast and couldn't wait for other glues to dry. Lol! 

The large chipboard in the left corner and on the bottom are painted the same way. I laid down a base of white gesso, applied DecoArt crackle glaze-dried naturally, then added the script stamp.  When the glaze was dry I swiped some Raw Umber antiquing cream over everything, heat dried it and wiped it back. Then I applied the blue paint randomly with my finger. And it is done! Show us what Earth Day means to you and remember to check out what my talented teamies have made! Hugz and Carpe Diem!


Thursday, March 24, 2016

Non traditional Easter Basket

Well it is almost Easter, and I really wanted to make something for Easter, but not anything that's typical. I knew I wanted to create a centerpiece so this is what I came up with. A non-traditional egg basket-box tray. Hehe!

I found this on clearance at a local craft store and automatically had a vision. Love when that happens. It didn't turn out exactly as I had hoped, but very close. 
I painted the entire egg holder with Walnut Stain DP, then a layer of Distress Crackle. While that was drying I set about determining what to do with the eggs. I knew I wanted to stay with a limited and earthy color palette. I painted one with Walnut Stain and applied the Distress crackle to it as well, then set it to the side to dry. Two of the eggs were painted with Picket Fence DP and then covered in tissue paper. 
I used some Tim Holtz stamps and stamped with Ranger Archival Ink-Coffee onto some tissue paper then used Ranger matte medium to adhere the tissue paper to each egg. Then I watered down some Walnut Stain DP and used it to create splatters on the eggs. 
The Walnut Stain egg was "painted" with Picket Fence DP and I heat set if for a sec, then wiped it off with a baby wipe so the Picket Fence would get into the cracks. Then I used a scrap piece of tissue and wrapped it and a twine bow around the egg. Some of the crackle came off but that's what I wanted, kind of a vintage feel. The splatters were created by adding water with Archival Pearl and PF and flicking my brush.
The last two eggs were altered using moss and twine for a nature feel. Then I used the Picket Fence and baby wipe for the outside of the box. I swipe some Distress glaze around the outside of the box before I stamped. I added the Tim Holtz stamps with Ranger Archival Ink and added the chit-chat sticker last. The sticker was edged in Walnut Stain as well. 
 I really enjoyed how this turned out and the Reese's bunny is my DH fave so of course I had to add it. He also gets other Reese's candy as well. 
 Here are a few different views of the box. This was a bit hard to photograph and capture the true look of the design. The sun was gone today and it's raining so that doesn't help. 
Finally stopped raining for a bit so I took these pictures outside. No sun, but at least it wasn't raining.
I hope you all have a wonderful Easter weekend and live in the moment! Hugz and Carpe Diem! ~Niki

I would love to share these eggs with these amazing challenges: 


Wednesday, March 2, 2016

Shroom Mixed Media

Ahhh yes! The creative hat has been worn and probably worn out for a bit. My muse is workin but I think I am confusing her. There are so many wonderful techniques and ideas to try and that's what I am doin. In all honesty, I am following some advice and trying to figure out my style. Some people are Shabby Chic, others are Vintage, and still others are 3D Queens, or Abstract. I'm on the journey to discover what I am. Make sense? Lol. Here is a LO I tried. Granted, this is only the 3rd LO I have ever done so we know there's room for improvement. :) Enjoy!
The picture was the inspiration for the colors and the feel of the design. I used a 12x12 cardstock paper that had a not so pretty design on the other side. I really wanted just plain white and luckily it was only patterned on one side. 
I laid out my idea, took a picture to remember where things might go, and then went to town with sprays, H2O's, mica powders, stamps and texture paste through a stencil. 

This paper warped so BAD! I was kinda freakin out a bit but then got the bright idea to iron it back flat. It kinda worked so I kept going. The picture below is after ironing.
I ended up ironing the paper twice. Yes there are small creases but that's okay because I have a secret that will fix it! 

Now, while the paper was drying after the ironing I got to work on painting the chippies. I used black acrylic paint for the base and then poofed on some Primary Element Powder-Green Apple (the same green is on the paper as well), spritzed it with water and done! The mushrooms were painted with Inka Gold-Turquoise and also just the Green Apple. I forgot to take pictures of that step. 

I added all of my elements and decided to ditch some and add others (hence the fairy and corner piece are gone). I popped the picture up on some foam dots, the paper layer behind the picture was created with DI Twisted Citron and Mermaid Lagoon and then splattered with water. The small blue design tucked into the rips of the page is made from polymer clay that I stamped into and sprayed with LSG sprays.
To finish off the design I splattered some DecoArt Misters in Cyan Blue and Turquoise and Titanium White. I then added a bit more stamping and ghost stamping (another first for me) and some cheesecloth. 

Now for my SECRET-to get my paper to lay flat again I laid it face down (before adding the chippies, picture, and flowers) and spritzed the backside with water. I gently swiped my hand around the entire page and then set HEAVY books over it. I waited 2 hours for the page to dry and lifted the books off, it worked! My page was flat again! Wowzers! Now I know. Hehe! 

I am going to pass this layout around to these wonderful challenges:

Creative Embellishments March Challenge

I have used The CE "Believe" chippie and the branch chippie (I cut it in half). I was inspired by the greens and the mushrooms in the pic.