Saturday, September 20, 2014

Fairy Door Altered Altoids Tin

Hello! First thing first-I am so happy to see that I have 3 followers! It means a lot to me as I am still so new to the mixed media art scene. Big thanks to my 3 peeps! Project time: This was totally a fun and frustrating project. I will tell you what NOT to do first. I learned the hard way. Here is my Fairy Door Altered Altoid Tin and ATCs.


First Don't: don't put any paper lining inside the top lid of the tin. It won't shut. 


Second Don't: don't put paper around the bottom of the tin that covers the little lips that allows the tin to close-it won't shut properly. I used lace to cover the edge of the paper that I messed up. Sshhhh!


Those are the big problems I ran into. Okay, onto the break down

First I cut all my paper to glue to the tin. I edged the papers with a purplish/pink chalk ink and then glued the papers using Mod Podge (love the stuff)! While that was drying I cut my ATCs to fit in the tin. 


Next I grabbed some polymer clay and set to work creating my fairy door, rocks (I didn't use these) and flower stems. I hand designed everything you see. I baked all items, let it cool down and painted everything with acrylic paints and Silks. This was my first time using clay. Fun stuff!


After that was all dry I glued my door to the front of the tin lid with Tombow glue and added some moss, the flower stems with glittery flowers and the grass moss at the bottom of the door. 


Now we turn to the inside part of the lid. I added a fairy, a mushroom (painted with Gesso and metallic purple acrylic paint), flowers and a small vial that had Wish Dust in it. So cute!

I then decided to start the ATCs that go in the tin. You can put anything or do anything for this part. I used everything from my stash. I used a pink ribbon as the "hinge" to fold the ATCs up in the tin and as the "handle" to pull it out. Don't use too many embellies or the lid won't shut-but if you do, grab a paperclip and clip the ATCs together so they don't spew out. 


Put all your parts together and Viola! Fairy Door Altered Altoid Tin with ATCs.

Thanks for stopping by and leaving your lovely comments. It brightens my day! Carpe Diem! ~Niki

This project will be shared with the following:

Altered Eclectics-Anything Goes HERE

Craft Hoarders Anonymous-School/Office supplies. HERE I used the paperclip to keep all the ATCs from spilling out-may have gone overboard on embellies. Oops!

Try It on Tuesday-Recycle It. HERE I recycled the Altoid Tin my hubby was going to throw away. 

Left of Center-anything goes in the mythical category. HERE

The Mirror Crack'd-Anything Mixed Media Goes Challenge #1. HERE

Mixed Media Monthly Challenge-Color challenge. HERE I used the pinks and garden feel from the photo. 


Thursday, September 11, 2014

Steamed Up

We all need a way to vent our frustration right? This little Steampunk inspired box tells my story about being irritated, mad, frustrated or upset. I write down what is bothering me and at the end of the month I burn all the little papers, therapeutic huh? Yep. Sometimes there is only 1 paper, thank goodness!


I started with a box that I purchased at the thrift store and of course the little hat. I painted the box with teal acrylic metallic paint after I applied gesso. It took about 3-4 coats. While that was drying I was working on finishing my hat. I had started the hat awhile ago but wasn't sure what I was going to do with it. I based the box around the hat. 


I used paper from SOE/SOD that had a flourish design on it and cut 5 panels to cover the outer sides. I also used paper on the inside of the box to cover the inner 5 sides as well. 

I used a wooden corset on one side that I painted with the same teal paint. I added a lace trim and a pleated skirt (it didn't photograph well) to the corset. On the other side I used a TH die to make paper roses. I also painted these with the teal paint, and added black ink to the edges of the flower and clear Stickles to give it some sparkle. 


The front of the box has a black clock on it that was embossed with black glitter embossing powder and a peacock feather with black tulle behind it to tie the box and hat together. The metal corner TH pieces were added last. 

This little box is probably my favorite project done so far. I wish you all could see it in real life. Thanks for stopping by and leaving your lovely comments, it brightens my day! Carpe Diem!


This little story box will be shared with the following:

SanDee & Amelie's Steampunk-Steampunk Stories (HERE)

Craft Hoarders Anonymous-All the Pretty Flowers (HERE)

Anything but a Card #39-Steampunktember (HERE)

Through the Craftroom Door Sept 9th-15th (HERE)


Monday, September 1, 2014

Falling Leaves

Hello! I started this project with a mad hatter theme in mind but switched it up to Fall to fit with the theme for Mixed Media Mojo-Fall/paste, where I am a new Design Team member. Thrilled is not even close to how happy I am to be with this team! Enjoy!

First I use gesso on my 8x10 canvas, then painted small strips of blue to show the "sky" between the wood panels I applied. 

The wood panels were made out of chipboard. I used a Mod Podge stencil and made my texture paste a light brown color. I use homemade texture paste made from baby powder, white acrylic paint and Elmer's glue. I then added a layer of gesso over that, dried it and then used Archival brown ink to add some color. 

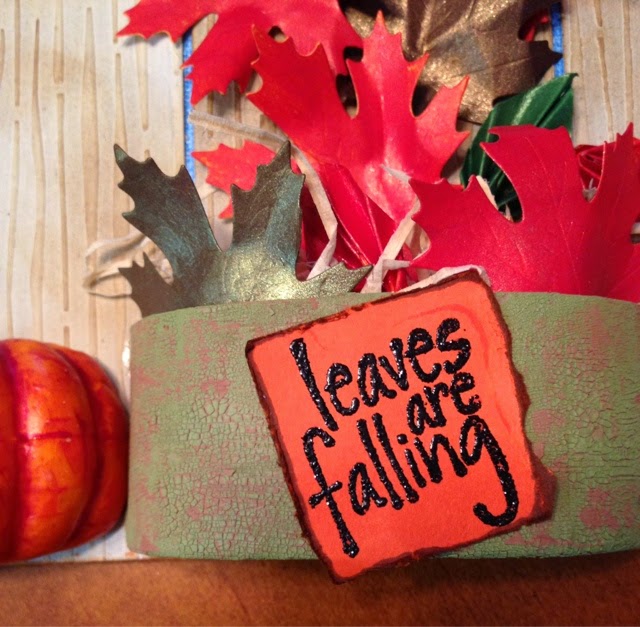
I cut out plenty of leaves with my Cuttlebug using a Momenta die from Hobby Lobby. The pumpkin was from the Dollar Tree, I just cut it in half and painted it with Silks Spiced Pumpkin. The original pumpkin is the bottom one. 

I found these amazing top hats and bought every last one they had (4 total, lol!) because I knew I could do lots with it. I cut the hat in half and sprayed the hat with Smooch Spritz copper (not a fan of their bottles-too messy but the color is wonderful) and added a red stitching design, a leaf, and a gold band to fill it out. 

Next comes the box holding the leaves. I purchased this with the top hats. I applied Distress Crackle paint in Peeled Paint and Vintage Photo to the box and added  the words "Leaves are Falling". I embossed the words with black glittery embossing powder and edged the orange paper with brown Archival ink. Adding the straw (Dollar Tree) put the finishing touch on this box. 

Thanks for stopping by and leaving your lovely comments, it brightens my day! Carpe Diem!~€

I will be sharing this project with the following:

Rhedds Creative Spirit-Anything Goes. HERE

Artistic Stamper-Autumn Colors and use a rubber stamp HERE My stamp in Leaves are Falling that I embossed.

Inspiration Journal-Fall is in the Air HERE

Try It on Tuesdays-Use Your Stash HERE. I have had the leaf die cut in my stash but never thought I would use it. Thank goodness I had it and the orange construction paper is from an art class I took in High School, yes, I save everything art related and orange is not a favorite color for me. :)

Altered Eclectics-Anything Goes HERE


Mixed Media Mojo

Hey y'all! This is my first post as a Design Team member for Mixed Media Mojo! So exciting!

For our September Challenge we would like you to create a project that incorporates Fall and uses paste (modeling paste, embossing paste, etc). Get those creative hats on and enter HERE!

Here is a sneak peak at what I made. Enjoy! I will post more later. 

You can check out the other Design Team members projects by clicking on their names.

Thursday, August 21, 2014

Flutterby Butterflies

I wanted to create a canvas with a layered tag look to it and incorporate soft colors. This is not my usual art but I think I did a good job. :)

I started with the tag and used the colors from that to design this piece. I found this amazing metallic acrylic paint and just had to have it. Lol! The blue, purple, and green are metallic paint and it is so gorgeous! I used a TH edger tool to roughen up my paper edges (paper is from Scraps of Elegence/Scraps of Darkness store) and then layered the papers behind the tag. I stamped the bottom two layers to give depth and to tie in my chipboard embellies that I also stamped. 
I then started on painting the canvas with the green metallic paint. I added some cheesecloth that I sprayed with Luminarte sprays and glued it to the canvas. 

I painted the chipboard flourishes with gesso and stamped words on both. I then used a butterfly cutout to make the small blue butterflies that are around the canvas. 

One of my favorite pieces on this is the small little container in the bottom left corner. It started as a bronze color and I hand painted the blues, green and purple to make it look like it belonged with this canvas. I thought it looked like I let the small butterflies out of this jar. :p

I then glued everything where I wanted it and added the finishing touches. Carpe Diem!

Thanks for stopping by and leaving your lovely comments, it brightens my day! Carpe Diem!~€

This canvas will be entered into the following, you can enter as well:

SOE/SOD mid month challenge on Facebook (HERE)

Country View Challenges-Word Play (HERE) I used the words Unlock Your Dreams and Explore Your New Reality to express my open mind about all things crafty I will, or may, get in to.

Artistic Stamper Creative Team Blog-August Challenge Anything Goes (HERE)

Our Creative Corner-Summertime (HERE) Summer to me means plenty of color and butterflies and exploring!

Craft-szafa-Challenge #42-mood board (HERE) I used the soft colors and texture I took from the welcome sign. 


Thursday, August 14, 2014

Fire Fun

Hello y'all! I was blog hopping (love to see what other creative people are creating and places they are sharing their projects with) and thinking about my next project when I happened upon a couple of challenges that caught my eye. I already knew I was going to use texture/paste and heat but wanted to add to my piece. The challenges that caught my eye were to use a song title and inspo image and another one that inspires you to use what you have. Here is what I came up with.

First I used a damask stencil and added some texture to my canvas using homemade texture paste. 

I then grabbed some LSG sprays and added the heat. I love the shimmer from the Starburst lines! I did use Luminartes Sunflower for the yellow and brushed the stencil with the Sunflower primary elements just to make it pop. Then I added some ribbon to the bottom. 
I knew my song title because I was listening to this song when I happened upon the challenge blog that wanted a song title. My song is FIRE by Krystal Meyers. All these colors remind me of fire or heat. 


I stamped my flower with a flourish design then sprayed it using the same colors as the background and added a red jewel that used to be part of a necklace. For the top left piece I used a wood embellie and painted it with Silks-Spiced Pumpkin and dry brushed the Sunflower pigment onto it. I used the same stamp from the flower to tie the paper and title together with the rest of the design. And added the butterfly. 

Just wanted to add: blog hopping is an amazing way to learn new techniques, get in touch with new blogs, "meet" new artists, and learn more about what you can create as an artist. Many many thanks to all that have inspired me and made me think outside of my box. Hugs!

 Thanks for stopping by my blog and leaving your lovely comments, it brightens my day. Carpe Diem! ~€

This art piece will be entered ino the following challenges:

Creative Embellishments-Song Title/Inspiration Board (HERE) I used the orange and yellow colors from the inspo board and my song title is FIRE.

Mixed Media Monthly Challenge #3-Stencils with modeling Paste (HERE)

Craft Hoarders Anonamous Challenge Blog #13-Up-Cycle August challenge (HERE). I love the rules of this challenge blog and up-cycled the ribbon, the red jewel on the flower (it used to be part of a necklace), and the red paper is scrap from another project.


Sunday, August 10, 2014

Time Flies!

Carpe Diem right? I felt like I seized today by the horns with my canvas creation!
Oh how I wish you could see the shimmer! Gorgeous!

I started with a flat canvas and a pocket watch that had no glass face! My coworker gave me a box of goodies and the watch was in it! Awesome! Almost everything I used in this piece was from Tim Holtz. 
Distress ink, Distress stain, Distress crackle paint, rub ons, stamps, gears oh my!

First I sprayed my canvas with LSG sprays and edged the canvas with Distress ink. I set that aside to dry naturally (no heat gun) while I worked on the watch. Just because it had no glass in it didn't mean I was going to throw it away! Nope, work with what you have. I cut out a circle that I had embossed with a clock stamp and added it to the background of the watch. I then added some gears, clock hands and copper wire to give it dimension. I added the wings to the watch to depict Time Flies because it really does! I wouldn't ever turn back time but am constantly surprised by how fast life is passing and I am enjoying most of it. Lol!

I used multiple stamps on this piece and love the grunge vibe of the entire piece. I had the moss in my stash from a camping trip and the cheesecloth was colored using Distress Stains. The copper wire was wrapped around a pen I had and then added where I thought it flowed best. Enjoy!

Thanks for stopping by my blog and leaving your lovely comments! It brightens my day! Carpe Diem! ~€

This canvas is entered into the following challenges:

A Vintage Journey #12-Time Flies (HERE)

Inspiration Journal (Inspiration Emporium) Anything Goes August (HERE)

Rhedds Creative Spirit August (HERE)

All Crafts Challenge August/September (HERE)

Love to Scrap-Running in Circles #35 (HERE). I used circles in the watch, the gears, small circles in the eye exam stamp and the copper wire was circled around a pen.  

Altered Ecletics August (HERE)


Friday, August 8, 2014

Moss My Heart

Hello there! I was very happy with this tag and the entire process to make it. I have been in a rut for a couple of weeks but today the flood gate opened! Thank goodness.

First I started with stamping script to my tag. Then I used a flourish stamp with embossing ink to add the resist. The brown is distress ink Vintage Photo. I kept it lighter towards the middle of the tag. 

This past weekend I had spent some time at a family reunion and while at the cabin I saw so much moss just laying on the ground. I knew I could do something with it (UPCYCLE anyone?) so I picked up a plastic ziplock bag full and that is how I made the moss heart. I added the sentiment "embrace imperfections" because for the last week I couldn't finish any art project I started (we've all been there) and I was embracing the fact that I have imperfections. I used hemp that I braided to add some more definition to the heart. 

Next would be the cheese cloth. Using distress stains I was able to color the cheese cloth to look like a vine (inspiration from the SOE/SOD mood board) and used it as a ribbon on the tag. 

For the finishing touches I added the metal piece in the middle of the moss heart and a gorgeous butterfly I purchased from Reneaboquet's Etsy shop (HERE)

I hope you likey! Thanks for stopping by my blog and leaving your lovely comments, it brightens my day! Carpe Diem~€

This tag will be entered into the following challenges:

Scraps of Elegence/Scraps of Darkness August mood board (HERE


Mixed Media Mojo-mixed media tag (HERE)

Anything But a Card-#38-Repeating Pattern (HERE). My repeating pattern is the stamp I used and the flourish that was used as the resist.

LESSology #39-Fluttering Butterflies (HERE)


Thursday, July 31, 2014

Tea for Me

This is a first for me as I have never tried to take apart an image and then put it back together. Enjoy!

I was inspired by the mood board for Scrap Around the World and wanted to use the pink color and the soft "feel" of the board. The pink powder reminded me of embossing powder so that is what I used on some of the trim for the tea cup. I also added multiple stamps to the cup and the background.


I started with a computer image and then deconstructed it. I used cardboard to make a replica of the teacup, this is way better to use than paper! I embossed the majority of the teacup and used a floral paper design for the cup. 


I added some flowers and embellishments and 2 beautiful butterflies from Renea Bouquet

Usually I take more pictures but my 15 year old dog had surgery (for the third time) today and I wanted to make her my priority. Cancer-hate it!

I hope you like the piece and try working out of your comfort zone-you ne'er know what will happen!

Thanks for stopping by my blog as leaving your lovely comments! It brightens my day. Carpe Diem! ~€

This piece will be entered into the following:

Scrap Around the World-July Challenge Light and Airy (HERE)

Love to Scrap-Scheming Crafters Challenge-(HERE)I used mostly duo with pinks and bluish colors