Monday, December 29, 2014

Family is.......

Hello again! I hope the holidays are treating you well and you are getting to spend time with family. Family is what this post is about. Enjoy!

This is the first year I have lived in the same state as my parents since I was 15!
We have always read books, it is a tradition and something that was started before I was born. I believe that I love reading because of my Grandma and my Dad. I love the smell, the feel, the excitement that books can bring. Everyone in my family reads at least a book a week. 

Now to the canvas! I started with Gesso and then sprayed Lindys Stamp Gang sprays. I was trying to achieve an older look. While that was drying I started on my bookmark (the tag). I used champagne embossing powder first then applied Distress Inks to my tag and I used the TH distress for the edges.

Next I cut out my book pages. I don't really use rulers so I just cut it down to the size I wanted. I applied DI to all the book pages and sewed it together with black string. I added the sentiments with black embossing powder. I did rub some of the embossing powder off to give the book an aged appearance. All the sentiments are related to what morals I grew up with. 


I adhered some stickers to a cream paper because the stickers are see through. Next I stamped the harlequin pattern and the typewriter. The typewriter was stamped onto tissue paper then glued to the canvas using Mod Podge. 
 There! Did and done!


Thank you for stopping by my little crafting corner. Carpe Diem!

This project will be shared with the following: 

Frosted Designs-All About Family HERE

SOE/SOD-mood board HERE

Vintage Journey-Ring out the old-Ring in the New. HERE I was inspired by the words in the poem. Ring out the old-books cover the old and the new. The typewriter makes a bell sound when you reach the end of the paper (old and new (young) people still use typewriters. I used many TH products and he is always an inspiration.


Sunday, December 21, 2014

Craftroom Makeover

So I haven't been doing much mixed media recently because I have done a total makeover of my craftroom. It doubles as a guest room. 

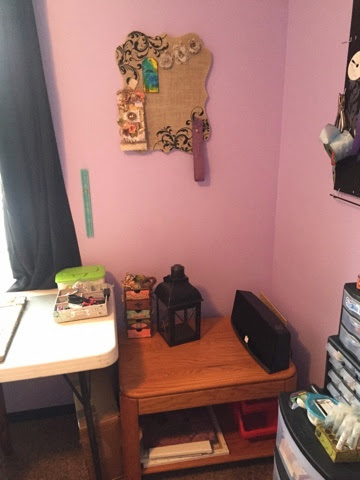
This is the end result. But I started with brown walls and it just wasn't a very inspiring place to create. The brown is okay but made me want to sleep. Lol. 

I painted the walls Sassy Lilac and added a damask stencil using Metallic FolkArt paint. Wow! It turned out good!
I have always loved the damask print and had multiple items (bedspread, lamp, journal etc) that have the print on it so into the room everything went.

 
Yes, that is a spatula! I wanted the trim to be black but didn't want to ruin the carpet so I used the spatula to keep the paint off the carpet. Think outside the box. Lol!

Next I added some embroidery hoops to the wall. The hoops hold some fabric that  coordinated with the space. Easy wall art!
I did paint the hoops black before putting the fabric in it. 


I do believe that Santa is going to bring me a new craft table! The one I use bows in the middle so stamping is not fun. 

And I did "stage" these photos, meaning I cleaned everything up before taking pics. I am messy when creating. Lol!

Thank you for taking a look around and if you have any questions about organizing,  my pegboard creation, or color choice please leave a comment. 

Carpe Diem!

Monday, December 15, 2014

Christmas Time!!!!

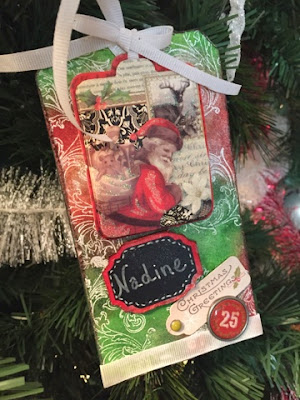
Hello y'all! Christmas is my absolute favorite time of the year. I can give gifts and nobody can say no. Hehehe! This tag is for my secret Santa at work. I hope she likes it and her gift-inside the awesome looking box is everything she will need for a spa day. Soaps, lotions, loofa, candle, showering gel and chocolate. And because I am a vet tech and she has 2 dogs, I included some dog treats dipped in yogurt for her furry babies.


I used my Tim Holtz (TH) tag die and made up about 20 tags so I would be good to go in the tag department. I used Mowed Lawn and Fire Brick DI for the background. I edged the tag with the TH distress tool and chalked around the tag with Dark Bark fluid chalker. Then I grabbed my TH stamp Fabulous Flourish, and embossed the stamped image with Snow embossing powder. It makes the stamped image POP! Loves it. 


I then sprayed Sheer Shimmer Spritz Frost to the entire tag for a glittery effect. Next I applied a ribbon at the bottom and added two brads from My Minds Eye-Sleigh Bells Ring. But shhhhhh-the brads actually hide a "mistake" I made during the heat embossing moment. Oops. 

I added some glitter ribbon and my Secret Santas name and I was done. 

Here are a couple of different angles and a close up so you can see all the glittery goodness. 


Thanks for stopping by during this busy Holiday season! Merry Christmas and Carpe Diem!

This project will be shared with the following: 

Mixed Media Monthly Challenge-Tic Tac Toe HERE-I used Bow, Glitter, and Ribbon

Frilly and Funkie-A Vintage Holiday HERE

A Vintage Journey-Special Christmas Giveaway!!! HERE

The Mirror Crack'd-Upcycle/Recycle or a Christmas Gift. HERE


Monday, December 1, 2014

Stacked Layered Christmas Card

Happy December y'all! This is my first year ever making my own Christmas cards. I saw an image floating around FB of a stacked image card and thought I could do that! The learning process was very curved for me though. Lol!


Our challenge over at Mixed Media Mojo this month is Winter Holidays with an optional twist to make an ornament. I will do a tutorial later this month on my ornament piece-it is kid friendly as well!

We can't wait to see what you all create! Happy Holidays and Merry Christmas! 

This project will be shared with the following:

Simon Says Stamp-Holiday Cards HERE


Thursday, November 13, 2014

Altered 5 Drawer chest

Hello there y'all! I have been working on this project for awhile now and am finally done. Perfect timing for Craft-Room Challenge's challenge to do something 3D. I hope this is 3D enough. Enjoy!

I got this 5 drawer box from SA Crafters.   You have to glue everything together and build it but that is part of the fun. This is the start. I used Aleen's Tacky Glue for the entire piece and it is a sturdy little sucker! I did spray the inside and outside of everything with Lindys Stamp Gang Mad Hatter Mint before the glue was applied. I used old hair ties to keep the pieces in place while the glue was drying. Use what you've got right? Lol


The hardest part of this piece was figuring out what I would cover the sides in and decorate the drawers with. I didn't plan on a garden type theme but that is how it played out and I am happy with the results. 
I mostly used the Bo Bunny Gabrielle collection. 
I edged all the papers with a Teak Wall chalker and used the TH distress tool. The papers were applied using Tombow glue (I love the stuff!). There are so many parts to this project I can't name it all and I was in the "zone" so I totally forgot to take before and after pics. :(
The 5 drawers turned out so cute!
This is the top of the piece. I try to use at least one item that I upcycle in every project. This one was the moss I found while camping and the twine on the side was given to me during an ATB swap.
This is one of the sides. The paper is Bo Bunny Gabrielle and one of the rub ons from the same collection. 
This is the other side of the piece. I wanted to be able to hang small items on the side so that the item could be out of the way drying or something to that affect. At least that is the plan. Hehe! 

I hope you enjoyed this as much as I did making it. Carpe Diem!~€


This project will be shared with the following: 

Altered Eclectics-Always Anything Goes HERE 

Anything But a Card-Whatever Strikes Your Cre8time Fancy HERE

Rhedds Creative Spirit-Anything Goes as long as it is Altered Art Only HERE

Craft-room Challenge-Anything 3D HERE

Saturday, November 1, 2014

Braided Card Thanks!

This is only the second card I have ever made but I like origami, so I gave this braided card a go.

This is my Design Team project for the Mixed Media Mojo November challenge:                           THANKFUL. You can make anything mixed media as long as it uses the word Thanks, Thankful, Thank you etc. 

The card was really simple to make but it looks intricate. I used a template that I got off of Pinterest and cut out a standard size card from cardstock. 

I then added some green paper that I distressed the edges of and layered. (The paper was purchased from SOD/SOE) I just kept cutting the layers a bit smaller than the layer below it. Everything was edged with Teak Wall chalk. 


I always lay out my design before gluing, just to see if everything works together. When it looks good, start gluing away. I really like the Tombow glue. 

I added a small pink ribbon to the braided edge of the card and finished with my stamped image to give Thanks. 
Hope you enjoyed my process. Carpe Diem! 


This card will be shared with the following: 

Simon Says Stamp-Anything Goes HERE

Buckwells Crafty Challenge-Use Ribbon HERE

Crafty Catz-Anything Goes HERE

Fussy and Fancy Challenge-Thankful HERE


Sunday, October 26, 2014

Always Remembered RIP Raj

I haven't really been in the right frame of mind to craft anything. My crafting partner died on 9/30/2014. Raj was my German Shepherd mix. She was diagnosed with mass cell tumors 7 months ago. I made this scrub top to honor her memory. To me, this shirt is Art. 

Many people don't understand what it feels like to lose such a huge part of your life, but those people usually aren't "animal" people. For those of us that have the unmistakable bond with a furry friend it is devastating to lose them. 

Raj was the only constant part of my life for 15 years. We were homeless together, slept in abandoned cars, the park. She made everything okay in the world. She was my rock. 

Every day that goes by makes me miss her more, not less, because it is yet another day that we aren't together. 

I am a veterinary technician because of Raj. I wanted to provide the best possible care for her and was successful for 15 years but I couldn't save her. All of my schooling and knowledge......we tried everything to beat the cancer. She was such a brave, fearless fighter until the very end and I couldn't have asked for anything more. She was happy and playful until the last surgery, she had 6 surgeries total and chemo. 

Not many people will read this blog post but to those that happen upon this and have lost a beloved pet-just know that you are not alone and my heart hurts for you. Only you will know what you are feeling, no other person can tell you when things will get better but when that day comes that you are able to talk about your lost loved one, know that I am there with you in understanding that feeling.

I miss my baby girl so very much and I am thankful that nobody is telling me to move on, or get over it, because I would probably go a bit PG-13 on them. Thank you for reading this and hugs to all the furry critters out there. 

RIP-Raj 12/25/1998-9/30/2014. 


Thursday, October 23, 2014

ATB with a Sweet Twist

I had to try this and see what all the craze was about. I don't have the ATB die so I made this block by using a template I drew out. 4x4x13 with 1/2 inch on each end. Cut 2.


I painted all the edges black to go with my theme and then cut each paper down to the correct size. It was time consuming but good to do.

I labeled each side so that I would know the correct direction to put items and words and thank goodness I did!


I kept cutting paper and glueing to give my sides some layers. 
Once everything was dry it was time to decorate each side. I kept everything in the same color pallete of Tiffany Blue, black, and some pink to keep with my inspo-"Breakfast at Tiffanys". I wanted to keep clean lines and add an air of elegence to my ATB. I also added white feathers and pearls to keep it "soft". 


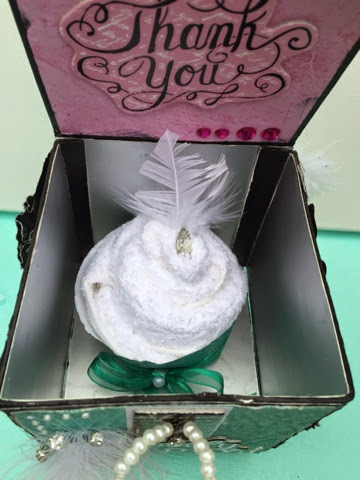
Now for the Sweet Twist and Disguise! Keeping with the Breakfast at Tiffany's theme, I made a washcloth cupcake to put in the ATB. How many of you have eaten a cupcake for breakfast? I have! So cute. 


This ATB is for a swap buddy and she lives far away so I knew I couldn't ship a real cupcake. I made this one from a rolled washcloth and then added the "wrapper" and some bling. Fun and easy to do! The feet of the box are some blinged beads. 

This project will be shared with the following:

Mixed Media Monthly Challenge (HERE)-Ribbons/Twines/Fibers-I used lots of Tiffany Blue ribbon

EileenHull Art with Heart Challenge (HERE)-October Tricks and Treats (my trick and my treat is the "cupcake" inside the ATB

Inspiration Emporium-In Disguise (HERE) (my cupcake is a washcloth, my ATB is actually a cupcake holder, and my bling diamond like pieces are shhhh! fake) :)

The Mirror Crack'd-Body Beautiful (HERE)(I used a curvaceous dress form, think Audrey Hepburn. 

Country View Challenge-Sparkle and Bling. (HERE) (This wouldn't pass for Breakfast at Tiffany's without bling and sparkle right? Lol! I used so many blinged items and sparkle, loves it in this piece!)

Saturday, October 4, 2014

Halloween with the Raven-For World Card Making Day!

Did you know that today is World Card Making Day and there is a special challenge over at Mixed Media Mojo? I did and I made this card to join in.

I started by cutting out my paper to roughly a 4.5x5 I used a pewter colored chalk to edge the piece. This is the first card I have ever made so bear with me. 

I cut the purple paper just a tad smaller than the card and applied the Raven stamp on the bottom section of the paper. I used the Tim Holtz edging tool around the edges. 

I then used my spooky fabric piece to cover the top. This is to go along with the Mixed Media Mojo October Challenge of using Halloween/Fall and Fabric, check it out HERE. There is a prize if you join in our special edition CARD making challenge by Sunday Oct 5 Midnight EST HERE

After applying the fabric I added the purple and black twine/ribbon piece to help separate the fabric from the Raven quote. The metal skull piece was added last. 


On the inside I kept it simple. A few die cut spider webs that were embossed with black glittery embossing powder and the Trick or Treat stamp that I applied clear embossing powder to. 


Hopefully you are joining in the Card Making Spirit and remember-have fun and get sticky! 

Thanks for stopping by and leaving your lovely comments. It brightens my day! Carpe Diem!

I am sharing this with:

World Card Making Day Blog HERE

Simon Says Stamp Monday Challenge-Finishing Touch HERE

Aud Sentiments Challenge-Halloween Sentiment HERE