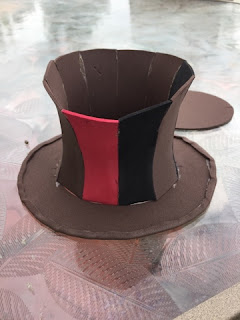
I started by making the top hat. If you would like to see more of the process for the hat HERE is a step by step. It all starts with craft foam and some scissors.
This is the hat almost all glued together. Then the fun begins with paints and accessories!
I wanted to showcase the DecoArt Media products. I don't have many of the mixed media line supplies (YET) but I make good use of what I have. All it takes is a good product and creativity! I started by painting the entire hat with DecoArt Media Fluid Carbon Black acrylic paint. Then I used DecoArt Media Crackle Paint, thin coats and thicker coats to get lots of different sized cracks and set it to the side to dry, naturally. No heat gun (it will warp the shape of the hat)! The craft foam soaks up paint so some splotches were used instead of covering everything up.
I then added some lace leftover from my last project. Brads and an old piece of chain from a necklace were used to create the cross-stitched pattern on the front. I adhered the lace with DecoArt Media Matte Medium and added the black beaded piece around the bottom rim with my hot glue gun.
Who knew trying to find a skull stamp would be difficult this time of year?!? I did find this paper bag (set of 12) and knew I could fussy cut the skull out! Winning! I then placed it on the top of the hat and sealed it with DecoArt Media Matte Varnish (I varnished the entire hat before placing the lace).
While the paper bag skull was drying on top of the hat, I used DecoArt Media White Gesso to paint a wash on the skull head. I wanted him less dirty looking. The picture below is before I painted him.
I then added the feathers and brooch to the top hat and started working with polymer clay to create a moustache, an eyeball, and a mold of the brooch. This is my first time making any of these polymer clay creations! The eyeball was the most fun but kept rolling around on my art desk. Lol!
Once all the polymer clay elements were baked and cooled down, the details were added to each. I painted the eyeball with white acrylic paint and then added a wash of DecoArt Americana Camel to give the eye an aged look on the sclera. I added red acrylic paint to the iris and drew silver lines around the iris to show pigmentation. The pupil was painted black with a small white highlight to give it a gleam. Mr. D. Debonair's moustache was painted with DecoArt Dazzling Metallics-Shimmering Silver and then dry brushed over with the Carbon Black. I attached the monocle chain to the hat and glued it to the skeleton head with hot glue.The neck tie bow was a piece of ribbon from my stash, it adds a little sumpthin, sumpthin. I used some Halloween rub ons for the base. The damask pattern is one of my favorites and I have been hoarding it since April!
I added some silver paint to create the small dots around the base and then some washi tape around the very bottom, along with the white bat, skull, spider, and eye.
Thank you for having a look see, and letting me know your thoughts on this design. I sure know that we all put a lot of work into our creations and feedback is greatly appreciated (the bad and the good)! The blog land I know, is a wonderful place, filled with so many creative and inventive peeps! Carpe Diem! ~Niki
I am stoked to be sharing this creation with these wonderful challenges please:
I used the Tic Tac Toe of Halloween (my entire design), Time (a couple of weeks to finish this piece),
Red (the rose and the eye)
Red (the rose and the eye)
Scrapbook.com-October Spooktacular Challenge-Use 1 piece of Bling OR washi tape
I used washi tape around the bottom of the base and also Bling in the form of the cross chain pattern on the front of the hat, as well as the Brooch.
Crafty Calender Challenge-Halloween
Beyond Grey Challenges-Anything Goes
Try It On Tuesday-Its Frightening-/-Halloween
Beyond Grey Challenges-Anything Goes
Try It On Tuesday-Its Frightening-/-Halloween


