Showing posts with label skull. Show all posts

Thursday, September 7, 2017

Ruffled in Darkness

Well hello there lovelies! I have been on a hat making kick and am going strong with so many designs. You all will probably get sick of me posting these. Hehe! I have wanted to make a totally black and soft hat featuring a more elegant gothic feel and so I decided to play with lots and lots of feathers. I was inspired by all of the beautiful ravens that are cawing around my neighborhood. Here is the finished design. Enjoy!
I started with the usual foam. I used the taller black top hat for this feathered design. The shorter white hat will be featured at a later date. 
I glue my hat together and the grabbed a load of black feathers. You can dye your feathers using food coloring if you would like to make a certain color. The draw back is, the lack of certain colors in food coloring, and it makes the feathers more of a light color. But anyway, it is a fun thing to try!
As you can see in the picture above, it was a feathery good time! Those feathers ended up everywhere! Each feather was laid exactly where I wanted it and surgically glued into place. I didn't want any of the stem to show so there is a lot of overlap. The feathers were bent and curled to fit the curve of the hat.
The skull and wings were given a special treatment and then I added some dark blue rhinestones to it. The circle under the beak was inlaid with Prussian blue paint and highlighted with glossy accents. I added some soft black lace around the base of the hat and also tied some black leather into knots to give it more texture. It is hard to see in the picture.
The sides of the hat feature a TH skull and crossbone. The eyes are ice blue rhinestones from Xanderous Crafty Stash. Those little gems are so little and were very interesting to work with. The eyes were glued in with glossy accents as well. I did trim off the loop at the top of the skull.
The back of the hat showcases the large lace bow and another skull and crossbone. The lace is extra long to give the hat a nice added form of elegant goth. I do hope you enjoyed this journey with me! Thank you for looking! Carpe Diem!

I would like to share this hat with these challenges:


With so many ravens about in my neck of the woods, I thought this would fit into the Nature part. 


Monday, May 9, 2016

Blood and a Zombie Barbie

Interesting title? I think so. I wanted to create a layout that featured an amazing and inspirational lady I know. Her name is Rheanon Nicole, also known as Zombie Barbie. She is a fantabulous and beautiful person, inside and out. She is also a TV Host, a published author (Broken Halo), a model, and a mother. As you can see, she wears many hats! Hehe! So for this layout I tried to include some of her favorite things.

I wanted to only use three colors (black, white, red). She loves horror movies and the horror genre. I started with a plain 12x12 page and then added some black DecoArt modeling paste through a stencil. I marked out where I wanted the picture and kept that spot blank. Then added some Versamark through an Andy Skinner skull stencil and heat embossed it with Snow EP. Next, I laid out some elements I thought would be used, of course everything changes as the process continues. 
The black fabric stuff reminds me of a web so I used it and also threw in some random pieces of red and white thread. The flowers echo the flower headband Rheanon wears in the picture. 
Here comes the pop of color with the red. I used DecoArt media mister and randomly sprayed. The drips were created by diluting the red with water and letting it run down the page. Looks like blood right? That's the idea and keeping with the Horror movie elements. What's your favorite horror movie? I can't pick just one! 
There are about four different stamps used in the background as well. The picture above shows the embossed skull and the brick chippies (those were heat embossed with Snow and Black EP) Fun stuff! 
The cameo necklace is part of an old necklace I tore apart. The blood red flowers were once orangish white, I just sprayed those with red and black paints. The little red stones are Mini Prills. The last bit was to splatter the entire page with black and red paints (I was going for a blood splatter effect). Viola, done! 

I would be thrilled to share this design with these lovely challenges:

I have Blood, Barbie, Black,  and beauty


I am hoping this darker art design is okay since it is an Anything Goes challenge


I used this definition of collage-a piece of art made by sticking various different materials such as photographs and pieces f paper or fabric onto a backing (I did all three)


Tuesday, March 8, 2016

Neons and Sprays

Well there comes a day when you try something completely new and find out some helpful tricks among the way. I've never worked with NEON colors before but today's their lucky day! I wanted to join in a couple of challenges and a new one that Andy Skinner is hosting. Here we go! Sit back and enjoy.

I used an old ruler to create the lines and texture in the DecoArt modeling paste. It was a fun and new experience. My canvas is a chunky one with thick edges. Then I left it overnight to dry completely.
 I knew I wanted to use sprays because I just have more fun with em than a brush. I figured I could make some sprays with the Americana Neon paints (Electric Blue, Thermal Green, Scorching Yellow, Torrid Orange, and the non neon-Lipstick) and grabbed some small 2oz bottles from a grocery store. I put 6 small beads and one large bead in the bottle before adding the paint because I figured it needed a mixing ball. :)

You can see in the photo above how much paint I added to each bottle. I then filled up the bottle with warm water and put the spray lid back on and shook everything up. It sounded like a mixer ball was in the bottle! Yippee! Then I sprayed a scrap piece of paper with each color to see how it worked. 

The purple color was a mix of the Neon Electric Blue and Satin Lipstick with a pinch of Purple Pearl metallic thrown is as well. 
I grabbed my spraying box (fancy name for a paper towel lined cardboard box I use to apply sprays on a canvas) and started spraying. I applied heavy coats of each color and dried between each application except where I wanted the colors to run together. 
Using a Spouncer tool, I applied DecoArt Carbon Black around the edge of the canvas and on some of the textures areas. Using the Carbon Black again and the Spouncer, I added an Andy Skinner Day of the Dead stencil. Go easy on the paint and brush some on before applying to the stencil or some of the paint with seep under the stencil. 

Now I wanted to stamp onto my canvas but that's never worked out for me so I decided to stamp onto some tissue paper and adhere it to my canvas. I didn't have any of DecoArts Media matte medium so I used Duraclear matte varnish. Of course I practiced on a scrap piece of paper first. 
It worked out okay so I went for it! And here's the end result! Very eclectic canvas and an interesting art journey. :)
It really is more vibrant in real life (can you imagine!) and I am glad I tried my hand at these very Bold and Bright and Loud colors. The funny part about this design is I went into it thinking I would do a more abstract design but that wasn't my journey. Lol! Hugz and Carpe Diem! 

I would love to share the neon with these challenges: 


Thursday, October 15, 2015

Steampunk Skeleton and DecoArt

RHappy October y'all! Thank you to everyone that swings by my little blog and has a gander! And a big thank you to my new followers and my regulars!  Over at SanDee&Amelie's Steampunk Challenge we dare you to create something involving Top Hats and Moustaches. I am super duper excited for this challenge and without further adieu here is Mr. D. Debonair! He knows he looks good and he is the perfect gentleman, although a bit past his prime. :)
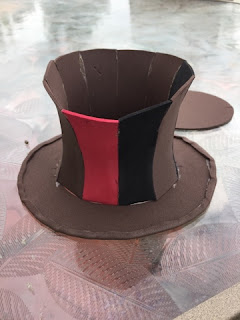
I started by making the top hat. If you would like to see more of the process for the hat HERE is a step by step. It all starts with craft foam and some scissors. 
This is the hat almost all glued together. Then the fun begins with paints and accessories! 

I wanted to showcase the DecoArt Media products. I don't have many of the mixed media line supplies (YET) but I make good use of what I have. All it takes is a good product and creativity! I started by painting the entire hat with DecoArt Media Fluid Carbon Black acrylic paint. Then I used DecoArt Media Crackle Paint, thin coats and thicker coats to get lots of different sized cracks and set it to the side to dry, naturally. No heat gun (it will warp the shape of the hat)! The craft foam soaks up paint so some splotches were used instead of covering everything up. 
I then added some lace leftover from my last project. Brads and an old piece of chain from a necklace were used to create the cross-stitched pattern on the front. I adhered the lace with DecoArt Media Matte Medium and added the black beaded piece around the bottom rim with my hot glue gun.
Who knew trying to find a skull stamp would be difficult this time of year?!? I did find this paper bag (set of 12) and knew I could fussy cut the skull out! Winning! I then placed it on the top of the hat and sealed it with DecoArt Media Matte Varnish (I varnished the entire hat before placing the lace).  
While the paper bag skull was drying on top of the hat, I used DecoArt Media White Gesso to paint a wash on the skull head. I wanted him less dirty looking. The picture below is before I painted him. 
I then added the feathers and brooch to the top hat and started working with polymer clay to create a moustache, an eyeball, and a mold of the brooch. This is my first time making any of these polymer clay creations! The eyeball was the most fun but kept rolling around on my art desk. Lol!
Once all the polymer clay elements were baked and cooled down, the details were added to each. I painted the eyeball with white acrylic paint and then added a wash of DecoArt Americana Camel to give the eye an aged look on the sclera. I added red acrylic paint to the iris and drew silver lines around the iris to show pigmentation. The pupil was painted black with a small white highlight to give it a gleam. Mr. D. Debonair's moustache was painted with DecoArt Dazzling Metallics-Shimmering Silver and then dry brushed over with the Carbon Black. I attached the monocle chain to the hat and glued it to the skeleton head with hot glue.
The neck tie bow was a piece of ribbon from my stash, it adds a little sumpthin, sumpthin. I used some Halloween rub ons for the base. The damask pattern is one of my favorites and I have been hoarding it since April!
I added some silver paint to create the small dots around the base and then some washi tape around the very bottom, along with the white bat, skull, spider, and eye.

Thank you for having a look see, and letting me know your thoughts on this design. I sure know that we all put a lot of work into our creations and feedback is greatly appreciated (the bad and the good)! The blog land I know, is a wonderful place, filled with so many creative and inventive peeps! Carpe Diem! ~Niki

I am stoked to be sharing this creation with these wonderful challenges please:


I used the Tic Tac Toe of Halloween (my entire design), Time (a couple of weeks to finish this piece),
Red (the rose and the eye)

Scrapbook.com-October Spooktacular Challenge-Use 1 piece of Bling OR washi tape
I used washi tape around the bottom of the base and also Bling in the form of the cross chain pattern on the front of the hat, as well as the Brooch.