Saturday, January 10, 2015

New Beginnings

This past week has started me down a new path in life and I am excited for it. So this piece signifies my new beginning, off the beaten path.


I was going to do a WOW (white on white) but wasn't feeling it today, maybe tomorrow. 

I started with a small black canvas and my inspiration was the butterfly ($1.00 bin score!) and my FolkArt Metallic paints. 

 I used my new BoBunny stamp and Very Berry chalking ink to stamp the purple hash marks (don't forget the sides!) Then another BoBunny stamp and the Blue Topaz FolkArt paint to add the corner stamp.  

While that was drying I worked on my sentiment "Off the Beaten Path" that is another new stamp. I used the Amethyst FolkArt paint on that stamp. I tore the paper down to the size I wanted, then used a clear embossing powder over the sentiment to give it a glossy appearance. Shiny!


Lastly I added some cheesecloth and the butterfly. I shaped the butterfly with my fingers to make the wings stand off the canvas. 

 Pictures below are the supplies I used. 


Here is another close up, the light is reflecting off the butterfly and it makes it look like there are yellows and reds but that isn't true. The butterfly is all purple and blue. The color spectrum is a wonderful thing!


Thank you for stopping by and leaving your lovely comments. It brightens my day! Carpe Diem!

This project will be shared with the following:

Frilly and Funkie-Anything Goes. HERE This is a frilly and Funkie piece for me and not my usual. 

Inspiration Emporium Inspiration Journal-Fresh Start HERE So perfect for where I am right now on the new path and hopefully a totally fresh start

Sweet Stampin-Girly but no Pink! HERE This piece is what I would call-Elegant Girly.  

Through the Craft Room Door-Anything Goes HERE


Friday, January 9, 2015

New Steampunk technique

Now that Christmas is over and I have used all my wonderful gift cards shopping for new supplies, I can finally begin creating with said supplies because my goodies came in the mail! Yippee!


I joined an ATC swap and knew I wanted to do something in the realms of Steampunk so I created these three ATCs. They measure 2.5x3.5

I used a NEW embossing folder from TH (Postcard) for all 3 backgrounds. I then tried a NEW technique of heat embossing the silver one and distressing it to create a tarnished look. TIP: Heat emboss the ATC before running it through your die machine. 
I used 3 pieces of washi tape on this one and also 3 metal gears under the rose. 
This greenish one was achieved using Inka Gold Metallic rub green/yellow. I used 3 gears on this one (under the rose)


This gold one was made using Rub-N-Buff European Gold. I used 3 gears on this one as well.  

Thank you for stopping by and leaving your lovely comments, it brightens my day. Carpe Diem!

This project will be shared with the following: 

SanDee and Amelie's Steampunk Challenge -Three's My Lucky Number HERE (I used 3 ATC's, 3 roses, 3 metal gears on each ATC, 3 clocks, and 3 new techniques using rubs, embossing powder, and Inka Gold

Mixed Media Monthly Challenge #8-Something New for the New Year HERE (I used new embossing techniques, a new embossing folder, and new metal embellies)

NBUS-anything goes using Never Before Used Schtuff (this blog is hilarious!) HERE


Try It on Tuesday-My Favorite Things HERE (My favorite "thing" isn't a thing but a theme or way of life for some-STEAMPUNK! Love everything about steampunk and I try to incorporate it into most of my art.

Thursday, January 1, 2015

2015!

Hello y'all! We have a new challenge at Mixed Media Mojo! This months theme is NEW and the twist is to use the number 15.

I used a 7x9 canvas as my base. I am trying a NEW technique of white space and the number 15 (in Roman numerals) is how old my baby girl, Raj, was when she passed to the Rainbow Bridge. 

I made the painting drippings by opening my Lindys Stamp Gang sprays and using the piece of plastic attached to the lid as my paintbrush. I then apied Gesso to the flowers and sprayed my flowers with the same LSG sprays and attached those with glue dots and E6000. 


For the chipboard pieces I painted those with black acrylic paint and also Metallic Purple FolkArt paint. I added some of the metallic paint to the sentiment (Dream as if you'll live forever) as well and adhered that using some rope and dimensional foam dots. 

I have wanted to make an inverted paw print of my girl for awhile but was chicken to try just in case I messed up her original paw print. Thankfully everything worked out. I used white polymer clay and pressed it into the mold. I then baked it and painted it with acrylic paints. 


Can you see the texture from her paw? I love it! The wings are dry brushed with the metallic purple paint as well. 

I added the small bone plaque with Raj's name on it last using TH pegs to hang it from the canvas. This is my tribute to my lovely, faithful best friend. Bless her heart and she will never be forgotten. The metal corner pieces I kept raw. 

I hope you enjoyed this process because this piece means more to me than any other. Thanks for stopping by and Carpe Diem! 

This will be shared with the following:

Altered Eclectics-Anything Goes Mixed Media HERE

Rhedd's Creative Spirit-Anything Goes Altered Art/Mixed Media Only HERE


Monday, December 29, 2014

Family is.......

Hello again! I hope the holidays are treating you well and you are getting to spend time with family. Family is what this post is about. Enjoy!

This is the first year I have lived in the same state as my parents since I was 15!
We have always read books, it is a tradition and something that was started before I was born. I believe that I love reading because of my Grandma and my Dad. I love the smell, the feel, the excitement that books can bring. Everyone in my family reads at least a book a week. 

Now to the canvas! I started with Gesso and then sprayed Lindys Stamp Gang sprays. I was trying to achieve an older look. While that was drying I started on my bookmark (the tag). I used champagne embossing powder first then applied Distress Inks to my tag and I used the TH distress for the edges.

Next I cut out my book pages. I don't really use rulers so I just cut it down to the size I wanted. I applied DI to all the book pages and sewed it together with black string. I added the sentiments with black embossing powder. I did rub some of the embossing powder off to give the book an aged appearance. All the sentiments are related to what morals I grew up with. 


I adhered some stickers to a cream paper because the stickers are see through. Next I stamped the harlequin pattern and the typewriter. The typewriter was stamped onto tissue paper then glued to the canvas using Mod Podge. 
 There! Did and done!


Thank you for stopping by my little crafting corner. Carpe Diem!

This project will be shared with the following: 

Frosted Designs-All About Family HERE

SOE/SOD-mood board HERE

Vintage Journey-Ring out the old-Ring in the New. HERE I was inspired by the words in the poem. Ring out the old-books cover the old and the new. The typewriter makes a bell sound when you reach the end of the paper (old and new (young) people still use typewriters. I used many TH products and he is always an inspiration.


Sunday, December 21, 2014

Craftroom Makeover

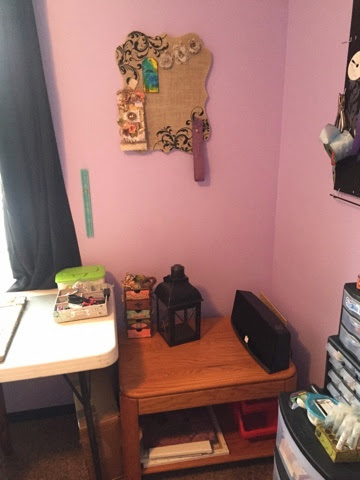
So I haven't been doing much mixed media recently because I have done a total makeover of my craftroom. It doubles as a guest room. 

This is the end result. But I started with brown walls and it just wasn't a very inspiring place to create. The brown is okay but made me want to sleep. Lol. 

I painted the walls Sassy Lilac and added a damask stencil using Metallic FolkArt paint. Wow! It turned out good!
I have always loved the damask print and had multiple items (bedspread, lamp, journal etc) that have the print on it so into the room everything went.

 
Yes, that is a spatula! I wanted the trim to be black but didn't want to ruin the carpet so I used the spatula to keep the paint off the carpet. Think outside the box. Lol!

Next I added some embroidery hoops to the wall. The hoops hold some fabric that  coordinated with the space. Easy wall art!
I did paint the hoops black before putting the fabric in it. 


I do believe that Santa is going to bring me a new craft table! The one I use bows in the middle so stamping is not fun. 

And I did "stage" these photos, meaning I cleaned everything up before taking pics. I am messy when creating. Lol!

Thank you for taking a look around and if you have any questions about organizing,  my pegboard creation, or color choice please leave a comment. 

Carpe Diem!

Monday, December 15, 2014

Christmas Time!!!!

Hello y'all! Christmas is my absolute favorite time of the year. I can give gifts and nobody can say no. Hehehe! This tag is for my secret Santa at work. I hope she likes it and her gift-inside the awesome looking box is everything she will need for a spa day. Soaps, lotions, loofa, candle, showering gel and chocolate. And because I am a vet tech and she has 2 dogs, I included some dog treats dipped in yogurt for her furry babies.


I used my Tim Holtz (TH) tag die and made up about 20 tags so I would be good to go in the tag department. I used Mowed Lawn and Fire Brick DI for the background. I edged the tag with the TH distress tool and chalked around the tag with Dark Bark fluid chalker. Then I grabbed my TH stamp Fabulous Flourish, and embossed the stamped image with Snow embossing powder. It makes the stamped image POP! Loves it. 


I then sprayed Sheer Shimmer Spritz Frost to the entire tag for a glittery effect. Next I applied a ribbon at the bottom and added two brads from My Minds Eye-Sleigh Bells Ring. But shhhhhh-the brads actually hide a "mistake" I made during the heat embossing moment. Oops. 

I added some glitter ribbon and my Secret Santas name and I was done. 

Here are a couple of different angles and a close up so you can see all the glittery goodness. 


Thanks for stopping by during this busy Holiday season! Merry Christmas and Carpe Diem!

This project will be shared with the following: 

Mixed Media Monthly Challenge-Tic Tac Toe HERE-I used Bow, Glitter, and Ribbon

Frilly and Funkie-A Vintage Holiday HERE

A Vintage Journey-Special Christmas Giveaway!!! HERE

The Mirror Crack'd-Upcycle/Recycle or a Christmas Gift. HERE


Monday, December 1, 2014

Stacked Layered Christmas Card

Happy December y'all! This is my first year ever making my own Christmas cards. I saw an image floating around FB of a stacked image card and thought I could do that! The learning process was very curved for me though. Lol!


Our challenge over at Mixed Media Mojo this month is Winter Holidays with an optional twist to make an ornament. I will do a tutorial later this month on my ornament piece-it is kid friendly as well!

We can't wait to see what you all create! Happy Holidays and Merry Christmas! 

This project will be shared with the following:

Simon Says Stamp-Holiday Cards HERE


Thursday, November 13, 2014

Altered 5 Drawer chest

Hello there y'all! I have been working on this project for awhile now and am finally done. Perfect timing for Craft-Room Challenge's challenge to do something 3D. I hope this is 3D enough. Enjoy!

I got this 5 drawer box from SA Crafters.   You have to glue everything together and build it but that is part of the fun. This is the start. I used Aleen's Tacky Glue for the entire piece and it is a sturdy little sucker! I did spray the inside and outside of everything with Lindys Stamp Gang Mad Hatter Mint before the glue was applied. I used old hair ties to keep the pieces in place while the glue was drying. Use what you've got right? Lol


The hardest part of this piece was figuring out what I would cover the sides in and decorate the drawers with. I didn't plan on a garden type theme but that is how it played out and I am happy with the results. 
I mostly used the Bo Bunny Gabrielle collection. 
I edged all the papers with a Teak Wall chalker and used the TH distress tool. The papers were applied using Tombow glue (I love the stuff!). There are so many parts to this project I can't name it all and I was in the "zone" so I totally forgot to take before and after pics. :(
The 5 drawers turned out so cute!
This is the top of the piece. I try to use at least one item that I upcycle in every project. This one was the moss I found while camping and the twine on the side was given to me during an ATB swap.
This is one of the sides. The paper is Bo Bunny Gabrielle and one of the rub ons from the same collection. 
This is the other side of the piece. I wanted to be able to hang small items on the side so that the item could be out of the way drying or something to that affect. At least that is the plan. Hehe! 

I hope you enjoyed this as much as I did making it. Carpe Diem!~€


This project will be shared with the following: 

Altered Eclectics-Always Anything Goes HERE 

Anything But a Card-Whatever Strikes Your Cre8time Fancy HERE

Rhedds Creative Spirit-Anything Goes as long as it is Altered Art Only HERE

Craft-room Challenge-Anything 3D HERE

Saturday, November 1, 2014

Braided Card Thanks!

This is only the second card I have ever made but I like origami, so I gave this braided card a go.

This is my Design Team project for the Mixed Media Mojo November challenge:                           THANKFUL. You can make anything mixed media as long as it uses the word Thanks, Thankful, Thank you etc. 

The card was really simple to make but it looks intricate. I used a template that I got off of Pinterest and cut out a standard size card from cardstock. 

I then added some green paper that I distressed the edges of and layered. (The paper was purchased from SOD/SOE) I just kept cutting the layers a bit smaller than the layer below it. Everything was edged with Teak Wall chalk. 


I always lay out my design before gluing, just to see if everything works together. When it looks good, start gluing away. I really like the Tombow glue. 

I added a small pink ribbon to the braided edge of the card and finished with my stamped image to give Thanks. 
Hope you enjoyed my process. Carpe Diem! 


This card will be shared with the following: 

Simon Says Stamp-Anything Goes HERE

Buckwells Crafty Challenge-Use Ribbon HERE

Crafty Catz-Anything Goes HERE

Fussy and Fancy Challenge-Thankful HERE