

This blog is about creating mixed media projects and maybe a card or two, while also having fun along the way. I hope to make you laugh out loud and enjoy the art we create. I may share some info about pets because I am an avid animal person and also a Vet Tech.Happy Crafting!Carpe Diem!
Thursday, May 26, 2016
Sneaky peek-Anything But Cute Tutorial
Hello lovelies! I hope today finds you all in good spirits and with a happy smile on our face! I am sharing a few tips and tricks over at Anything But Cute for our Spotlight Artist post today, using a most wonderful medium for your mixed media makes! Find out more about this tutorial by visiting here! The picture below is just one of numerous ways to use this product. Enjoy!
 And don't forget to join our current challenge "Celebrate Your Style" that runs until June 4th! Our awesome sauce sponsors Alleystamp, Emerald Creek and The Funkie Junkie are giving away some FANTASMIC prizes! Hugz and Carpe Diem! ~Niki

Sunday, May 15, 2016
Mini Anxiety Art Book
Hello lovelies! Today is the middle of the month reminder for our challenge over at SanDee&Amelie's Steampunk challenge. You can create anything industrial/steampunk. Let your mind go and have fun! Here's what I came up with.
 I wanted to share a new idea I had and also tell you a little bit about myself in the process. This idea was generated because of a recent diagnosis that I got. I knew I was having problems breathing and my heart felt like it might run right out of my chest, not to mention the sweaty hands and constant barrage of questions in my head. I felt hopeless and confused because I know I am a strong person. So what in the world was happening to me? My wonderful DH convinced me to go see a Doc. That was an event in itself and a story for another day. The 3rd Doc I ended up going to (all in the same day) told me I had anxiety and was having a full blown anxiety attack. We talked for a bit and she mentioned medication and also possibly seeing a therapist. I declined the therapist and asked if I could do something else. She said sure. So I can up with this idea to do an Anxiety Book. This is a small enough (3.5x2.5) book to carry around with me and I can draw in it, write in it, scribble, or even throw it. Lol! Now you know where the idea came from and here's the process.
 I started by cutting some brown leather paper and then embossed it. Then I cut some pages down to size. I don't measure stuff with a ruler, mostly by eyeballing it. I made 4 signatures and then got to binding my book. It took a few mistakes that had to be corrected but I get er done.
 Then out came some distress inks and metal elements. The silver flourish frame was brushed with Frank Garcia Artisan powder-La Chapelier ,as were the gears piece.
 I added some springs the the metal pieces. A couple of stencils from Andy Skinner and some stamps on the inside cover. The corner pieces were bright silver stickers that I applied Alcohol ink to.
 And a small closure that I sewed to the back with a Finnabair mini knob on the front to keep the book closed. Below is a picture of the binding.
 I have only done 1 page in my anxiety book. I used a TH stamp and cut the heart out and raised it with small foam dots. I hand wrote the word Brave in pencil, not totally brave enough to write it in pen yet, but I feel brave sharing this and brave going to the doctor.


I plan on sharing this design with these amazing challenges:
I used real hand stitching on the Coptic binding and to add the elastic closure.

Remember to Steampunk it up and have an amazing day! Hugz and Carpe Diem! ~Niki

Monday, May 9, 2016
Blood and a Zombie Barbie
Interesting title? I think so. I wanted to create a layout that featured an amazing and inspirational lady I know. Her name is Rheanon Nicole, also known as Zombie Barbie. She is a fantabulous and beautiful person, inside and out. She is also a TV Host, a published author (Broken Halo), a model, and a mother. As you can see, she wears many hats! Hehe! So for this layout I tried to include some of her favorite things.

 The black fabric stuff reminds me of a web so I used it and also threw in some random pieces of red and white thread. The flowers echo the flower headband Rheanon wears in the picture.
 Here comes the pop of color with the red. I used DecoArt media mister and randomly sprayed. The drips were created by diluting the red with water and letting it run down the page. Looks like blood right? That's the idea and keeping with the Horror movie elements. What's your favorite horror movie? I can't pick just one!
 There are about four different stamps used in the background as well. The picture above shows the embossed skull and the brick chippies (those were heat embossed with Snow and Black EP) Fun stuff!
 The cameo necklace is part of an old necklace I tore apart. The blood red flowers were once orangish white, I just sprayed those with red and black paints. The little red stones are Mini Prills. The last bit was to splatter the entire page with black and red paints (I was going for a blood splatter effect). Viola, done!

I wanted to only use three colors (black, white, red). She loves horror movies and the horror genre. I started with a plain 12x12 page and then added some black DecoArt modeling paste through a stencil. I marked out where I wanted the picture and kept that spot blank. Then added some Versamark through an Andy Skinner skull stencil and heat embossed it with Snow EP. Next, I laid out some elements I thought would be used, of course everything changes as the process continues.


I would be thrilled to share this design with these lovely challenges:
I have Blood, Barbie, Black, and beauty
I am hoping this darker art design is okay since it is an Anything Goes challenge
I used this definition of collage-a piece of art made by sticking various different materials such as photographs and pieces f paper or fabric onto a backing (I did all three)
Thursday, May 5, 2016
Celebrate You!
Hello lovelies! Today is a super special day because it is our 1st Anniversary over at Anything But Cute! We have an exciting challenge in store this month and want to CELEBRATE! I wanted to create something that I have never tried before and also use one of my favorite movies as inspiration so I came up with this design. Meet my version of Jack Skellington and his dog, Zero!
 As we celebrate our First Anniversary at Anything But Cute, we want you to celebrate what you do best...mixed media! This is your chance to do it your way, in your favorite style...so pull out those inks and paints and show us what you're made of! You can make anything you want, in any theme you want and any style you want, just as long as it has some mixed media products on it and no cute images. HAVE FUN!

We have some special treats for you this month. Along with our design team projects, we have invited our Favorite Artists from last year to come and celebrate with us. You don't want to miss the incredible line up of inspiration they have provided for you!! We also have a wonderful line up of prizes from some amazing sponsors...lots of chances to win some goodies, so don't miss out!

 Zero was easier to sculpt and his collar was painted with red acrylic paint and his nose is orange acrylic paint. Yes, I added shoes to Jack. Hehe!
 I then started on my background while everything was baking in the oven. I tried a tag background with different designs but wasn't feeling it so I decided to create a tombstone. I drew out my shape on regular paper and used it as a template to trace onto thick matboard. I wanted the tombstone to be one sturdy piece to hold all these wonderful elements (I even add a kickstand to the back of the tag so it would stand on its own). The edges of the tombstone are made from a mold (I only used a section of the mold). You can see in the picture below what the stones and bricks are made from: I hoarded some of these foam pieces but for the life of me, I can't remember what art supply they came with. It's left over packaging of some sort. Any ideas? I think it is from dies.
 I cut the foam and made my bricks/stone and glued everything (including the molded boarder) with TomBow Multi. Then at this point everything was painted with black acrylic paint. The texture sand in the picture below didn't end up showing up because of where I placed Jack. Oh well. Hehe!
 I used so many different paints and daubers to get the stones/bricks the color I wanted, then I applied white acrylic paint in certain spots to highlight areas. The inside of the tombstone was inked up with a stencil just for some depth.
 Then I started adding all the pieces together one little detail at a time. Some Spanish moss.............
 A new clock mold and the pillars are new molds as well. All three were painted grey then antiqued. A few pumpkins, and a black branch looking thing.

 And finally some closeups of Jack and Zero! I did paint Jack's name on the bottom step of the tombstone but you can't really see it.


We have some special treats for you this month. Along with our design team projects, we have invited our Favorite Artists from last year to come and celebrate with us. You don't want to miss the incredible line up of inspiration they have provided for you!! We also have a wonderful line up of prizes from some amazing sponsors...lots of chances to win some goodies, so don't miss out!
I started this design by sculpting Jack. He has a wire armature inside him because I wanted his arms to move and they do, although I did accidentally break his arm off, and had to fashion it back together! Sorry Jack!

I then added his legs, his bat bow tie, his eyebrows, his hands, and got to painting with acrylic paints.


Some pumpkins and art stones that were painted with acrylic paints, a few bats...........


Jack's head moves, as well as his arms.

I know this was a long post and thanks for reading until the end. Don't forget to check out what my lovely teamies have designed! Hugz and Carpe Diem! ~Niki

I would like to share this design with:
My "doll" isn't paper exactly but he's a sort of doll.
I went LOC with a Halloween design.
Friday, April 15, 2016
Rusty Tag
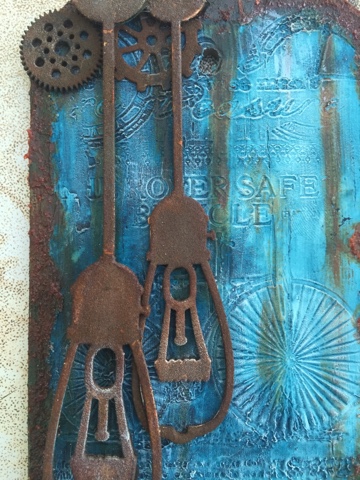
Hello lovelies! I do hope you have been enjoying your day. Seems like April is flying by and the sun sure is out in my neck of the woods. Do you see yourself outside more during the warmer months and creating less? My mojo seems to be out gallivanting right now but I was able to create this rusty tag for our new challenge at SanDee&Amelie's Steampunk challenge.

 I then added some texture sand around the edge and when dry painted a thick layer of Quinacridone Gold and used the Q-gold to create my rusty drip lines. I used my trusty rusting powder on all of the die cuts.

 And there you have it, I've never really tried this color combo and am very happy I stumbled into it. I had planned on more paint layers, but once the wash was down I really loved it and decided it was enough. Yippee! Sometimes it sure is hard to add anything to an amazing background. I am sure you all know what I mean! Hugz and Carpe Diem! ~Niki


You can create anything your heart desires as long as there is a Steampunkish, Vintage or Industrial vibe. I started with a canvas tag and applied a layer of modeling paste. Once the paste was almost dry, I used multiple stamps and stamped into the paste. You don't have to push hard to get results. I then applied a wash of Prussian Blue Hue.


Here is a close up since I forgot to take more process pics. Oops. I need a new phone with more memory so I can take more pictures. Hehe! But don't you just love those rusty drips and the white highlights from dry brushing? SHARED SECRET-those light bulb chippies have been on three, yep, 3, different designs and I have painted, spritzed, powdered and pull off this chippies every time. Thank goodness I was FINALLY able to use em. Whew! I didn't want to throw em away and was getting frustrated. Lol.

I would love to share this rusty mixed media tag with the fantabulous challenges:
This tags goin on my Father's Day gift
I used the different shades of blue

Monday, April 11, 2016
Craftroom Decor from an old Kitchen Cabinet
Hello lovelies! I have been breaking out of my norm of doing mixed media and have tried my hand at some home decor items. I have 3 projects going right now. One is complete, the second is almost there-just waiting on new handles, and the third is somewhere in-between. Today I am sharing my new/old kitchen cabinet that's been turned into an art room storage facility. :)
 For this design I used the DecoArt Chalky Paint in Everlasting and Relic. I applied 3 coats of the Everlasting (white) because the original color of the cabinet was a dark tone and took a bit to cover up. I applied the paint with a roller but IMHO using a paintbrush is better because the roller sucks up so much paint!
 After the Everlasting Chalky paint was dry, I used a DecoArt-Old French Script stencil to add the design to the sides and front of the cabinet. My art room is mostly grays, whites and some black so I wanted to stick with that color palette.
 The handles were a bronze color but I applied 2 coats of Everlasting with a foam brush and got a nice shabby look. I drilled the holes for the handles and screwed em in. For some reason the cabinet had no drill holes but it was an easy fix.
 I added some small rounded balls to the bottom of the cabinet for feet and also to make it easy to open the doors without rubbing on the carpet. Those were painted with Everlasting. And there you have it a kitchen cabinet makeover! I was able to thrown away my very broken book shelf that held all of the goodies that are now in this cabinet. The end of it was leaned against my wall so it wouldn't
fall over. Lol! Into the trash it went. Spring cleaning is in full swing at my house. Thanks for looking and Carpe Diem! Hugz! ~Niki


The front door inlays are the DecoArt Chalky Paint in Relic. I hand painted the sides with a brush and boy did that take some time. Lol! I really enjoy the chalky paint because it will adhere to anything, even a varnished surface but that is a story for another time and that project is the almost finished one.

fall over. Lol! Into the trash it went. Spring cleaning is in full swing at my house. Thanks for looking and Carpe Diem! Hugz! ~Niki
I would love to share this trash to treasure piece with
Tuesday, April 5, 2016
Earth Day at Anything But Cute
April showers bring May flowers right? And also Earth Day! What do you think of when you hear the words Earth Day? Mother Nature? New growth? Earthquakes? I think of it all, but mostly what natural found items I can try to make art with. Tree branches, moss, flowers, bark and such are among the list that helped me design this reverse canvas.


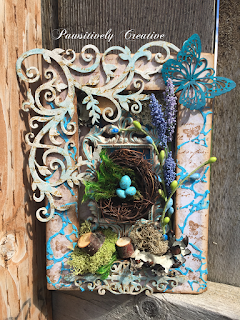
 Now it's time to play with some paper. I trimmed out a rough shape and then cut out the middle section to leave room for my nest. I edged all sides with Ground Espresso Distress Ink and used a Rubber Dance script stamp to add some stamping. Then added some small little butterflies as well. I then used some texture paste that I tinted with Primary Elements to make it blue, I pulled the blue colors from the mood board.
 I used a bit of washi tape on the inner edges to help ground the front of the canvas and get rid of the space between the canvas and wood frame. Then added some moss, some grass (element from the mood board),some flower sprigs, and pieces of a stick. I also painted a chipboard butterfly blue (another element I pulled from the mood board).
 The small eggs were made from polymer clay and then painted a light blue. The "spots" on the eggs were made with a brown Archival ink pen.
 I glued everything down with a hot glue gun just because I wanted to see the end result fast and couldn't wait for other glues to dry. Lol!

Our new challenge at Anything But Cute is: Earth Day (celebrated on April 22nd). Hosted by the amazingly talented Samra of Paper Talk with Samra. Here's what she would like to see: Create a mixed media project inspired by this mood board (picture below) and the beauty of our planet. Please tell us what inspired you. Entries for this challenge can be eco friendly, or even recycled/upcycled items, or a depiction of the sea, mountain, river, forest, flowery meadow.....let's celebrate our planet!
This is my first attempt at a reverse canvas. I placed some elements I knew I wanted to use and took a picture. Not very Earthy yet, but layers and paints and creativity will turn this into a Spring Earth Day design. :)


The large chipboard in the left corner and on the bottom are painted the same way. I laid down a base of white gesso, applied DecoArt crackle glaze-dried naturally, then added the script stamp. When the glaze was dry I swiped some Raw Umber antiquing cream over everything, heat dried it and wiped it back. Then I applied the blue paint randomly with my finger. And it is done! Show us what Earth Day means to you and remember to check out what my talented teamies have made! Hugz and Carpe Diem!

I would like to share this reverse canvas with these challenges:
I used lilac flowers
I used chippies, a stencil and flowers
I was inspired by the blues, the black filigree, and the butterfly in the board.
Thursday, March 24, 2016
Non traditional Easter Basket
Well it is almost Easter, and I really wanted to make something for Easter, but not anything that's typical. I knew I wanted to create a centerpiece so this is what I came up with. A non-traditional egg basket-box tray. Hehe!

 I painted the entire egg holder with Walnut Stain DP, then a layer of Distress Crackle. While that was drying I set about determining what to do with the eggs. I knew I wanted to stay with a limited and earthy color palette. I painted one with Walnut Stain and applied the Distress crackle to it as well, then set it to the side to dry. Two of the eggs were painted with Picket Fence DP and then covered in tissue paper.
 I used some Tim Holtz stamps and stamped with Ranger Archival Ink-Coffee onto some tissue paper then used Ranger matte medium to adhere the tissue paper to each egg. Then I watered down some Walnut Stain DP and used it to create splatters on the eggs.
 The Walnut Stain egg was "painted" with Picket Fence DP and I heat set if for a sec, then wiped it off with a baby wipe so the Picket Fence would get into the cracks. Then I used a scrap piece of tissue and wrapped it and a twine bow around the egg. Some of the crackle came off but that's what I wanted, kind of a vintage feel. The splatters were created by adding water with Archival Pearl and PF and flicking my brush.
 The last two eggs were altered using moss and twine for a nature feel. Then I used the Picket Fence and baby wipe for the outside of the box. I swipe some Distress glaze around the outside of the box before I stamped. I added the Tim Holtz stamps with Ranger Archival Ink and added the chit-chat sticker last. The sticker was edged in Walnut Stain as well.

 Here are a few different views of the box. This was a bit hard to photograph and capture the true look of the design. The sun was gone today and it's raining so that doesn't help.
 Finally stopped raining for a bit so I took these pictures outside. No sun, but at least it wasn't raining.
 I hope you all have a wonderful Easter weekend and live in the moment! Hugz and Carpe Diem! ~Niki


I found this on clearance at a local craft store and automatically had a vision. Love when that happens. It didn't turn out exactly as I had hoped, but very close.


I really enjoyed how this turned out and the Reese's bunny is my DH fave so of course I had to add it. He also gets other Reese's candy as well.


I would love to share these eggs with these amazing challenges:
I used water to dilute my paints for the splatter effects.
Subscribe to:
Posts (Atom)